Prince
  • Buy Prince
  • Samples
  • Documentation
  • Forum
  • Download
  • Installation Guide
  • User Guide
  • Reference Guide

Contents

  • 1. Getting Started
    • Installing Prince
      • Installing Prince on Windows
      • Installing Prince on MacOS X
      • Installing Prince on Linux
        • Debian and Ubuntu
        • Redhat and CentOS
        • OpenSUSE
        • FreeBSD, Solaris and Generic Linux
      • Installing a license file
    • Your First Document
      • The lab report
      • Processing the document
      • Styling the document
    • If Something Didn't Work
      • Missing fonts
      • Fontconfig
      • Image formats
      • Shared library trouble
      • PATH issues
  • 2. Formatting
    • CSS Box Model
    • Tables
      • Running table headers and footers
      • Numbering table rows
      • Automatic table layout
      • Fixed table layout
      • Separated table borders
      • Collapsing table borders
      • Cells that span columns
      • Cells that span rows
    • Lists
      • List marker position
      • List marker type
      • List marker style
    • Images
      • Images in XHTML
      • Images in DocBook
      • Images in arbitrary XML
    • Scalable Vector Graphics (SVG)
      • Viewbox and viewport
      • Rectangles
      • Circles
      • Ellipses
      • Lines
      • Polylines
      • Polygons
      • Paths
      • Text
      • Images
      • Links
      • Transformations
      • Style Properties
  • 3. Paged Media
    • Styling pages
      • Page size
      • Page style
      • Page headers and footers
      • Generated content in headers and footers
      • Footnotes
    • Some @page selectors
      • The :first, :Nth, :left and :right page selectors
      • Named pages
    • Controlling pagination
      • Page breaks
      • Widows and orphans
    • Advanced paged media examples
      • The :blank page selector
      • Page groups
      • Page breaks and decoration
      • Printing wide content sideways
  • 4. Prince Input
    • Applying Style Sheets
      • Importing Style Sheets
      • Conflicting Declarations
      • Priority Determination
    • XML Input
      • XML Input
        • Validation
        • xml:lang
        • xml:id
        • xml:base
      • XML Styling
      • XML Inclusions (XInclude)
        • Including XML files
        • Including text files
        • Fallback
    • Using JavaScript with Prince
      • Logging
      • Console access
      • Event handling
      • Document statistics
      • PDF properties
      • Unsupported DOM properties
  • 5. Prince Output
    • PDF Output Options
      • PDF Compression
      • Font Embedding
      • Creating PostScript output
    • PDF Bookmarks
      • Bookmark levels
      • Bookmark labels
      • Bookmark targets
    • PDF Metadata
    • PDF Profiles
  • 6. Server Integration
    • Using Prince from Java
    • Using Prince from .NET with C#
    • Using Prince from .NET with VB.NET
    • Using Prince from Python
    • Using Prince from Perl
    • Using Prince from PHP
    • Using Prince from ASP
    • Using Prince from ColdFusion
      • Using Java
      • Using ActiveX/COM
    • Using Prince from ActiveX / COM / Visual Basic
  • 7. Prince Tips and Tricks
    • Generated Content
      • Page headers and footers
      • List markers
      • Footnote markers
      • Before and After pseudo-elements
      • Counters and Numbering
        • Counter reset and increment
        • Nested counters
        • Counter styles
      • Cross-references
        • Using target-counter
        • Using target-content
      • Script Functions
        • Accessing the current date and time
        • User-defined counter styles
      • Using generated content in margin boxes
      • Copying text content from the document
      • Taking elements from the document
    • Imaging and color
      • Color (RGB, CMYK, spot colors)
        • RGB
        • RGBA
        • CMYK
        • Spot colors
  • 8. Fonts
    • Generic font families
    • Redefining the generic font families

Reference Guide

  • A1. Command-line Reference
    • Examples
    • Specifying input and output
    • Options
      • General Options
      • Logging Options
      • Input Options
      • Network Options
      • JavaScript Options
      • CSS Options
      • PDF Output Options
      • PDF Metadata Options
      • PDF Encryption Options
      • Utility Options
  • A2. CSS Selectors
    • Universal Selectors
    • Type Selectors
    • Descendant Selectors
    • Child Selectors
    • Direct Sibling Selectors
    • Indirect Sibling Selectors
    • Attribute Selectors
    • Class Selectors
    • ID Selectors
    • Link Selectors
    • Language Selectors
    • Contains Selectors
    • Root Selectors
    • Empty Selectors
    • Negated Selectors
    • Child Selectors
    • Typed Child Selectors
    • Nth Child Selectors
    • Nth Last Child Selectors
    • Nth of Type Selectors
    • Nth Last of Type Selectors
    • Pseudo-element Selectors
  • A3. CSS Properties
    • background
    • background-attachment
    • background-clip
    • background-color
    • background-image
    • background-origin
    • background-position
    • background-repeat
    • background-size
    • border
    • border-bottom
    • border-bottom-color
    • border-bottom-left-radius
    • border-bottom-right-radius
    • border-bottom-style
    • border-bottom-width
    • border-clip
    • border-collapse
    • border-color
    • border-left
    • border-left-color
    • border-left-style
    • border-left-width
    • border-radius
    • border-right
    • border-right-color
    • border-right-style
    • border-right-width
    • border-spacing
    • border-style
    • border-top
    • border-top-color
    • border-top-left-radius
    • border-top-right-radius
    • border-top-style
    • border-top-width
    • border-width
    • bottom
    • box-decoration-break
    • box-sizing
    • caption-side
    • clear
    • clip
    • clip-path
    • clip-rule
    • color
    • column-break-after
    • column-break-before
    • column-count
    • column-fill
    • column-gap
    • column-rule
    • column-rule-color
    • column-rule-style
    • column-rule-width
    • column-span
    • column-width
    • columns
    • content
    • counter-increment
    • counter-reset
    • direction
    • display
    • empty-cells
    • float
    • font
    • font-family
    • font-size
    • font-stretch
    • font-style
    • font-variant
    • font-weight
    • footnote-style-position
    • height
    • hyphens
    • left
    • letter-spacing
    • line-height
    • line-stacking-strategy
    • list-style
    • list-style-image
    • list-style-position
    • list-style-type
    • margin
    • margin-bottom
    • margin-inside
    • margin-left
    • margin-outside
    • margin-right
    • margin-top
    • marks
    • max-height
    • max-width
    • min-height
    • min-width
    • opacity
    • orphans
    • overflow
    • overflow-wrap
    • padding
    • padding-bottom
    • padding-left
    • padding-right
    • padding-top
    • page
    • page-break-after
    • page-break-before
    • page-break-inside
    • position
    • prince-background-image-resolution
    • prince-bleed
    • prince-bookmark-label
    • prince-bookmark-level
    • prince-bookmark-state
    • prince-bookmark-target
    • prince-caption-page
    • prince-flow
    • prince-footnote-policy
    • prince-forced-breaks
    • prince-hyphenate-after
    • prince-hyphenate-before
    • prince-hyphenate-lines
    • prince-hyphenate-patterns
    • prince-image-magic
    • prince-image-resolution
    • prince-linebreak-magic
    • prince-link
    • prince-mark-length
    • prince-mark-offset
    • prince-page-group
    • prince-pdf-destination
    • prince-pdf-link-type
    • prince-pdf-open-action
    • prince-pdf-output-intent
    • prince-pdf-page-label
    • prince-pdf-page-layout
    • prince-pdf-page-mode
    • prince-pdf-paper-tray
    • prince-pdf-print-scaling
    • prince-pdf-profile
    • prince-pdf-script
    • prince-rotate-body
    • prince-shrink-to-fit
    • prince-text-justify
    • prince-text-replace
    • prince-trim
    • prince-wrap-inside
    • right
    • size
    • string-set
    • table-baseline
    • table-column-span
    • table-layout
    • table-row-span
    • text-align
    • text-align-last
    • text-decoration
    • text-indent
    • text-line-through
    • text-line-through-color
    • text-line-through-style
    • text-overflow
    • text-overline
    • text-overline-color
    • text-overline-style
    • text-transform
    • text-underline
    • text-underline-color
    • text-underline-style
    • top
    • transform
    • transform-origin
    • unicode-bidi
    • vertical-align
    • visibility
    • white-space
    • widows
    • width
    • word-break
    • word-spacing
    • writing-mode
    • z-index
  • A4. Appendix
    • Unsupported features in CSS 2.1
    • Page Size Keywords
    • Character Entities
      • Accented Letters
      • Symbols
      • Quotes
      • Accents
      • Miscellaneous
  • A5. Acknowledgements

Your First Document

In this section we will process a very simple document. We've chosen a document that fits HTML's heading and paragraph structure naturally: a lab report. The lab report will have a title, an author and date, several headings (Aim, Hypothesis, Method, Results and Conclusion). It does not include a table of results, graphics or diagrams: it is a very simple lab report.

The lab report

The report itself is very basic, the HTML source is shown below. You can save the HTML to a file named lab_report.html or download it here.

<!DOCTYPE html>
<html>
<head>
<title>Lab Report</title>
</head>
<body>

<h1>Lab Report</h1>
<h2 class="subtitle">John Doe</h2>

<h2>Aim</h2>

<p>
This simple document aims to show just how easy it is to generate PDFs from
HTML+CSS using Prince.  The document mostly uses Prince's built in styles
for HTML, but it also applies some custom styles.  The custom styles: center
the title and subtitle, choose fonts and specify the style for the hello
world exclamation below.
</p>

<h2>Hypothesis</h2>

<p>
Our hypothesis is that generating PDFs using Prince is easy.
By using a simple document containing only
<code>h1</code>,
<code>h2</code>,
<code>h3</code>,
<code>p</code>,
<code>code</code>,
<code>pre</code>,
<code>ul</code> and
<code>li</code>
tags and a simple stylesheet we will generate a PDF that looks good.
</p>

<h2>Method</h2>
<h3>Apparatus</h3>

<ul>
  <li>Prince</li>
  <li>This document</li>
  <li>A stylesheet</li>
</ul>

<h3>Steps</h3>

Execute this on your computer's command line:

<code><pre>
$ prince style.css lab_report.html
</pre></code>

<h2>Results</h2>

<p id="hello">Hello World!</p>

<h2>Conclusions</h2>

<p>
If you're currently looking at a PDF file then this works.
</p>

<p>
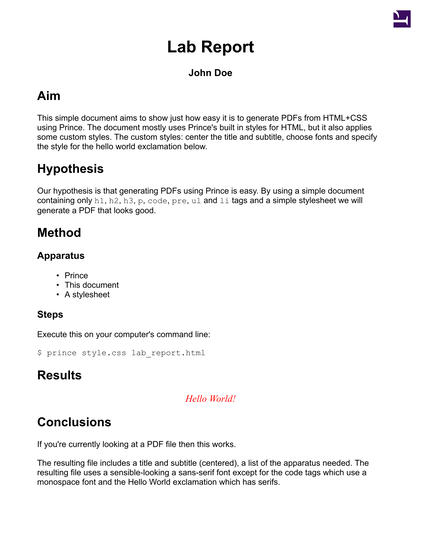
The resulting file includes a title and subtitle (centered), a list of the
apparatus needed.  The resulting file uses a sensible-looking a sans-serif
font except for the code tags which use a monospace font and the Hello World
exclamation which has serifs.
</p>

</body>
</html>

The report is written using very familiar HTML5 tags. Headings (h1, h2 and h3), paragraphs (p) and lists (ul, li) are used for the report's structure, the code tag is used to identify code and pre is used to identify pre-formatted text.

All user agents, including Prince, associate default styles with all of these tags. Without any explicit styles Prince will format this document in a reasonable and familiar way, similar to most web browsers. The major difference between Prince and a web browser is that Prince needs to create discrete pages, a web browser will format the document as a continuous flow. See Paged Media for more information.

Processing the document

Unstyled lab report
The unstyled lab report
The unstyled lab report. Download the PDF here.

Process the document using the command line prince command:

$ prince lab_report.html

This will create a lab_report.pdf file in the current directory. If it did not the If Something Didn't Work section may be useful. 
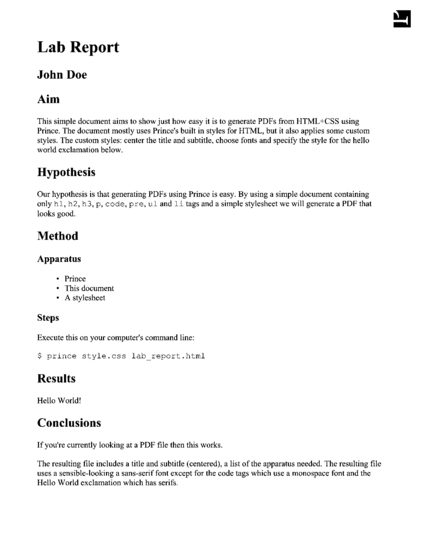
When you open the document in a PDF viewer you should see something like Unstyled lab report. Prince has applied a default stylesheet to the document. A different default stylesheet is used depending upon the document's type (HTML or Docbook XML) see XML Input. The default stylesheet may be overridden by other stylesheets, more on that in Applying Style Sheets.

Prince GUI
The Prince GUI
The Prince GUI. Note that in this image both a HTML and a CSS file had been selected.

Prince's command line interface supports many options (Command-line Reference) and can be called from scripts and other software. 
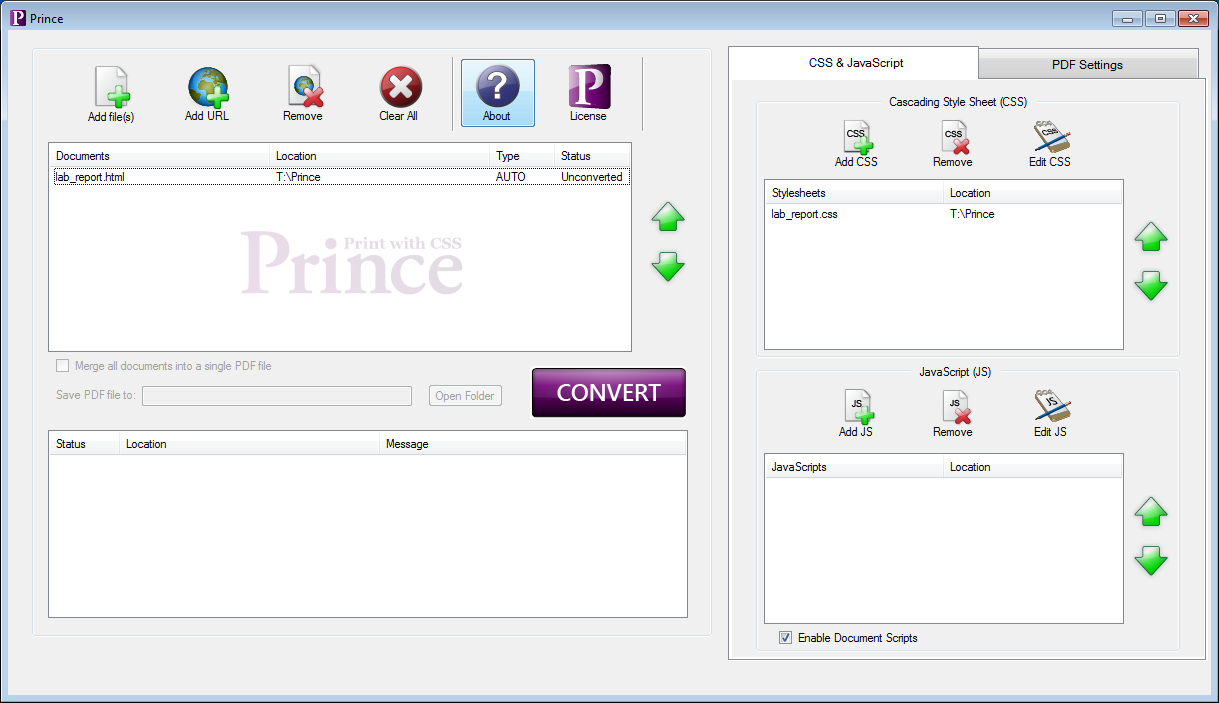
However some users may not be comfortable with the command line interface. On Windows, Prince provides a more familiar GUI interface, which can be started by choosing Prince from the start menu. Prince GUI shows the Prince GUI, click "Add File(s)" to choose your HTML file (lab_report.html) then click the large "Convert" button to convert it. Prince will generate a PDF file and place it in the directory with your HTML file.

Styling the document

We can now make the report look better by adding our own styles. It is good practice to keep style information separate from the document itself. This makes it easy to modify or replace the styles later. The style information is kept in one or more Cascading Style Sheets (CSS) files.

Let's start by creating and opening a new file named lab_report.css, First we can specify a sans-serif font for the document:

body {
    font-family: sans-serif;
}

The default is a font with serifs, a sans-serif font is easier to read on a computer screen while a serif font is easier to read when printed out. See Broken link and the font-family property.

Styled lab report
The styled lab report
The styled lab report, download the here.

Next let's center the title and subtitle and decrease the font size of the subtitle:

h1, h2.subtitle {
    text-align: center;
}

h2.subtitle {
    font-size: 14pt;
}

Note that we use the .class syntax to style only the subtitle, which is a h2 with the subtitle class, without affecting the other h2 elements in the document. See the section on CSS Selectors for more information. Information about alignment (such as centered text) can be found in the Broken link section.

Finally we will make the "Hello World!" paragraph stand out. This paragraph is identified by an id attribute so we can use the #id syntax in the CSS selector.

#hello {
    color: red;
    text-align: center;
    font-size: large;
    font-style: italic;
    font-family: serif;
}

Okay, that's getting unnecessary, however we can see just how easy it is to apply styles to our document. You can download the complete CSS file here: lab_report.css.

There are many ways to apply a stylesheet to a document, for this tutorial we will show only three. For information about the ways that styles can be applied and style precedence see Applying Style Sheets.

Using the -s command line option:
$ prince -s lab_report.css lab_report.html
Using the GUI

Press the "Add CSS" button on the right of the Prince GUI and choose your CSS file (Prince GUI). You will need to click "Convert" again for these changes to take effect.

By creating a link from the HTML link tag.

Place the tag within the head tag of the document. For example:

<!DOCTYPE html>
<html>
<head>
<title>Lab Report</title>
<link rel="stylesheet" href="lab_report.css" />
</head>
<body>
...

You will need to re-run Prince for these changes to take effect.

After applying the style as above Prince should generate something similar to Styled lab report You can download the generated PDF file here: lab_report-styled.pdf.

This sample document and many others are available in our samples repository. You are encouraged to use samples from the repository and contribute your own.

Copyright © 2002 – 2019 YesLogic Pty. Ltd.
  • About Us
  • Privacy Policy
  • Contact Us