
When preparing a document with HTML and CSS, you need to first create the content - but then you need to style it to make it visually appealing. You can choose which fonts to use, how to format your text and your paragraphs, choose the layout for your page, give your text, background and style some color, insert images - and much more!
In the following sections you can find detailed information on how to achieve this with Prince.
The major difference between formatting for the web and PDF/Print is that PDF is paginated, which means that content is placed on discrete pages, as opposed to one continuous flow, typical for web pages.
Prince allows you to control a number of options that affect how PDF formats pages, from straight-forward options such as page size, to decorations, headers and footers, numbering and page breaking options. See detailed information in the Paged Media section.
Prince applies default styles to all (X)HTML documents - these style
rules can be found in the html.css style sheet, located in the
style folder inside the installation directory (see
Installation Layout).
Prince supports WOFF (Web Open Font Format), TrueType and OpenType (TTF and CFF) font formats.
To define the font, or the fonts to be used in a document, the
font-family property is used. Prince will
try to use the specified font, and should glyphs be missing, it will silently
fall back to the next font in the cascade - typically a
generic font family.
To prevent this font switching mechanism and force Prince to only use the defined
font, the special keyword prince-no-fallback is available: it triggers
a warning if any glyphs are not found in the specified font, instead of switching
to another one.
h1 { font-family: MyFont, prince-no-fallback; }
The @font-face
at-rule can be used to define custom font names. The font-family
descriptor defines the font family name that will be used in all CSS font family
name matching, and the src descriptor specifies
the resource containing font data. They both are required for the
@font-face
rule to be valid.
The src descriptor can define the resource with a
url() function - an optional format() function defines
the format of the remotely fetched font. Alternatively, the local()
and prince-lookup() functions can be used - the former searches for
locally installed system fonts, while the latter will also find fonts defined by
other @font-face
rules. See CSS Functional Expressions.
@font-face {
  font-family: MyFont;
  src: prince-lookup("MyFont"),
       url("http://example.com/MyFont.ttf") format("truetype");
}
In this example we are defining a new font face, called MyFont. We
instruct Prince to check if the MyFont truetype font is installed locally or already
defined by another @font-face rule, and, all failing, to download it from a
remote location.
When a chosen bold and/or italic font is missing, Prince tries to
artificially synthesize the missing font - i.e. to embolden or italicize the
original font. However, it might lead to undesired results. This feature
can be disabled with the
--no-artificial-fonts
command-line option.
Prince supports OpenType features, and enables certain ones by default in specific scripts. The following ones are enabled by default in Prince:
| Script | Enabled features |
|---|---|
| Latin, Greek, Cyrillic | ccmp, liga, dist, kern*, mark, mkmk, vrt2/vert |
| Arabic/Syriac | ccmp, rlig, calt, liga, mset, isol, medi, fina, kern, curs, mark, mkmk |
| Indic | ccmp, and many other Indic-specific substitutions |
| Other scripts | kern*, mark, mkmk |
|
* Kerning can be disabled with the keyword |
|
Microsoft has a list of the OpenType feature names here.
It is possible to enable other OpenType features by using the font-variant
CSS property with the prince-opentype() function (see
CSS Functional Expressions).
Care must be taken in which order the features are enabled! And please note that enabling one feature will disable all the default features.
Prince maps the CSS generic font families to the Microsoft Core Fonts. The Microsoft Core Fonts are pre-installed on Windows and MacOS X systems but not on Linux systems. To use them on Linux you must install the msttcorefonts package, which is available for most Linux distributions.
The following table shows the default fonts for the main languages on Windows, MacOS X and Linux.
| Generic family | Operating system | Language | Actual font |
|---|---|---|---|
serif |
Windows | Latin | Times New Roman |
| Chinese | MingLiU | ||
| Japanese | MS Mincho | ||
| Korean | Batang | ||
| Devanagari / Hindi | Mangal | ||
| MacOS X | Latin | Times New Roman | |
| Chinese | LiSong Pro | ||
| Japanese | Hiragino Mincho ProN | ||
| Korean | AppleMyungjo | ||
| Devanagari / Hindi | Devanagari MT | ||
| Linux | Latin | Times New Roman, DejaVu Serif, DejaVu LGC Serif, Liberation Serif | |
| Chinese | AR PL UMing CN, AR PL SungtiL GB | ||
| Japanese | Kochi Mincho, IPAMincho | ||
| Korean | UnBatang, Baekmuk Batang | ||
| Devanagari / Hindi | Lohit Devanagari | ||
sans-serif |
Windows | Latin | Arial |
| Chinese | |||
| Japanese | MS Gothic | ||
| Korean | Dotum | ||
| MacOS X | Latin | Arial | |
| Chinese | LiHei Pro | ||
| Japanese | Hiragino Kaku Gothic ProN | ||
| Korean | Apple SD Gothic Neo, Apple Gothic | ||
| Linux | Latin | Arial, DejaVu Sans, DejaVu LGC Sans, Liberation Sans | |
| Chinese | AR PL UKai CN, AR PL KaitiM GB | ||
| Japanese | Kochi Gothic, IPAGothic | ||
| Korean | UnDotum, Baekmuk Gulim | ||
monospace |
Windows | Courier New | |
| MacOS X | |||
| Linux | Courier New, DejaVu Sans Mono, DejaVu LGC Sans Mono, Liberation Mono | ||
The complete list of defaults, including details like e.g. the exact Unicode
ranges Prince is using, can be found in the fonts.css file
located in the installation directory of Prince resources. (See
Installation Layout).
In order to redefine these defaults, see Redefining the generic font families.
The CSS generic font families can be redefined to use different fonts
by editing the fonts.css file in the Prince
installation (see Installation Layout).
Each font family is defined using a
@font-face rule,
which maps a font family to an actual font either by name or by filename. (See
Generic font families).
Here is an example of mapping the generic "sans-serif" font family to the local system font called "Trebuchet MS".
fonts.css
@font-face {
    font-family: sans-serif;
    src: local("Trebuchet MS")
}
It is also possible to map the generic font families to local fonts specified
by the filename of the TrueType font file.
This will usually require using multiple
@font-face rules,
one for each TrueType font file in the font family, which usually includes four
files (normal, bold, italic and bold-italic). Here is an example of mapping the
generic "sans-serif" font family to the "Trebuchet MS" font using filenames,
assuming that the font is installed in the usual system directory on Linux.
fonts.css
@font-face {
    font-family: sans-serif;
    font-style: normal;
    font-weight: normal;
    src: url("/usr/share/fonts/truetype/msttcorefonts/trebuc.ttf")
}

@font-face {
    font-family: sans-serif;
    font-style: normal;
    font-weight: bold;
    src: url("/usr/share/fonts/truetype/msttcorefonts/trebucbd.ttf")
}

@font-face {
    font-family: sans-serif;
    font-style: italic;
    font-weight: normal;
    src: url("/usr/share/fonts/truetype/msttcorefonts/trebucit.ttf")
}

@font-face {
    font-family: sans-serif;
    font-style: italic;
    font-weight: bold;
    src: url("/usr/share/fonts/truetype/msttcorefonts/trebucbi.ttf")
}
Prince can be instructed not to use system fonts with the
--no-system-fonts
command-line option. Only fonts defined with
@font-face
rules in CSS will be available.
Layout is the way in which text and pictures are set out on a page. It defines the final look of a document. Prince understands layout by means of CSS, cascading style sheets.
In the following chapters we shall go through the main points when preparing the layout of a page. It mainly follows the general steps of layout for web pages: starting from Text formatting and Paragraph formatting, via the Box Model, until Tables, Lists, Columns, Floats, Flex Layout, and Footnotes.
A separate chapter, Paged Media, will analyze in-depth the major difference between formatting for the web and PDF/Print, namely that PDF is paginated, content is placed on discrete pages.
Text can be styled with CSS by defining font styles or text layout styles.
After choosing an appropriate typeface for your text with the font-family
property (see Fonts), you can assign it different sizes with the
font-size property.
Next up you should decide whether to give it some color. The default
text color for a page is defined in the body selector, but each selector
can have its own color.
body {
    font-family: Helvetica, Arial, sans-serif;
    color: blue;
}
Special formatting can be achieved through the font-style,
font-weight, text-transform
or text-decoration properties. All of these
properties can also be set with the shorthand property font.
It is also possible to style the vertical alignment of text in an inline box with
the vertical-align property. The value baseline is
the default, sub and super align the baseline of the element
with the subscript-baseline or superscript-baseline of its parent respectively. The
text-top and text-bottom values align the top of the element
with the top or bottom of the parent's font, while middle aligns the
middle of the element with the baseline plus half the x-height of the parent.
In order to determine how compact the text should be displayed, the letter-spacing
can be used. Alternatively, the property font-stretch might be
used, but note that it does not change the geometry of any arbitrary font by stretching
or shrinking it - instead, it merely instructs Prince to choose the most appropriate
face of the font, if the selected font offers several ones. Also note that this property
is not supported for system fonts on Windows.
In a similar fashion, the property word-spacing can be used
to determine the distance between words.
The directionality of the text is controlled through the Writing Mode.
Now that you have decided on the basic properties of the text, you can turn your
attention to styling the paragraphs. The text-align property is
used to control how text is aligned within its containing box, while the
text-indent property determines the indentation of
the first line of text in the element.
If the text-align property has a value of left,
right or center, the text will be aligned to the left, right
or center respectively. The justify value instructs Prince to justify
text. It is not uncommon, in printed texts, to align text based on whether the text
appears on a left or right page. To support this, two new keywords are added to the
text-align property: inside is the
same as 'left' on right pages and 'right' on left pages, and outside
is the same as 'right' on left pages and 'left' on right pages.
Prince adds the property prince-text-justify to
define how to treat justified text for CJK languages. The value prince-cjk
allows space to be inserted between CJK characters when justifying even if there
aren't any space characters.
The last line of an element can receive its own alignment style with the
text-align-last property. It takes the same
values as text-align.
p {
    text-align: justify;
    text-indent: 5em;
}
It is also possible to style the first line of a paragraph in a different way -
to achieve this, the selector ::first-line is used.
p::first-line {
    text-indent: 8em;
}
It is not unusual to give the first letter of a paragraph a bigger font size than
the rest of the paragraph. The selector ::first-letter is useful for
this purpose.
p::first-letter {
    font-size: 2em;
}
One of the most common use cases is for so-called drop caps - large capital letters at the beginning of a chapter that have the depth of several lines of text.
In the following example we are selecting the first letter of the first paragraph, which gets styled much bigger than the normal text, and gets floated to the left. The normal text is wrapping around this first large letter.
p:first-child::first-letter {
    font-size: 5em;
    line-height: 3rem;
    float: left;
}
Another important aspect when formatting a paragraph is how compact the text
lines should appear on the printed page. The property
line-height can be used to determine the height
of text lines.
The property line-stacking-strategy allows to
choose whether individual lines should have their height determined based on their
content, or whether all lines in a paragraph should have the same height, or a
compromise where their heights are determined by their content and then rounded
up to a multiple of the paragraph line height.
In order to lay out text in a well-balanced way, it might at times be necessary
to hyphenate some words - to enable hyphenation, the hyphens
property is used. For details please refer to the section on
Hyphenation.
Prince also allows for line-breaking in certain situations even in the absence of
whitespace - for example, after slashes in long URLs. This behavior can be
disabled with the prince-linebreak-magic property
for situations in which more precise control over line-breaking is preferred.
The property overflow-wrap controls wrapping
behavior of last resort: whether it is better for a word to overflow
its container, or to be broken at an arbitrary point (subject to
white-space, and not splitting within a grapheme
cluster), without adding a hyphen.
Prince does not support the value break-word of the property
word-break to achieve a similar effect. Use the
value break-all of word-break, or
the property overflow-wrap with the value
break-word instead.
A writing mode describes the directionality of a script, i.e. it describes
the direction the script is to be read. In (X)HTML, the language of a
document is defined by the lang or xml:lang
attributes. To control the rendering of the text, a couple of CSS properties
can be used: the direction property defines
the inline direction of the script, that is left-to-right (like e.g. Latin or
Indic scripts) or right-to-left (like e.g. Arabic and Hebrew scripts).
The writing-mode property, on the other
hand, describes the block direction of the script, namely whether the text
should be laid out horizontally, top-to-bottom (like e.g. Latin or Arabic
scripts), or vertically, right-to-left (like e.g. Chinese scripts). The
default value is horizontal-tb, which means horizontal,
top-to-bottom.
Prince sets the PDF direction based on the direction and writing mode of the document root element to support right-to-left books.
Changing the writing mode of a document, that is, the inline or block direction, not only changes the direction of the script, but also affects several other aspects of the printed document.
The page selector pseudo-classes :recto and :verso
(see Selecting pages) are relative to the direction of
the script. In a left-to-right script, :recto is the right-hand
side of a spread, and :verso is the left-hand side, while in a
right-to-left script these values are inverted: :recto defines
the left-hand side of a spread, and :verso defines the
right-hand side. See also Selecting pages.
Columns change their orientation when the writing mode is changed -
writing-mode vertical-rl arranges the
columns horizontally, top-to-bottom.
This can be used to rotate content - see Printing wide content sideways and Rotating content in table cells.
All HTML elements follow the CSS box model. Their margin,
border, padding and
background can all be styled.
At the very outside of the box are the margins. Each margin's size can be set individualy with the properties margin-top, margin-bottom, margin-left and margin-right, or you can use the shorthand property margin to specify all four margins together. The syntax of the shorthand property is:
margin: top right bottom left
If there are only:
Prince expands the margin properties with margin-inside
and margin-outside, defining the margin
respectively on the inside or outside of a spread: inside is on the right when
used on a left-facing page, and on left on a right-facing page; outside is on
the left when used on a left-facing page, and on the right on a right-facing
page.
Always keep in mind that margin-top and
margin-bottom of blocks are combined (i.e.
"collapsed") into a single margin according to a possibly rather complex
behavior known as margin collapsing. The notable exception is
the behavior of margins in Flex Layout.
The border of a box can be styled with several border properties. The borders can
either be individually styled with border-top,
border-right, border-bottom
and border-left, or the shorthand property
border can be used to style all four borders of
the box in the same way.
To style the borders, the border-color,
border-style and
border-width properties can be used. For each
of them, also top, right, bottom and
left variants are available to style each border separately.
The property border-radius property can be used
for styling rounded corners.
The border-clip property splits the borders into
parts along the border edge - the first part is visible, the second one is
invisible, the third part is visible, etc.
The property padding defines the padding inside the box model.
Each padding's size can be set individually with the properties
padding-top, padding-bottom,
padding-left and padding-right, or you can
use the shorthand property padding to specify all four
paddings together. The syntax of the shorthand property is:
padding: top right bottom left
If there are only:
The background of an element can be styled with the
background-color and the
background-image properties, or with the
shorthand property background. See also
Background Images.
Various standard properties are available to position the background, to clip it
or to determine whether, and how it should be repeated. Prince extends control
on the background with the prince-background-image-resolution
property, used to control image size in print (see Image Size).
Every HTML element is displayed in a way depending on what type of element it
is. Most elements are displayed as either block or inline
elements. The default display value can be changed with the
display property.
A block element always starts on a new line and takes up all the
available width.
An inline element, on the other hand, does not start on a new line,
and only takes up as much space as necessary.
inline elements are not allowed to have block elements
inside it.
A hybrid type, namely the inline-block element, is like
inline elements, but it can have a width and a height - which
can be very useful when you want to create a grid of CSS boxes that fills all
the width and wraps nicely. The inside of an inline-block element
is formatted like a block box.
Care needs to be taken with inline-block elements, because Prince
cannot split them over several pages.
The value run-in displays a block element as if it were an inline
element at the beginning of the following block element.
With the value list-item, the element is effectively transformed
into a list item - for more on lists, please see the chapter Lists.
The value flex enables Flex Layout, while
inline-flex makes an element behave like an inline element and lays
out its content according to the flex layout model.
Several values refer to Tables, making elements behave as if
they were table elements. However, the value inline-table has no
direct equivalent in HTML - it behaves like a table HTML element,
but as an inline element, rather than a block element. Inside the table box is
a block context.
The special value none, which removes the content from the document,
is very useful when hiding certain elements in the printed layout.
Prince supports CSS transformations of Level 1, with some limitations: it
recognizes transform and transform-origin, but does
not recognize transform-box. Furthermore, Prince does not allow
perspective transforms.
The transform property can be used to rotate,
translate, scale or skew an element.
The transform property currently does not affect
SVG elements - they need to use their own transform attribute instead
(see SVG Transformations).
The transform property function rotate()
rotates the element clockwise from its current position. Negative values rotate
conter-clockwise.
The function translate() moves an element along a vertical and/or
horizontal axis. The functions translatex() and
translatey() move the element along one of those axis only. The
function translate3d() is supported if the Z (third) coordinate is
zero, thus making it equivalent to the 2D translate().
The function scale() affects the size of the element - note that
this also alters other properties of an element, such as its
font-size, padding,
height and width.
The functions scalex() and scaley() transform the
element in one dimension only.
The functions skewx() and skewy() tilt an element to
the left or right. There is no shorthand form.
The origin for the transformations, i.e. the point around which a transformation
is applied, can be set with the transform-origin
property.
If only one term is given, then the second component is assumed to be
center. In particular, if only a percentage or length is given,
then it is assumed to be the horizontal coordinate.
If both values are given as keywords, order doesn't matter; but if two
coordinates are given and either coordinate is a length or percentage, then
the horizontal component must come first: so top 50% is not valid,
but top and top center and 50% top are
all valid and equivalent.
A list item has two parts: marker and
content.
The content part is rendered inside the list item's
border box,
and is styled the same way as a normal block,
such as div or p element.
The marker positioning is determined by the
list-style-position
property and is styled using the ::marker
pseudo-element.
The content property can be applied to the ::marker
pseudo-element to specify a custom marker for list items.
CSS
li::marker { content: "No. " counter(list-item) }
List markers are rendered outside the list item in the left
margin area by default.
If the CSS property list-style-position has value
inside,
the marker is rendered as the first inline box inside the list item.
CSS
ol {
    padding-left: 1cm;
    border: solid 2px darkgreen
}
li { border: solid 1px black }
li.inside { list-style-position: inside }
li.outside { list-style-position: outside }
Output
list-style-position to inside,
so the list marker is rendered inside the principal box of li.
list-style-position to outside,
so the list marker is rendered outside the principal box of li.
When the marker position is outside,
it is rendered outside the li principal box.
If you want the marker to appear inside the principal box of
ol,
make sure to give ol enough left padding
or li enough left margin.
Different list marker types can be chosen by setting the
CSS property list-style-type to different values:
disc | hyphen | decimal | lower-alpha | ...
The property list-style-type
applies to list items and determines the type of marker that
they receive. The following table shows examples of some list
style types (a table with examples of all supported options for
ordered lists, see Counter styles).
decimal |
1, 2, 3, ... |
decimal-leading-zero |
01, 02, 03, ... 09, 10, 11, ... |
lower-alpha, lower-latin
|
a, b, c, ... z, aa, ab, ... |
upper-alpha, upper-latin
|
A, B, C, ... Z, AA, AB, ... |
lower-roman |
i, ii, iii, iv, v, vi, ... |
upper-roman |
I, II, III, IV, V, VI, ... |
asterisks |
*, **, ***, ... |
CSS
li.upper-alpha { list-style-type: upper-alpha }
li.lower-roman { list-style-type: lower-roman }
Output
The list marker can also be replaced by an image by using the
list-style-image property.
The shorthand property list-style can be used to
set the three properties list-style-image,
list-style-position and
list-style-type together.
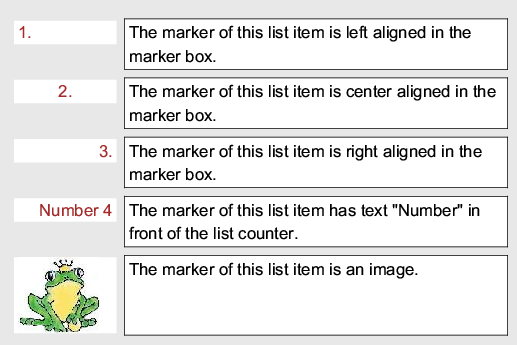
Alternatively, the ::marker pseudo-element can be used to style the
list item marker, giving full control over its content, width, alignment and so on.
CSS
li::marker { width: 2.4cm }
li.left::marker { text-align: left }
li.center::marker { text-align: center }
li.right::marker { text-align: right }
li.text_marker::marker {
    content: "Number " counter(list-item)
}
li.image_marker::marker {
    content: url("../../image/prince.jpg")
}
Output
When the automatic table layout algorithm is used, all contents of the table will be processed to determine the table width and its column width.
The automatic table layout algorithm is used in the following situations:
table-layout property is
auto; or
width property is
auto, regardless of the
value of the table-layout property.
The basic rules used by Prince can be summarized as follows:
width has value auto,
and if the table fits in the container when using maximum column widths,
then maximum column widths will be used.
Otherwise, minimum column widths will be used,
but they will be adjusted, if the sum of them is smaller than the specified the
table width or the container width,
so that the table can take up as much space as possible.
When the fixed table layout algorithm is used, the table column widths are determined by their specified widths or by the remaining space available, regardless of their contents.
The fixed table layout algorithm is used in the following situations:
table-layout property has a value
fixed,
and
width property is not
auto
table {
    table-layout: fixed;
    width: 90%
}
Note that if the width property has value
auto
(which is the default value), the table-layout property
will be ignored and automatic table layout will be used instead.
The basic rules used by Prince are as follows:
When the border-collapse property is set to
separate,
a table can have separate borders around individual cells.
The space between table cell borders is determined by the value of its
border-spacing property.
CSS
table {
    border-collapse: separate;
    border-spacing: 5px;
    border: solid 3px black
}
td { border: solid 1px red }
td.dash-blue  { border: 2px dashed blue }
td.solid-green { border: 2px solid green }
Output
| A | B | C |
| D | E | F |
| G | H | I |
Note that by default,
the value of border-collapse is
separate.
When the CSS property border-collapse is set to
collapse,
each edge of each cell resolves its final border style and border width
based on certain rules.
CSS
table {
    border-collapse: collapse;
    border: solid 3px black
}
table td { border: solid 1px red }
td.dash-blue  { border: 2px dashed blue }
td.solid-green { border: 2px solid green }
Output
| A | B | C |
| D | E | F |
| G | H | I |
Note that the border-spacing property is not used
in the collapsing table border model.
The rules used by Prince for choosing the "winner" border are as follows:
hidden,
it beats those with other border styles;
none, it
loses to those with other border styles;
solid,
dashed then dotted;
Prince table cells that span multiple columns using the
table-column-span CSS property, which
takes an integer value and is set to 1 by default.
CSS
td.colspan2 { table-column-span: 2 }XML
<td class="colspan2"> B </td>
Output
| A | B | |
| C | D | E |
Prince supports table cells that span multiple rows using the
table-row-span CSS property, which takes
an integer value and is set to 1 by default.
CSS
td.rowspan2 { table-row-span: 2 }XML
<td class="rowspan2"> A </td>
Output
| A | B | C |
| D | E |
If you want to number table rows in a table, but there are just too many rows to number by hand, or if the document is dynamically generated and hand numbering is impossible, CSS counters and generated content can help you out:
CSS
table { counter-reset: row }
tr { counter-increment: row }
tr::before {
    content: counter(row);
    display: table-cell
}
HTML
<table>
<tr><td>The First Table Row</td></tr>
<tr><td>The Second Table Row</td></tr>
<tr><td>The Third Table Row</td></tr>
</table>
Output
| 1 | The First Table Row |
| 2 | The Second Table Row |
| 3 | The Third Table Row |
As pseudo-elements only inherit inheritable properties from the element they are attached, non-inheritable properties, such as display and border properties, need to be explicitly set in the pseudo-elements.
When a table spans across more than one page, it might be desirable to have a "running" table header and footer so that they can be carried on to all the subsequent pages on which the table appears.
HTML
<table>
 <thead>
  <tr> <td>Name</td> <td>Mark</td> <td>Grade</td> </tr>
 </thead>
 <tr> <td>Xuehong</td> <td>95</td> <td>H1</td> </tr>
 <!-- other rows for other students -->
 <tfoot>
  <tr> <td>Name</td> <td>Mark</td> <td>Grade</td> </tr>
 </tfoot>
</table>
Rows inside the thead element are used as a running table header.
Rows inside the tfoot element are used as a running table footer.
See also Long Tables.
Tables can also be provided with a table caption by using the caption
HTML element, or by styling an arbitrary element with
display: table-caption to be made to behave like
caption elements. The caption is positioned above the table by
default, but it can be moved to the bottom with the
caption-side property.
When a table spans across more than one page, the prince-caption-page
property determines whether table captions will be displayed on the first page of
a table, or only on the following pages, or repeated on every page that a table
appears on. See also Fancy Table Captions.
Reading long lines of text can be difficult - multiple columns have been used in print for a very long time. CSS allows for clean styling in multiple columns with the help of several properties.
The column-count property specifies the number of columns for the
selected element - the column width will be calculated automatically. Alternatively,
you can define the (optimal) width of a column with the column-width
property, and the number of columns will be defined automatically. Note that Prince might
make small adjustments to the actual width in order to use the available space at
its best. Both values can also be set simultaneously with the shorthand columns
property.
p {
    column-count: 3;
}
The height of the columns is balanced by default, and the text is distributed
to the available columns so that the height of the content in each column is approximately
equal. In some situations it might be desirable to explicitly determine the height
of the columns, creating as many columns as necessary. This is achieved by setting
the height or max-height
properties on a multi-column block.
With the column-gap property the distance between columns can be
styled and the column-rule property allows the addition of a line
between columns - this is similar to using border-left or
border-right properties.
p {
    column-gap: 2em;
    column-rule: red dotted thin;
}
The column-fill property determines how the content is distributed
to fill various columns: the property can be set to auto, filling the
columns sequentially, or balance, dividing the content in equal ways
between the columns.
When content is laid out in multiple columns, Prince can determine where column
breaks are placed in a similar way to breaking content into pages. Use the
properties break-before and break-after
with the value column to fine tune this behavior.
Prince also supports the properties column-break-before
and column-break-after. However, you are encouraged
to use the newer properties break-before,
break-after with the keyword column
from the CSS Fragmentation Module Level 3.
If an element is to break the flow and span several columns, the property
column-span helps to achieve this. For
floated elements (see Floats) a numeric value tells Prince how
many columns the element should span. For non-floated elements that are part of
the regular flow of the document, only the keyword all can be used.
The following example instructs Prince to make the h1 heading element
span all the columns:
body {
    column-count: 3;
}
h1 {
    column-span: all;
}
Prince features also several column-specific extensions to the
float property, namely
Page and column floats and
Page and column footnotes.
When printed texts contain images, the text is usually laid out to wrap around those
images. To accomplish the same with CSS, the images are floated - either to the
left or right of text, or at times even to the top or to the bottom of a column. The float
property does just this - it floats an element, allowing the content of other elements
to flow around it.
img {
    float: right;
}
The property clear can be considered the float's sister property:
an element that has the clear property set on it will not move up,
next to the floated element, like the float is asking for. Instead, it will move
down after the float.
Prince extends the traditional behavior of floats with a few features that have been ubiquitous in printing for a long time.
Traditionally, floats move in the inline direction, left or right. Prince extends this behavior with page floats that move in the block direction, specifying that an element should be floated to the top or to the bottom of a page, and with column floats that move the float to the nearest edge of the column in a multi-column layout, with optional column spanning of the float.
This allows for more flexible layout options that meet the needs of formatting documents for print.
When giving the float property the value top or
bottom, the element will be floated to, respectively, the top or the
bottom of the page. The values column-top and column-bottom
float the element to the top or bottom of the column it appears in, while column-top-corner
and column-bottom-corner float the element to the top or bottom of
the last column, rather than its natural column. These can be useful if you wanted
to create a magazine-style layout, floating an image to the right-hand corner of
the current multi-column layout.
img {
    float: column-top-corner;
}
A floated element can span several columns with the help of the column-span
property (see Columns). The following example instructs Prince to
make the image span two columns:
img {
    float: column-top-corner;
    column-span: 2;
}
The value prince-snap instructs Prince to float the image to the
nearest "end", i.e. to the top or bottom of the page, or of the column in the case
of a multi-column layout.
img {
    float: prince-snap;
}In print one typically has to deal with left facing and right facing pages, together
forming a spread. To take this into account when placing an element, Prince extends
the float property with the values inside and outside,
moving the element respectively to the inside or outside of a spread.
If the inside and outside values are used in a multi-column
layout, the element is floated to the inside or outside of the column it appears
in its natural flow.
The value footnote transforms the element into a footnote: it creates
a footnote call in the place where it appears in its natural flow, and moves the
element to the bottom of the page. The footnote marker is placed outside of the
block of the footnote. With the value inline-footnote, the footnote
marker is placed inside of the block of the footnote. Two additional values, namely
prince-column-footnote and prince-column-inline-footnote
behave in an analogous way, but move the footnote not to the bottom of the page,
but to the bottom of its column instead. See also Footnotes.
Prince also takes the additional modifier next. In a multi-column
layout, this defers the float to the next column, otherwise it defers the float
to the next page.
img {
    float: column-top next;
}
The optional modifier unless-fit is to be used in combination with
other float instructions, and expresses a conditional: the element is only floated
if it would otherwise cause a page or column break. For example, If you have a
large image that happens to occur at the end of the page, it could force a page
break and leave a gap at the end of the previous page. So you could float the image
top unless-fit, which would move it to the top of the next page unless
it fits on the current page without causing a break and leaving a gap:
img {
    float: top unless-fit;
}
Prince supports footnotes using the float property.
If an element has the property float: footnote then it will be
floated into the footnote area of the page and a reference will be placed in
the text.
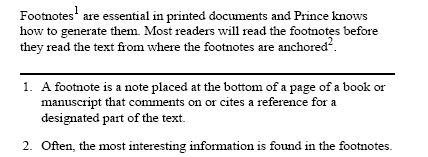
This example shows some simple footnotes, the fn class is used to create footnotes:
CSS
.fn {
    float: footnote
}
HTML
<p>
Footnotes<span class="fn">A footnote is a note placed at
the bottom of a page of a book or manuscript that comments on or
cites a reference for a designated part of the text.</span>
are essential in printed documents and Prince knows how to generate
them. Most readers will read the footnotes before they read the text
from where the footnotes are anchored<span class="fn">Often,
the most interesting information is found in the footnotes.</span>.
</p>
Each footnote implicitly increments the footnote counter which is used to number the footnotes. The footnote counter can be reset at each new page, section or chapter as necessary. This example resets the counter on each new page.
@page {
    counter-reset: footnote
}
Footnote calls are the numeric anchors in the text that refer to the
footnotes.
Prince will generate footnote calls using the ::footnote-call
pseudo-element.
This is the default style for footnote calls:
*::footnote-call {
    content: counter(footnote);
    font-size: 83%;
    vertical-align: super;
    line-height: none
}
This will display the current value of the
footnote counter in a superscript position in a slightly smaller font than
the main text.
The line-height declaration ensures that the superscript
position of the footnote does not affect the line height of the main text.
The footnote call style can be customized to use different fonts or colors. It can even be customized to include different content, such as placing the footnote counter in brackets rather than making it superscript.
*::footnote-call {
    content: "[" counter(footnote) "]";
    font-size: inherit;
    vertical-align: inherit;
}
This rule will generate footnote calls with the number of the footnote in brackets, like this: [1], [2], [3].
Prince automatically generates footnote markers, the numeric markers placed
in front of the footnote text.
Footnote markers are similar to the markers added to
list items (see Lists)
in most respects, and can be styled in a similar fashion
using the ::footnote-marker pseudo-element:
*::footnote-marker {
    font-weight: bold
}
This rule will generate footnote markers with a bold font.
Footnote markers are rendered outside the footnote in the left
margin area by default.
If the CSS property footnote-style-position
has value inside,
the marker is rendered as the first inline box inside the footnote.
This property is similar to the
list-style-position
property that applies to list markers (see Lists).
Footnotes are placed within the @footnote area of the page
(see Page regions), which can be styled within
@page rules.
@page {
    @footnote {
        border-top: solid black thin;
        padding-top: 8pt
    }
}
This rule adds a border and some padding to the top of the footnotes area.
If there are no footnotes on a page, the footnotes area will not be displayed on that page at all.
By default, the @footnote area is at the bottom of the page.
However, Prince allows to position the area in different places, effectively
offering a mechanism to create simple sidenotes (see Sidenotes).
This rule moves the footnotes area to the left side of a page.
Footnotes are created with the float property
(see also Floats): an element can be removed from the normal
flow of the document by styling it with the footnote value. This
creates a footnote call in the place where the element would be in its natural
flow, and moves the element's content to the bottom of the page. The footnote
marker is rendered outside the footnote in the left margin area, and the footnote
is displayed as a block element.
The property footnote-display can be used to change
the default display of footnotes: besides the default block display,
they can be also treated as inline elements. The value compact
leaves it up to Prince to determine whether to display the footnote as a block
or inline element: if two or more footnotes fit on one line, they will be treated
as inline elements to take up less space.
Making a footnote into an inline element moves the footnote marker into the footnote box as the first inline box inside the footnote.
The float property offers also the value
inline-footnote, which is another mechanism to transform the
footnote into an inline element.
In a multi-column layout, footnotes can be rendered at the bottom of the page as
normal footnotes, or alternatively at the bottom of each column by using the values
prince-column-footnote or prince-column-inline-footnote
for the float property. See also Prince extensions to floats.
In some situations it might happen that footnotes do not fit on the page on which
the footnote call was placed. It might be desirable to tie the footnote to the same
page as the call - the prince-footnote-policy can be of help. The
following example instructs Prince to move the line with the footnote call to the
next page, in order to keep it on the same page as the footnote itself:
p {
  prince-footnote-policy: keep-with-line;
}
Alternatively, the value keep-with-block moves the entire paragraph to
the next page.
This property must be applied to the paragraph in which the footnote occurs, not to the footnote element itself.
Flex layout is a layout model similar to the block layout. It lacks Columns and Floats but gains powerful possibilities to distribute space and align content in a more flexible way. The content of a flex container can alter its height and width to best fill the available space, it can be easily aligned even if the size is unknown or dynamic, and most importantly it can be laid out in any direction, as opposed to the traditional layout models that would either be vertically-based (block layout) or horizontally-based (inline layout).
Prince supports the Flex specification fully, the main limitation currently being page breaks.
In Flex layout some properties apply to the parent element, i.e. to the flex container, while others apply to the children, or flex items.
To use the flex layout, flex needs to be enabled on the parent
element to create the flex container by defining
the flex value for
the display property.
.flexcontainer {
    display: flex;
}
Next, the direction of the flex layout can be defined by means of
the flex-direction property: rightwards,
leftwards, downwards, or even upwards! With the flex-wrap property the wrapping of the flex container is
controlled - the default is to try to arrange all items on one line. The
shorthand property flex-flow can be used
to define flex-direction and
flex-wrap together.
The property justify-content
defines the alignment of the content along the main axis - extra
free space can be distributed in various ways after or before the
content, or in specific ways between the flex items. The alignment
along the cross axis is controlled with
the align-items property. In case
there are multiple item lines in a flex container, the alignment of
the lines can be controlled with
the align-content property. If
there is only one line, the property has no effect.
By default, items are placed in the source order inside a flex
container, but with the order
property it can be modified!
The flex-grow property defines the
proportion by which a flex item can grow, if necessary,
while flex-shrink defines the
proportion by which an item can shrink.
The flex-basis property defines the
default size of an element, before the remaining space is
distributed. However, it is recommended to use the shorthand
property flex instead - the value
for the flex-grow is mandatory, the
other properties are automatically set in an intelligent way.
.flexitem {
    flex: 2;
}
Finally, the property align-self
allows the default alignment specified with
the align-items property to be
overridden for individual flex items.
It is important to know that margins of flex items behave in a slightly
special way: margins of adjacent flex items do not collapse, and using
the keyword auto for the margins of a flex item will
automatically distribute the available space equally around the item -
and it will be centered in both axis!
Please notice that percentage values of margins and paddings of flex items are resolved by Prince against the inline axis, i.e. left/right/top/bottom percentages all resolve against width.
Prince produces PDFs - which are a prominent example of paged media. There are a few differences that are crucial to keep in mind when preparing a document for paged media intended for print:
The major difference between formatting for the web and for PDF/Print is that PDF is paginated, i.e. the content is placed on discrete pages. Pages have a defined size and content can be laid out in a specific pattern making use of predefined page regions. Elements can not only be floated right and left, but they can also be floated to the top and bottom of the page, or of a column, or the float even can be deferred to the next page (see Prince extensions to floats). Pages can be selected and named, which allows for specific treatment of certain pages. Also, it is important to have an understanding of pagination: content might not fit on a page and might spill over into the next page, or it might be necessary to move it to the next page in order to avoid creating gaps (see also Conditional modifiers).
A basic unit for paged media in print is the page spread: the left page, called
verso in a left-to-right script (see Writing Mode), and
the right page, called recto, are of the same size and typically are
symmetrical to each other and are centered on the gutter. Selected and named
pages can be placed recto or verso, and Prince expands several
properties and the @page
at-rule pseudo-classes with the values verso and recto, or
inside and outside, referring to the layout on each
page of the spread.
Last but not least, paged media intended for print is non-interactive by nature. All CSS properties referring to user interaction make no sense, scripting cannot be interactive and scripts need to run before layout is finished. But for these details and scripting after layout please check the section on JavaScript in Printed Media.
Prince allows you to control a number of options that affect how to format pages, from straight-forward options such as page size, to page style, page regions like headers and footers, pagination control and page numbering.
CSS properties that affect pages are specified within
page at-rules (see CSS At-rules).
For example, we can use the size property within the
@page rule to
specify the page size (see Page size).
@page {
    size: A4
}
In this section we will show most of the properties that can be specified within a page rule, then we will show how pagination can be controlled and how page styles can be applied to selected pages.
Page size can be specified using the size
property in length units or by a page size keyword (see
Page Size Keywords for a list), optionally combined with
the portrait or landscape keyword.
/* Use A4 paper */
@page { size: A4 }

/* Use A4 paper in landscape orientation */
@page { size: A4 landscape }

/* These two custom sizes are equivalent */
@page { size: 30cm 40cm }
@page { size: 40cm 30cm landscape }

/* Use square paper, this sets width and height */
@page { size: 30cm }
Sometimes it can be useful to specify the page dimensions in pixels, for example when creating presentation slides (see Presentation slides).
@page {
    size: 1280px 960px;
}
Pages, like other block level elements, follow the CSS box model
introduced in Box Model. Their margin,
border, padding
and background can be styled within
@page rules.
The @page
rules can only style the page and its margin boxes - it cannot contain
style rules to target specific elements, but it can contain at-rules
to target the page regions (for a complete list of possible at-rules,
see Page regions).
@page {
    margin: 2cm;
}
Prince also supports the margin-outside and
margin-inside properties. These allow you to specify different
margins for the inside and outside edges of paper as it is bound into a book.
For example it may be necessary to have a larger inside margin (called a
gutter) so that after some of the margin is used by the binding, the
remaining margins are even.
@page {
    margin: 2cm;
    margin-inside: 3cm;
}
This is used in Fancy headers.

Most content appears inside the page area of one or more pages. Surrounding the page area, but within the margin area, are the page-margin boxes. Other special areas are overlaying the whole page or are placed at the bottom of the page area. Collectively, they are known as the page regions.
This figure shows the positions of some page regions placed in the page margin, called the page-margin boxes. Some of them can be used for creating running page headers and footers.
The @page
background is grey and the
body's, i.e. the page area's background is
white.
The first four page-margin boxes, namely
@top,@bottom,@left and@rightare easy to understand and are shown in yellow and red.
Each of these page-margin boxes has a synonym ending in -center
or -middle - for instance @top-center is the same
as @top, while @left-middle is the same as @left.
You can place content in a page-margin box with the content
property.
For example, you can print the current page number at the bottom of each page (see Generated Content):
@page {
    @bottom {
        content: counter(page)
    }
}
Two examples in the next chapter show examples of page headers and footers:
Several other page regions can also be used. The full list of page regions is shown in the Page regions table.
| Name | Default alignment | In figure | |
|---|---|---|---|
text-align |
vertical-align |
||
@top |
center | middle | yellow |
@bottom |
center | middle | yellow |
@left |
center | middle | red |
@right |
center | middle | red |
@top-left |
left | middle | green |
@top-center |
center | middle | not shown |
@top-right |
right | middle | not shown |
@bottom-left |
left | middle | not shown |
@bottom-center |
center | middle | not shown |
@bottom-right |
right | middle | not shown |
@left-top |
center | top | green |
@left-middle |
center | middle | not shown |
@left-bottom |
center | bottom | not shown |
@right-top |
center | top | not shown |
@right-middle |
center | middle | not shown |
@right-bottom |
center | bottom | not shown |
@top-left-corner |
right | middle | not shown |
@top-right-corner |
left | middle | blue |
@bottom-left-corner |
right | middle | not shown |
@bottom-right-corner |
left | middle | not shown |
@page-float-top |
center | top | not shown |
@page-float-bottom |
center | bottom | not shown |
@prince-overlay |
center | middle | not shown |
@footnote |
left | middle | not shown |
Prince will try to create page regions of the correct sizes. If you need to
create boxes of specific sizes you may need to use only a single box (eg:
@top) and use the content
property to place elements with specific sizes in it.
Note that in the above
Page regions
figure, Prince
leaves space for @top-right and @left-bottom boxes
because their counterparts (@top-left and @left-top
respectively) have been defined. This keeps the @top and
@left centered along the top and side of the page respectively.
The page-margin boxes @top, @top-left or
@top-right can be used to create running page headers, and
the page-margin boxes @bottom, @bottom-left or
@bottom-right are useful for page footers (see
Page Headers and Footers).
The page region @prince-overlay is a special region, overlaying
all of the page area. A typical use is for creating watermarks on all pages of
the document (see Watermarks).
The page region @footnote is placed by default at the foot of
the page area and contains the footnotes (see Footnotes).
Note that if there are no footnotes on a page, the footnote area will not be
displayed on that page at all.
Many CSS properties can be applied to page regions:
All of the
margin, border,
padding and background
properties can be used to style page regions.
The vertical-align property can be applied to any
page region to vertically align its content.
When a page region contains generated content, many inline style properties such
as color and font
can be applied to style the generated content.
The @footnote area can be positioned other than its default
position (see Styling and behavior of footnotes and Sidenotes).
All other page regions cannot be moved - their position is defined by the
page margins.
We have already shown an example of using the page counter to
print the page number at the bottom of each page,
this is one example of generated content.
The page counter is predefined and starts at 1;
it increments automatically for each new page.
(Note that the page counter cannot be incremented manually using the
counter-increment property.)
The page counter can be reset using the
counter-reset property at any block-level element within
a non-floating element in the normal flow.
This is useful for restarting page numbering at a new section of the
document.
HTML
<body>
    <div class="front"> cover page, etc, ... </div>
    <div class="contents">
        table of contents, ...
    </div>
    <div class="body">
    <div class="chapter"> chapter 1...</div>
    <div class="chapter"> chapter 2...</div>
    </div>
    <div class=appendix"> appendix1 </div>
    <div class=appendix"> appendix2, ... </div>
</body>
CSS
.contents {
    display: block;
    page: table-of-contents;
    counter-reset: page 1
}
@page table-of-contents {
    @top { content: "Table of Contents" }
    @bottom {
        content: counter(page, lower-alpha)
    }
}

.body {
    display: block;
    page: main;
    counter-reset: page 1
}
@page main {
    @top { content: string(chapter-title) }
    @bottom {
        content: counter(page)
    }
}

.chapter h1 { string-set: chapter-title content() }
Restarting page numbering also uses Named pages which we will explain in more detail below. We create three types of pages: table-of-contents pages, main pages, and pages without a name.
The .contents rule names the pages that it
appears on as table-of-contents and resets the page counter to
1 at the start of the contents div.
Then the @page
rule for those pages generates a page footer that contains the current page
number in lower-alpha style. This rule also sets the page header
to the string "Table of Contents".
The .body rule names the pages that it appears on as
main and resets the page counter to 1 at the start of main div.
Then the @page
rule for the main pages generates a page footer that contains the
current page number in the default decimal style.
This rule, together with the .chapter h1 rule,
sets the page header to the title of the chapter.
Pages that don't match either of these names have the default style, which does not include a page number in the footer.
In some documents,
particularly those that are unbound such as office documents,
it can be useful to show the total number of pages on each page.
The total number of pages can be accessed using the pages
counter.
This is a pre-defined counter that is fixed to the total number of pages in
the document.
@page {
    @bottom {
        content: "Page " counter(page) " of " counter(pages)
    }
}
This rule will generate page footers such as "Page 1 of 89".
This example demonstrates a more complete headers style. It uses generated content to print page numbers, the chapter number and title and the section number and title using different styles for left and right pages. It also prints an underline under the header.
@page {
    font-family: Times, Serif;
    font-size: 11pt;
    text-align: justify;
    margin-top: 2cm;
    margin-bottom: 2cm;
    margin-inside: 3.5cm;
    margin-outside: 2.5cm;
}

@page body:left {
    @top-left {
        content: counter(page);
        vertical-align: bottom;
    }
    @top-right {
        content: "Chapter " counter(chapter) ": " string(chapter);
        vertical-align: bottom;
    }
}
@page body:right {
    @top-right {
        content: counter(page);
        vertical-align: bottom;
    }
    @top-left {
        content: counter(chapter) "." counter(section) " "
            string(section);
        vertical-align: bottom;
    }
}
@page body {
    border-top: thin black solid;
}
@page body:first {
    margin-top: 25%;
    @top-left { content: normal; }
    @top-right { content: normal; }
    border: none;
}
@page body:blank {
    @top-left { content: normal; }
    @top-right { content: normal; }
    border: none;
}
body {
    font-family: Times, Serif;
    font-size: 11pt;
    text-align: justify;
    padding: 0.5cm 0cm;
}

div.body {
    page: body;
}

div.body h1 {
    break-before: right;
    prince-page-group: start;
    string-set: chapter content();
    counter-increment: chapter;
    counter-reset: section;
}
div.body h1::before {
    content: "Chapter " counter(chapter) ": ";
}

div.body h2 {
    string-set: section content();
    counter-increment: section;
}
div.body h2::before {
    content: counter(chapter) "." counter(section) " ";
}
The main content area is 2.5cm from the page's edge on all sides.
On the left and right this is a margin of 2.5cm and on the top and bottom
it's 2cm of margin and 0.5cm of padding.
This places the bottom border of the
@top page region 0.5cm from the main content area, enough to
avoid making it look crowded.
The header text has the vertical-align: bottom property to
ensure that it appears immediately above the border — the border
is made to look like an underline.
This example uses many properties and page selectors discussed later in
this section.
This is a small part of a larger
example in our Prince samples repository.
Generated content in page regions may contain text content copied
from the document using the string-set property:
CSS
@page {
    @top {
        content: string(doctitle)
    }
}

h1 { string-set: doctitle content() }
The @page rule specifies that the top-center page region will contain the text
content of the document title copied from the text content of the
h1 element in the document.
The second argument to the string() function is a
page-policy (see The optional page-policy value).
For a dictionary, you might want to have a page header that says "a-af",
where "a" is the first definition on the page and "af" is the last,
so you apply string-set for each definition,
and then you can select the first and last one with
a page policy in the page header.
@page {
  @top-left { content: string(term, first);}
  @top-right { content: string(term, last);}
}
The page policy value first-except is equivalent to start,
unless the string-set is applied on
the current page, in which case it will return no value.
This can be very useful as a means to repeating the title of a chapter as a page
heading in the @top-center page region, without duplicating the
information on the page where the heading appears in the running text of the
page.
@page {
  @top-center { content: string(letter, first-except);}
}
You can see these examples in full action in the Dictionary sample (HTML - PDF).
Page region content may also be taken from the document itself. Any block-level element can be removed from the normal flow and placed in a page region. It will normally inherit from its original position in the document, but does not display there. Please also note the following:
margin properties of an element not in the
natural document flow will be ignored.
To move the content into a page region, the element needs to be removed from
the normal document flow position with the running() function of
the position property, and inserted into the
specified region with the element() function of the
content property.
CSS
@page {
    @top { content: element(header) }
}
h1 { position: running(header) }
The @page rule specifies that the top page region is a new running header named "header".
The rule for the h1 element moves it to the "header" running element,
removing it from the default normal flow.
Prince also provides another interface for creating running headers: the content
can be removed from the normal flow with prince-flow: static(),
to be placed in a page region with content: flow().
CSS
@page {
    @bottom { content: flow(footer) }
}
footer { prince-flow: static(footer, start) }
In addition to the standard mechanism, the Prince specific one offers an
extra feature that might be useful in certain scenarios: the static()
function accepts an optional start argument, which makes
the fetched content available, as if it were fetched from the start of the
document. An example to clarify:
Many HTML documents designed for browsers have the following structure:
<header>
main content
<footer>
Unfortunately, if you want to place the footer element in the page footer, it will only appear on the last page - because it is at the end of the document! To solve this, the document must be modified to look like this:
<header>
<footer>
main content
It can be achieved by using JavaScript to move the element, but the simple
start keyword on the prince-flow
property instructs Prince to pretend that the element was seen at the
beginning of the document.
The element() and flow() functions replace the entire
margin box, and cannot be combined with other content. If you just want to
capture some text from the document, use named strings instead (see
Copying content from the document) - they can be combined with other content.
It is often necessary to apply styles to some pages, but not others. Either applying them to only some pages, or on every page except selected pages. CSS and Prince provide a number of page selectors for choosing which pages a rule applies to.
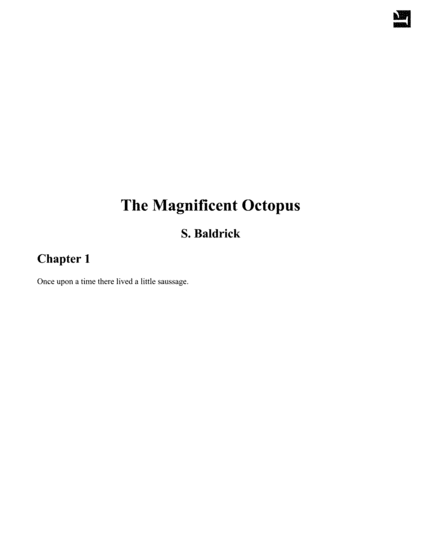
In a novel it is useful to print a page number at the bottom of every page,
except for some pages such as the title page.
In this example the @page
rule is applied to all pages. Then the @page:first rule, which is
more specific, removes the footer from the first page.
See Page regions and Generated Content.
<html>
<head>
<style>
@page {
    @bottom {
        content: counter(page)
    }
}
@page:first {
    margin-top: 10cm;
    @bottom {
        content: normal
    }
}
h1, h2.subtitle {
    text-align: center
}
h2.chaptertitle {
    break-before: page
}
</style>
</head>
<body>

<h1>The Magnificent Octopus</h1>
<h2 class="subtitle">S. Baldrick</h2>

<h2 class="chaptertitle">Chapter 1</h2>
<p>Once upon a time there lived a little saussage.</p>

</body>
</html>
In this example the @page
rule specifies styles that apply to all pages:
Then the @page:first rule overrides this for the first page
only.
It resets the content property for the footer and
increases the top margin,
printing the title of the novel in a reasonable place on the page
(see Page style).
This example also uses the
break-before property to force a page break
(see Page breaks).
When using the :first page selector to choose the first page
in each chapter (such as in Fancy headers) it may be
necessary to add
prince-page-group: start
to the first element in each chapter (such as h1).
See Page groups.
The :left and :right page
selectors can be used to style left and right pages in a bound book
differently. This is often used in text books to place the page number
on the outside top corners of pages.
Alternatively, the :recto and :verso selectors can
be used, with the advantage of being independent of directionality of the
script: in a left-to-right script, :recto is the right-hand
side of a spread, and :verso is the left-hand side, while in a
right-to-left script these values are inverted: :recto defines
the left-hand side of a spread, and :verso defines the
right-hand side. See also Writing Mode.

@page:left {
    @top-left { content: counter(page) }
    @top-right { content: string(book-title) }
    margin-left: 2cm;
    margin-right: 3cm;
}
@page:right {
    @top-left { content: string(chapter-title) }
    @top-right { content: counter(page) }
    margin-left: 3cm;
    margin-right: 2cm;
}

h1 { string-set: book-title content() }
h2 { string-set: chapter-title content() }
These rules also place the book title in the header of left pages,
and the current chapter's title in the header of right-facing pages.
The book title is copied from the text content of the
h1 element while the chapter title is copied from the
text content of the h2 elements
(see Generated Content).
They also specify wider margins in the gutter of the
page spread; binders may need this extra width for a book's binding.
The first page in a document using the default left-to-right reading order is a right page. Imagine the cover or a title page of a book which appear on a right page. The first page of a right-to-left document is a left page.
By putting break-before: left or right at the
very beginning of the document, it will not leave a blank page, but instead will
change whether the document begins on a left or right facing page.
Sometimes it can be useful to select the Nth page in a
document.
The :nth( page selector can be
used to do this:
@page:nth(42) {
    ...
}Sometimes it is necessary to style pages depending on their content; named pages allow us to select pages that contain particular elements. We used this in Restarting page numbering, to apply a style to the table of contents pages to print their page numbers using roman numerals.
The element containing the table of contents has a
page property applied, specifying that this element's
pages are table-of-contents pages.
The page property may be applied to any block-level element
within a non-floating environment in the normal flow.
Then using this page name to apply a different @page
rule to the table-of-contents pages:
@page table-of-contents {
    @top { content: "Table of Contents" }
    @bottom {
        content: counter(page, lower-alpha)
    }
}
More than one element can belong to the same name, in other words, page names behave like CSS classes.
Prince will create a page break between elements belonging to different named pages, including elements without a named page. So in Restarting page numbering, a page break will be inserted after the the table of contents, because the next element has the page name main rather than table-of-contents.
Selectors such as :first,
:, :left and
:right also work with named pages. For example:
@page preface {
    @bottom {
        content: counter(page, lower-alpha)
    }
}
@page preface:first {
    @bottom {
        content: normal;
    }
}
This example only works when a page name is used only once within a
document, such as for the preface of a document
(documents only have one preface).
If you wish to apply a style to the first page of every chapter then you
must use the prince-page-group property to create
page groups:
div.chapter {
    page: chapter;
    break-before: right;
    prince-page-group: start;
}
@page chapter {
    @bottom {
        content: counter(page);
    }
}
@page chapter:first {
    @bottom {
        content: normal;
    }
}
The property prince-page-group: start instructs Prince to
start a new page group.
This is necessary for the div.chapter:first selector to match
the first page of each chapter, instead of only the first page in the first
chapter.
See Page groups.
A special case are blank pages.
As we discussed in the previous section,
break-before: right can be used to place
the first page of a chapter on the right page in a spread. If the previous
page is a right page, two page breaks are inserted, leaving a blank left page.
However, this page will have normal
@page styles
applied to it, which is usually not what people want. The :blank
page selector can be used to change the style of blank pages, pages skipped
such as a left page before a break-before: right, including
removing any content.
@page:left {
    @top-left {
        content: counter(page);
    }
}
@page:right {
    @top-right {
        content: counter(page);
    }
}

@page:blank {
    @top-left {
        content: normal;
    }
    @top-right {
        content: normal;
    }
}

h1 {
    break-before: right;
}
This example clears the generated content used on these pages. This works
because :blank is more specific than either :left
or :right. The :blank page selector can also be
used with named pages.
@page frontmatter {
    @bottom { content: counter(page, lower-roman); }
}

@page frontmatter:blank {
    @bottom { content: normal; }
}
If chapter 1 also resets page numbering, then the page numbers will be reset on the first content page, i.e. a non-blank page.
It is not always desirable to have no content on blank pages. Sometimes otherwise blank pages are required have some content, such as a notice saying "This page intentionally left blank". For example, in legal documents, this prevents people from mistaking a dangerous printing error for an intentionally blank page.
When consecutive elements belong to the same named page
but logically separate structures (such as individual chapters)
Prince combines them into one page group.
This causes it to apply the :first page selector
to the first page of the whole page group only (the first page of chapter 1).
Instead we usually want :first applied to the first page of
each chapter.
This can happen either:
h1 which may have
break-before: right applied
(this can be seen in Fancy headers);
div.
Prince provides the prince-page-group property that can
be used to start a new page group.
It can be seen in Fancy headers applied to h1 elements
in the body of the document.
div.body h1 {
    break-before: right;
    prince-page-group: start;
    ...
}
prince-page-group also forces a page break,
overriding any properties that attempt to avoid page breaks.
The more specific left and right page take
precedence over prince-page-group.
Prince will create page breaks automatically when new content will not fit on a page. Sometimes it is useful or necessary to control where page breaks should and should not be used. There are two ways to do this, and both are useful in different circumstances: page breaks can be added or prohibited with the Page breaks properties, and you can control where, within a paragraph, a page break may occur with the Widows and orphans properties.
The simplest case is when you want to explicitly create a page break. This is typically used at the beginning of a chapter, to start the new chapter on a new page.
h1 {
    break-before: page;
}
break-before
is used to force a page break immediately before an
h1 element,
New chapters are often started on the recto
pages in text books, this is usually the right page:
h1 {
    break-before: right
}
Other values are auto, avoid, avoid-page,
avoid-column, left, as well as recto,
verso and column.
The previous example could therefore also have been written in the following, more semantic (and possibly more flexible) way:
h1 {
    break-before: recto
}
The property break-after may also be used
to force a page break after an element.
It is necessary to force a page break when creating overhead slides.
This can be done by placing the content for each slide in a
<div class="slide"> and using
break-before: page as shown below.
This example shows other styling that may be required to create presentation
slides.
CSS
@page {
    size: 1280px 960px;
    @bottom-left {
        content: "Presentation Title";
    }
    @bottom-right {
        content: counter(page);
    }
    background: black;
    color: white;
    font-family: DejaVu Sans, sans-serif;
    font-size: 16pt;
    margin: 96px;
}

@page:first {
    @bottom-left { content: normal }
    @bottom-right { content: normal }
}

div.centerpage {
    /*
     * Cause the content on these pages to begin part-way through
     * the page. This is useful for a title page.
     */
    margin-top: 33%;
}

body {
    font-size: 28pt;
    font-family: DejaVu Sans, sans-serif;
    color: white;
}

div.slide {
    break-before: page;
}
HTML
<div class="slide">
  <h2>Slide Title</h2>

  <p>
    Lorem ipsum dolor sit amet, consectetur adipiscing elit, sed do
    eiusmod tempor incididunt ut labore et dolore magna aliqua. Ut enim
    ad minim veniam, quis nostrud exercitation ullamco laboris nisi ut
    aliquip ex ea commodo consequat. Duis aute irure dolor in
    reprehenderit in voluptate velit esse cillum dolore eu fugiat nulla
    pariatur. Excepteur sint occaecat cupidatat non proident, sunt in
    culpa qui officia deserunt mollit anim id est laborum.
  </p>
</div>
The font-family and color properties are
specified both in the @page and body rules, even
though they're the same.
This is required because the page regions are outside of the
body and must be styled separately, likewise the content within
body cannot be styled by the @page rule.
A rendered slide for this example is shown in Presentation slides example . The example has been adapted from slides (HTML+CSS) for a presentation about the Mercury programming language. This is part of our samples repository. You are encouraged to use samples from the repository and contribute your own.
So far we have discussed forcing a page break,
however suppressing page breaks is also important.
For example,
it is poor style to have a page break between a header and the first
paragraph of a section.
Therefore, the default Prince stylesheet will use the
break-after property to suppress page breaks
immediately after headers:
h1, h2, h3, h4, h5, h6 {
    break-after: avoid
}
If a heading occurs at the bottom of a page, it may be moved to the next page to keep it with the content that follows it, usually a paragraph.
Avoiding page breaks within an element is also important.
For example, it is best to avoid breaks within a figure or table.
This can be done with the
break-inside property:
.figure, table {
    break-inside: avoid
}
If the figure or table would have been split across two pages, it may be moved to the next page to keep it in one piece. An element longer than one page will still need to be split across multiple pages.
The break-inside property cannot be used
to create forced page breaks;
its only valid values are auto and avoid.
These three properties can be applied to block-level elements, table rows and table row groups that occur within an in-flow element (ie. inside the normal flow of the document, not inside a float or an absolutely positioned block). Therefore the figure and table example only make sense when the figure or table is not floated.
Prince also supports the properties page-break-before,
page-break-after and page-break-inside
from the CSS 2.1 specification. However, you are encouraged to use the newer
properties break-before, break-after
and break-inside from the CSS Fragmentation Module
Level 3.
Page breaks have similarities with column breaks, see Columns.
When a page (or column) break occurs within a box (such as a div) its bottom
and top borders are cloned so that they also appear at the bottom of the
first section and the top of the second section of the box.
This is shown in the left of Box decoration break sample.
This is the default but may be set with the
box-decoration-break property, setting its value to
clone.
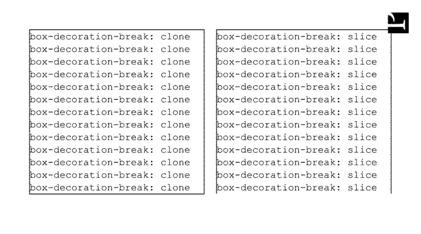
box-decoration-break property.
On the left the clone value is used while on the right
slice is used.
The
PDF
and
HTML
are available for download.
div.box1 {
    box-decoration-break: clone
}
If instead you wish the borders to remain open, as if the box were simply
sliced in half,
as in the right of Box decoration break sample,
then you can set this property to slice.
div.box2 {
    box-decoration-break: slice
}
Just as breaking a page between a heading and the first paragraph below
the heading can look bad, breaking the page after only one or two lines
of a paragraph also looks bad. These stray lines are called
orphans.
The minimum number of orphans to allow can be specified with the
orphans property (the default is 1).
p {
    orphans: 2
}
Likewise the minimum number of lines to move to a new page
(widows)
can be specified with the widows property
(the default is 1).
p {
    widows: 2
}
It can be easy to confuse widows and orphans. However a mnemonic device can help: "An orphan is alone from the beginning [of the paragraph]; a widow is alone at the end [of the paragraph]". (Source Widows and orphans — Wikipedia).
When typesetting a magazine or flier it can be useful to print right to the
edge of the paper. However most printers will refuse do do this. It is better
to print on larger stock and then crop the paper to the correct size.
If you use the marks property, Prince will create
bleed and trim areas around your content (and the declared page size).
This can be seen in the catalog example, adapted from the
Catalog sample
in the Prince samples repository.

@page{
    size: 8.5in 10.5in;
    margin: 0;
    background: url("images/CatalogueCover.jpg");
    background-position: center;
    background-size: 104%;
    background-repeat: no-repeat;
    marks: crop cross;
    prince-bleed: 0.25in;
    prince-trim: 0.25in;
}
This example uses some of the properties that we introduced above, plus
three new ones: marks, prince-bleed
and prince-trim.
These options enable crop and cross marks and specify bleed and trim areas.
Note that size of the content does not change when we add these options,
the page is still 8.5in by 10.5in as specified by the
size property.
Instead 0.25in of bleed area and 0.25in of trim area has been added to each
edge (1in total).
Therefore we will need to print on 9.5in by 11.5in paper.
Prince will print solid background colors and repeating pictures into the
bleed area - we set the background size to 104% so that it would print
into the bleed area.
Prince also allows the placement, length and width of the crop marks to be
specified respectively with the
prince-mark-offset,
prince-mark-length and
prince-mark-width properties.
Generated content is text and other content that is not found in the original
input document, but is added to the output from a style sheet using the CSS
content property. Useful applications of this
property include Page regions,
List markers or Footnotes.
Generated content is inserted by means of several functions that typically are
used within the content property. However,
please note that these functions are not unique to the content
property, but can be used for the same purpose in several other ones, namely:
See also the section on CSS Functional Expressions for additional details on these functions.
The most simple use of generating content in these properties is to insert a
literal string. A literal string can also be passed as an argument to the
leader() function, which expands to fill the available space on
the line like justified text, by repeating the string as many times as necessary.
The properties can also insert external content fetched from another resource. This can be done with the following functions:
url(url) function, returning the text content at the given URL,target-content(url) function, referencing the text content
of the linked element (see Using target-content()), orprince-base-url() function, returning the base URL of the
current document.
It can also be done with the prince-fallback(url) function, which
works just like the url() function, but also has the
possibility of specifying a fallback content, in case the
loading of the URL should fail.
The content to be inserted can also be fetched from the attributes of other
elements with the attr(attribute-name) function, or from
other elements with the following mechanisms:
position
property and its running(name) function, and inserted with the
element(name) function. Alternatively, it can be removed with the
prince-flow property, to be inserted with the
flow(name) function. See the documentation for
Taking elements from the document for more details.
string(ident) function after having
been defined in the string-set property with the
content() function. This does not remove the element from the natural
document flow, but instead copies it into the page region. See
Copying content from the document.
The following functions can also be used for different forms of counters:
counter(name) function generates a value for the innermost
counter,counters(name, "separator") function concatenates counters on all
levels;target-counter(url, counter) function retrieves the value of the
innermost counter with a given name at the given URL, andtarget-counters(url, counter, "separator")
function retrieves the value of all
counters of a given name from the end of the given URL.
All counter functions can take an optional argument to define the counter
style (see Counter styles). Prince also offers two
mechanisms to create user-defined counter styles: either by means of the
prince-script() function (see below, and
User-defined counter styles), or by means of the generated
content functions repeat(string+),
defining a sequentially repeated pattern for numbering the items, or
symbols(string+), defining the symbols used for
numbering the items.
Last but not least, Prince supports arbitrary JavaScript functions to be called
from CSS generated content using the prince-script() function (see
Script Functions).
A special function is prince-glyph-index(int), which allows
to choose a glyph from a font by the index of that glyph in the font. Note that this
is very non-portable, as glyph indices are specific to individual font versions.
But it is a possible escape hatch for people who need a specific glyph and don't
have any other way of accessing it (by Unicode character or OpenType substitution).
page-policy value
The generated content functions element(), counter(),
counters(), string() and flow(), have
a second, optional argument, namely page-policy, which can be
one of the following:
startfirststart if the counter was not set on this page;first-exceptlaststart if the counter was not set on this page.
The page policy values of the string() function are only
meaningful for string() used in page region content.
For a good example of its use, please see Copying content from the document.
The content property can be applied to the
::before and ::after pseudo-elements to add generated
content before or after an element. For example, adding section numbers in front
of headings or including quotation marks around a block of text.
CSS
h1::before, h1::after { content: "***" }
This will place three asterisks before and after h1 elements.
Counters are the mechanism provided by CSS to perform numbering. They can be used to number list items, pages, footnotes, sections and any other document content that needs to be numbered.
To use a counter, it first needs to be initialized with the
counter-reset property, which can be applied
to any element and initializes one or more counters to the specified values,
or to zero if no value is specified. The property can be used to reset a
counter by re-initializing it.
Unless the resetting of a counter creates a nested counter, the scope of the counter includes the current element and all of its following siblings.
The counter-increment property applies to any
element and increments or decrements one or more counters by the specified
values, or by one if no value is specified.
The counter-increment and
counter-reset properties are ignored on
elements whose display property has the
value none.
Once initialized, a counter can be displayed with either the counter()
or counters() function in a content
property.
The counter() function generates a value for the innermost counter,
formatted in the optional counter style (decimal by default - see
Counter styles).
The counters() function concatenates counters on different levels,
separated with the separator string and formatted in the optional counter style
(decimal by default - see Counter styles).
CSS
div.example1 { counter-reset: h3 h4 }
div.example1 h3 { counter-increment: h3 }
div.example1 h4 { counter-increment: h4 }
div.example1 h3::before { content: counter(h3) }
div.example1 h4::before {
    content: counter(h4, lower-alpha)
}
This creates two counters inside the scope of
a div element. All h3 and h4 heading
elements will be numbered starting from 1 and the counter number will be
placed before the heading text.
CSS
div.example2 { counter-reset: h3 }
div.example2 h3 {
    counter-increment: h3;
    counter-reset: h4
}
div.example2 h4 { counter-increment: h4 }
div.example2 h3::before { content: counter(h3) }
div.example2 h4::before {
    counter(h4, lower-alpha)
}
In this example the h4 counter will be reset at each
h3 element, to produce sub-section numbering that restarts
at each new section.
If a counter is reset on an element and the same counter has also been reset on an ancestor of that element, a nested counter will be created. The scope of the nested counter is the current element only and its final value will not be carried onto its following siblings.
For example, a nested XHTML list with a ul element inside a
li inside another ul creates a nested
list-item counter.
CSS
ol { counter-reset: list-item }
li { counter-increment: list-item }
li::marker {
    content: counters(list-item, ".", decimal);
    color: brown;
    font-weight: bold
}
Counter values are displayed as decimal numbers by default, but they may be displayed using other styles such as roman numerals or consecutive letters of the alphabet.
CSS
chapter { counter-increment: chapter-num }

chapter::before {
    content: "Chapter " counter(chapter-num, upper-roman)
}
This rule will generate text such as "Chapter IV" before each chapter, with the appropriate chapter number displayed in uppercase roman numerals.
The following table shows examples of the various counter styles:
| decimal | 1, 2, 3, … 9, 10, 11, … |
| decimal-leading-zero | 01, 02, 03, … 09, 10, 11, … |
| lower-roman | i, ii, iii, iv, v, vi, … |
| upper-roman | I, II, III, IV, V, VI, … |
| lower-alpha, lower-latin | a, b, c, … z, aa, ab, … |
| upper-alpha, upper-latin | A, B, C, … Z, AA, AB, … |
| asterisks | *, **, ***, ****, … |
| lower-hexadecimal | 1, 2, 3, … 9, a, b, c, … |
| upper-hexadecimal | 1, 2, 3, … 9, A, B, C, … |
| octal | 1, 2, 3, 4, 5, 6, 7, 10, 11, 12, … |
| binary | 1, 10, 11, 100, 101, 110, 111, … |
| arabic-indic | ١, ٢, ٣, ٤, ٥, ٦, … |
| lower-greek | α, β, γ, …, ι, κ, λ, … |
| upper-greek | Α, Β, Γ, …, Ι, Κ, Λ, … |
| persian / urdu | ۱, ۲, ۳, ۴, ۵, ۶, … |
| cjk-decimal | 一, 二, 三, 四, 五, 六, … |
| japanese-informal | 一, 二, 三, 四, 五, 六, … |
| simp-chinese-informal | 一, 二, 三, 四, 五, 六, … |
| trad-chinese-informal | 一, 二, 三, 四, 五, 六, … |
| japanese-formal | 壱, 弐, 参, 四, 五, 六, … |
| simp-chinese-formal | 壹, 贰, 叁, 肆, 伍, 陆, … |
| trad-chinese-formal | 壹, 貳, 參, 肆, 伍, 陸, … |
| lower-norwegian | a, b, c, … z, æ, ø, å, aa, ab, … |
| upper-norwegian | A, B, C, … Z, Æ, Ø, Å, AA, AB, … |
| lower-russian | а, б, в, г, д, е, ж, … |
| upper-russian | А, Б, В, Г, Д, Е, Ж, … |
| lower-ukranian | а, б, в, г, д, е, є, … |
| upper-ukranian | А, Б, В, Г, Д, Е, Є, … |
| lower-belarusian | а, б, в, г, д, е, ж, … |
| upper-belarusian | А, Б, В, Г, Д, Е, Ж, … |
| lower-bulgarian | а, б, в, г, д, е, ж, … |
| upper-bulgarian | А, Б, В, Г, Д, Е, Ж, … |
| lower-serbian | а, б, в, г, д, ђ, е, … |
| upper-serbian | А, Б, В, Г, Д, Ђ, Е, … |
| repeat(x, y, z) | x, y, z, xx, yy, zz, xxx, yyy, … |
| symbols(x, y, z) | x, y, z, 4, 5, 6, … |
See also User-defined counter styles for custom counters.
Prince supports cross-references using generated content with two special
functions: target-counter() and target-content().
The target-counter() function can be used with the
content property to reference the
value of a counter at a linked element.
CSS
a[href]::after {
    content: " [See page " target-counter(attr(href), page) "]"
}
This will add a cross-reference after every link with the correct page number determined automatically. For example: [See page 17].
The target-counter() function can specify any counter, allowing
cross-references to refer to list items, chapters or sections as well as pages.
The target-counter() function can also take an optional counter
style, similar to the normal counter function.
CSS
a[href]::after {
    content: " [See chapter "
	     target-counter(attr(href), chapter, upper-roman)
	     "]"
}
This will add a cross-reference after every link with the correct chapter number determined automatically and displayed using roman numerals. For example: [See chapter IV].
The target-content() function can be used with the
content property to reference the
text content of a linked element.
CSS
a[href]::after {
    content: " [See '" target-content(attr(href)) "']"
}
This will add a cross-reference after every link that includes the text of the element being linked to, such as a chapter title. For example: [See 'Introduction'].
Prince supports arbitrary JavaScript functions to be called from CSS generated
content using the prince-script() function (see the
content property). To make the functions available
to CSS, the Prince.addScriptFunc method is used
(see The Prince Object).
Please note that Prince is not running JavaScript by default - it needs to be explicitly enabled. See Applying JavaScript in Prince.
CSS
p::after {
    content: prince-script(myfunc)
}
JavaScript
function myfunc()
{
    return "Some generated content text!";
}

Prince.addScriptFunc("myfunc", myfunc);
JavaScript functions have access to the current date and time, which can be
added to the document using prince-script() in generated content.
CSS
@page {
    @top {
	content: prince-script(datestamp)
    }
}
JavaScript
Prince.addScriptFunc("datestamp", function() {
    return (new Date()).toString();
});
The JavaScript functions used with prince-script() can take
arguments that are themselves generated content. This allows functions to
operate on counter values and implement new counter styles.
CSS
li::marker {
    content: prince-script(mycounterstyle, counter(list-item))
}
JavaScript
Prince.addScriptFunc("mycounterstyle", function(n) {
    if (n == 1) return "one";
    else if (n == 2) return "two";
    else if (n == 3) return "three";
    else return n;
});
For another way of creating user-defined counter styles, see Generated Content Functions.
JavaScript can be used to transform documents by generating tables of contents and indices, sorting tables, rendering charts and graphs, and other tasks that go beyond the scope of CSS.
Scripts can access and modify the input document using the W3C standard DOM (Document Object Model). Prince also supports some additional properties and methods described below.
Please note that Prince is not running JavaScript by default - it needs to be explicitly enabled. See Applying JavaScript in Prince.
Prince is a user agent producing primarily documents meant to be printed, and as such, some limitations are in place that set it apart from most other user agents that support JavaScript.
The most notable difference is the fact that a printed page cannot be interactive,
being static in nature: a document cannot be modified after it is deemed to be ready
for print. JavaScript can be run twice only: the first time it is run before layout,
where it interacts with and modifies the layout (and the DOM structure). Once layout
is finished, JavaScript can be run a second time from the complete event
handler (see Event Handling). However, this time it is only allowed to
inspect the layout and cannot modify the DOM. See also The "Two-Pass" Solution.
A consequence of the non-interactive nature of printed media is that any interactive
events, such as e.g. onClick, do not make sense, and will never fire.
Prince allows also for scripts to be passed directly to the PDF, to be executed
when the PDF file is opened. The prince-pdf-script
property is used for this purpose. A common use case is to activate the "Print"
dialog automatically. See also PDF Actions.
Prince supports most of ECMAScript 5th edition (ES5), but not strict mode. Later editions of ECMAScript are not supported.
A full list of all supported JavaScript objects, methods and properties can be found in the References section in JavaScript Support. Here we shall just illustrate a few highlights from Prince's JavaScript support.
The Prince log can be accessed from JavaScript via the
Log object
(also available as Prince.Log),
which has the following methods:
Log.info("message")
Log.warning("message")
Log.error("message")
Log.data("name", "value")
When running Prince from the command-line, the console object
can be used to write messages directly to the terminal:
console.log("Hello, world!")Console access is only supported when running Prince directly from the command-line, and should not be used when calling Prince through a server wrapper or graphical user interface.
When the document has been fully parsed and is ready for processing, Prince
will fire the DOMContentLoaded and load events on
the window object.
These load events can be captured by setting the onload
attribute on
the body element in HTML documents, or by setting the
window.onload property or calling
window.addEventListener.
When document conversion has finished, Prince will fire the
complete event on the Prince object. This event can
be captured by calling Prince.addEventListener, and is useful for
logging document statistics, or for using the output for The "Two-Pass" Solution.
When multiple documents are processed into one PDF, the complete
event will only fire once, on the first document.
User interface events such as onclick are not supported by Prince.
The Prince.pageCount
property can be accessed after document conversion has finished, then logged as
data for the calling process to access:
function logPageCount()
{
    Log.data("total-page-count", Prince.pageCount);
}

Prince.addEventListener("complete", logPageCount, false);
See also The "Two-Pass" Solution for another use of accessing document properties after the document conversion has finished.
The Prince
object can be used to control various scripting aspects in Prince.
Prince.addScriptFunc(name, function)
Prince.trackBoxes = (boolean)
Prince.convertToFile(JSON, OutputFileName, ...optional extra job resources)
Prince.convertToBuffer(JSON, ...optional extra job resources)
The Prince.addScriptFunc
method takes two arguments: the string name that will be exposed to CSS, and the
function itself. See Script Functions for an example.
Prince.trackBoxes
is a bool that will enable the box tracking API if set to true, so that it can be
used later in the complete event. See The Box Tracking API.
The Prince.convertToFile
and Prince.convertToBuffer
methods allow you to start new Prince jobs:
convertToFile(JSON, OutputFileName, ...optional extra job resources)
- returns bool indicating success
convertToBuffer(JSON, ...optional extra job resources)
- returns ArrayBuffer if successful, null if not
Whereby JSON is a job description similar to the one specified in
the Prince Control Protocol, while the optional extra job resource
arguments are ArrayBuffers or strings that can be referenced from the JSON
using the job-resource: URLs. See Prince Control Protocol.
The PDF object can
be used to specify PDF properties and settings, including attaching extra files
to the generated PDF, similar to the
--attach
command-line argument:
PDF.attachFile(url, description?)

PDF.attachFile("data.xls", "Latest sales figures.");
Other PDF properties, which are set by assignment, include:
PDF.embedFonts = (boolean)
PDF.subsetFonts = (boolean)
PDF.artificialFonts = (boolean)

PDF.compress = (boolean)

PDF.encrypt = (boolean)
PDF.userPassword, PDF.ownerPassword = (string, can be null)
PDF.allowPrint, PDF.allowModify, PDF.allowCopy, PDF.allowAnnotate = (boolean)
PDF.keyBits = "40" | "128"

PDF.script = (string, can be null)
PDF.openAction = (eg. "print")
PDF.pageLayout = "single-page" | "one-column" | "two-column[-left/right]"
PDF.pageMode = "auto" | "show-bookmarks" | "fullscreen" | "show-attachments"
PDF.printScaling = "auto" | "none"
PDF.duplex = "auto" | "simplex" | "duplex-flip-short-edge" | "duplex-flip-long-edge"

PDF.profile = (string, can be null)
PDF.outputIntent = (URL string, can be null)

PDF.objectStreams = (boolean)

PDF.title
PDF.subject
PDF.author
PDF.keywords
PDF.creator

PDF.lang
There is one more PDF object not mentioned so far: the
PDF.pages
object is different from all preceding PDF objects - the latter ones are set
before document conversion begins, while the former becomes available only after
the complete event (see Event Handling) and returns a
list of boxes - see The Box Tracking API.
The box tracking API must be enabled with
Prince.trackBoxes
before formatting starts.
Prince.trackBoxes = true;
It then becomes available in the complete event (see
Event Handling), when you can call the
getPrinceBoxes()
method while iterating through the required DOM elements, to return a list of
boxes.
Prince.addEventListener("complete", function() {
  var xs = document.getElementsByTagName("ins");
  for (var i = 0; i < xs.length; ++i)
    {
      var ins = xs[i];
      var boxes = ins.getPrinceBoxes();
    }
}, false);
The PDF.pages
array mentioned earlier (see The PDF Object) also is available only
after the complete event and also returns a list of boxes
(see Page regions).
function printbox(str,box) {
  console.log("");
  for (var i in box) {
    console.log(str+i+": "+box[i]);
  }
  for (var i=0; i<box.children.length; i++) {
    printbox(str+"  ",box.children[i]);
  }
}

Prince.addEventListener("complete", function() {
  var pages = PDF.pages;
  for (var i = 0; i<pages.length; ++i)
    {
      console.log("PAGE "+(i+1)+" HAS THESE BOXES");
      printbox("  ",pages[i]);
    }
}, false);
Boxes are JavaScript objects with some or all of the following properties:
type =     "BODY" |
           "COLUMN" |
           "FLEXLINE" |
           "FOOTNOTES" |
           "FLOATS" |
           "BOX" |
           "LINE" |
           "SPAN" |
           "TEXT" |
           "SVG" |
           "IMAGE"
pageNum =  the page of the current box
x =        x-coordinate, in pt
y =        y-coordinate, in pt (set to zero on some boxes)
w =        width, in pt
h =        height, in pt (set to zero on some boxes)
children = array of child boxes
parent =   parent box
element =  DOM element for box (may be null)
pseudo =   pseudo-element name or null
text =     string
src =      URL string for images
style =    CSS style object for box
The x, y, w and h measures,
defining respectively the x- and y-coordinates and the width and height of the
box, use the same coordinate system as the PDF, i.e. the box tracking
units are measured in points (pt) and the origin is the lower left
corner of the page.
The box with the value BODY represents the page area returned by
PDF.pages
(and thus is not necessarily equivalent with the body element);
the content of the page-margin boxes is not included in the tree (see
Page regions for the definition of page area and
page-margin boxes).
The properties of a box can be queried with the
BoxInfo()
method.
Since the box tracking API is available only after the complete
event, it cannot be used to modify the document (see JavaScript in Printed Media).
However, see The "Two-Pass" Solution for making use of its output. Two further sample applications of the box tracking API can be seen in the Changebars example, and in Detecting Overflow.
The following DOM properties are not supported in Prince:
document.write
window.setInterval
Prince supports a wide range of graphic features, treated in more detail in the following sections. RGB, RGBA, HSL, HSLA, CMYK, and named spot colors are supported, and so is color management. Bitmap images and SVG are supported.
Prince supports RGB, RGBA, CMYK, HSL, HSLA and named spot colors. For Prince's color management, please see the Color Management section.
Prince understands CSS basic color names as well as the list of extended color
keywords from the CSS
Color Module Level 4. It also supports the keywords transparent
and currentColor.
To use an RGB color in CSS, it can be expressed either as a value in hexadecimal notation,
as an rgb() function or as a named color. For example, red can be specified
in three ways:
color: #ff0000
color: rgb(255, 0, 0)
color: red
RGBA colors are equivalent to RGB plus an opacity (or alpha) value between 0 and 1.
When the opacity is 0 the color is transparent, and when the opacity is 1 the
color is identical to the RGB color. RGBA colors are expressed as an rgba()
function.
color: rgba(255, 0, 0, 1)    // red
color: rgba(255, 0, 0, 0.5)  // translucent red
color: rgba(255, 0, 0, 0)    // fully transparent
CMYK colors can be specified using the cmyk() or, alternatively, the
equivalent device-cmyk() function syntax. An optional fifth value is
for the alpha channel, i.e. for opacity.
color: cmyk(1, 0, 0, 0)       // cyan
color: cmyk(0, 1, 1, 0)       // red
color: cmyk(0, 0, 0, 1)       // black
color: cmyk(0, 1, 1, 0, 0.1)  // translucent red
HSL(A) colors are supported as of Prince 12.1 .
HSL (Hue-Saturation-Lightness) color values can be specified with the hsl()
function. HSL takes three values:
0 or 360 is red, 120 is green, 240 is blue);
Just as with RGB values expressed with the rgb() function an alpha
channel for opacity can be added with the rgba() function, so also
for HSL color values an alpha channel can be expressed with the hsla()
function, which adds a fourth value for alpha - when the opacity is 0 the color is
transparent, and when the opacity is 1 the color is identical to the HSL color.
The advantage of HSL over RGB is that it is much more intuitive to use and easier to create sets of matching colors (by keeping the same hue and varying the lightness and saturation values).
Prince also supports named spot colors that can be defined with the
@prince-color
rule. An alternate color must also be specified with the alternate-color
property, using any of the valid notations for RGB, HSL or CMYK colors. This will be used
in situations where the named color is not available, such as when viewing the generated
PDF file on a display. Please note that alternate-color cannot
be RGBA, HSLA or CMYKA.
@prince-color MyColor {
    alternate-color: rgb(255,0,0)
}
Spot colors can be used with the prince-color() function with a specified
tint value between 0 and 1, which defaults to 1, or alternatively expressed in percentage.
They can also enable overprint:
color: prince-color(MyColor)                  // tint 1.0
color: prince-color(MyColor, 0.5)             // tint 0.5
color: prince-color(MyColor, overprint)       // tint 1.0, overprint
color: prince-color(MyColor, 50%, overprint)  // tint 50%, overprint
Another way to enable overprint is by using the prince-overprint()
function, which allows to specify a non-transparent color value.
color: prince-overprint(red);
color: prince-overprint(cmyk(0,1,1,0));
The purpose of color management is to keep the appearance of colors consistent as they are converted between different devices and media. This is e.g. of advantage when preparing a PDF file on a computer screen before sending it to a printer - the desirable result will be to have a print that looks as close as possible to the display on the screen. Perfect equivalence is not possible, also not least because of the difference between a device with reflected light, such as paper, and one with direct light, such as a screen, but color management helps to achieve a close match in perception.
The conversion of color is facilitated by profiling devices; the set of data that characterizes a device or color space, i.e. the color attributes of the device, is kept as an ICC color profile. Color profiles are often embedded in image files to denote the color space of the image. When the color space is not known, color values are essentially arbitrary numbers without a physical interpretation.
The aim of Prince, within a color-managed workflow, is to preserve color information (namely, color profiles) from the input documents and images, through to the PDF output file.
As described in the PDF Versions and Profiles section, both PDF/A and PDF/X profiles impose restrictions on the features that may be used in a PDF file, including restrictions on color.
PDF/A and PDF/X files have an output intent that defines the intended output color
space of the PDF file. In Prince, the output intent color profile is selected using
the --pdf-output-intent
command-line option, or using the prince-pdf-output-intent property
inside a @prince-pdf
at-rule. Both take a filename or URL to an ICC profile as its value.
The URL specified with the --pdf-output-intent
command-line option or the prince-pdf-output-intent
property will be resolved relative to the base URL of the style sheet or document
in which the rule is, and needs to point to an existing color profile file.
@prince-pdf {
    prince-pdf-output-intent: url("ISOcoated_v2_eci.icc")
}
For PDF/X, the output intent must be given as it describes the intended printing process. For PDF/A, Prince assumes an sRGB ICC profile if an output intent is not given.
Briefly, the restrictions on color imposed by PDF/X are:
PDF/A requires that all colors to be device-independent, or else characterized by the output intent (thus making them device-independent). Transparency is not allowed.
Prince supports RGB, RGBA, HSL, HSLA, CMYK, and named spot colors. For Prince's color handling, please see the Color section.
As CSS defines RGB colors in the sRGB color space, Prince tags those colors with an sRGB ICC profile in the PDF output. See also the section on Rich black and true black below.
CMYK colors specified using the cmyk() function syntax, or equivalent
device-cmyk() syntax, represent device-dependent colors, so they will
be left as such in the PDF when possible. Device-dependent color is not allowed in
PDF/A or PDF/X, so those CMYK colors will be assumed to be either in the output intent
color space (if it is CMYK), or else the color space of the fallback CMYK profile.
See the command-line option --fallback-cmyk-profile
in the PDF Output Options section, or the prince-fallback-cmyk-profile
property.
prince input.html
       --pdf-profile=PDF/A-1b
       --pdf-output-intent=sRGB.icc
       --fallback-cmyk-profile=ISOcoated_v2_eci.icc
@prince-pdf {
prince-pdf-output-intent: url("sRGB.icc");
prince-fallback-cmyk-profile: url("ISOcoated_v2_eci.icc");
}
Prince preserves the ICC profiles embedded in bitmap images, unless directed not to
(see the ignore-icc-profile value of the prince-image-magic
property). If an image does not have an embedded ICC profile, the behavior depends
on the color model of the image. Untagged RGB images will be assumed to be in the
sRGB color space. Untagged CMYK images will, when necessary, be assumed to be either
in the output intent color space (if it is CMYK), or else the color space of the fallback
CMYK profile. Untagged grayscale images will be left as DeviceGray in the PDF (in
PDF/A and PDF/X, it means it is characterized by the output intent color space).
Prince will convert all the colors in a document to a single color space if the
--convert-colors
command-line option or the prince-pdf-color-conversion
property is used. The destination color space is specified with the
--pdf-output-intent
option (or the prince-pdf-output-intent property), even when
not producing PDF/A or PDF/X files.
Prince automatically converts colors to the output intent color space only when
producing PDF/X-1a files. Files in any of the other profiles need also the
--convert-colors
command-line option or the prince-pdf-color-conversion
property if colors are to be converted.
In printing, "rich black" is a mixture of CMYK ink colors to produce a darker tone than using the black ink alone ("true black").
The property prince-pdf-color-options controls the encoding of
CSS RGB values representing black and grays, i.e. RGB colors with equal values of
red, green and blue.
When the value use-true-black is used, such an RGB value will be encoded
in the DeviceGray color space in the PDF. A CMYK printer should print the gray level
using only the black ink. This is the default setting of Prince.
On the other hand, the use-rich-black value instructs Prince to keep
all RGB colors as RGB in the PDF. A CMYK printer should print RGB colors using a
mixture of all four CMYK inks.
@prince-pdf {
    prince-pdf-color-options: use-rich-black;
}
Color conversion takes into account the use-true-black value when converting
CSS RGB values to CMYK. True blacks and grays will be converted to CMYK with only
non-zero values in the K channel. Note, however, that this does not affect bitmap
images.
The property prince-pdf-page-colorspace controls the color space
of pages in the PDF file. It affects the compositing of transparent content onto
the page by selecting the color space in which compositing is performed. Prince
currently defaults to the RGB color space. It may be useful to set this property
to avoid converting the colors of transparent content before it is composited onto
the page, possibly resulting in distorted colors.
The filter property provides graphical effects like blurring, saturating
or color shifting an element. Filters can be used alone, or combined in any way. However,
the order in which filters are applied matters - applying grayscale() after
any other filter will result in a gray result.
In this section we shall examine the various possibilities offered by this property.
The following filters can be used alone, or in any number and combination. Care is to be taken to the order the filters are being applied.
filter: grayscale([ <number> | <percent> ])This filter converts the input to grayscale. The amount value defines the proportion of the conversion.
filter: sepia([ <number> | <percent> ])This filter converts the input to sepia. The amount value defines the proportion of the conversion.
filter: saturate([ <number> | <percent> ])This filter saturates the input. The amount value defines the proportion of the conversion.
filter: hue-rotate(<angle>)This filter applies a hue rotation to the input. The angle value defines the number of degrees around the color circle that the rotation will be performed.
filter: invert([ <number> | <percent> ])This filter inverts the samples of the input. The amount value defines the proportion of the conversion.
filter: opacity([ <number> | <percent> ])This filter applies transparency to the input. The amount value defines
the proportion of the conversion. This function is similar to the opacity
property.
filter: brightness([ <number> | <percent> ])This filter makes the input appear more or less bright. The amount value defines the proportion of the conversion. Values over 100% are allowed.
filter: contrast([ <number> | <percent> ])This filter controls the level of contrast. The amount value defines the proportion of the conversion.
filter: blur(<length>)This filter applies a gaussian blur to the input. The amount value defines the proportion of the conversion.
filter: drop-shadow(<length>{2,3} <color>?)This filter applies a drop shadow effect to the input. This is a blurred, offset version of the input, composited below the image.
Alternatively, a filter can be written in SVG and can be referenced by a URL:
filter: url(<url>)
The resolution used when rasterizing to images for applying CSS and SVG
filters is controlled through the prince-filter-resolution
property. The default value is 96dpi for compatibility with web
browsers.
Prince supports JPEG, PNG, TIFF and GIF images as well as Scalable Vector Graphics (SVG).
Images can be included in XHTML and DocBook documents using the appropriate image elements, which are pre-defined in the default style sheets.
Images can also be included in arbitrary XML documents using the CSS
content property, which can be used to specify
the image filename.
Furthermore, images are widely used in style sheets for the background. CSS allows also for several mechanisms to manipulate images and background images.
Please note that Prince tries to preserve the ICC color profile embedded in images - for details see the Color Management section.
The img element is used to include images in XHTML documents.
XML
<img src="picture.jpg" alt="A Nice Picture"/>
The imagedata element is used to include images in DocBook
documents.
XML
<mediaobject>
    <imageobject>
      <imagedata fileref="picture.jpg"/>
    </imageobject>
</mediaobject>
Images can be included in arbitrary XML documents by using the CSS
content property to specify the image filename.
The content property can specify the image
filename directly, or it can take the filename from an attribute of the element
to which it has been applied.
CSS
picture { content: url("picture.png") }XML
<para> A nice <picture /> here. </para>
The content property directly specifies the
filename of the image that will be used as the content of the
picture element.
CSS
picture { content: attr("src", url) }XML
<para> A nice <picture src="picture.tiff" /> here. </para>
The content property specifies that the content
of the picture element will be an image loaded from the filename
specified by the src attribute of the element.
Images can be added to a document as content or decoration, and can be modified with the help of CSS properties.
Several properties are available to add background images:
background-image is used to add an image to
a page, while background-position,
background-attachment and
background-repeat are used to position it
precisely, also defining its appearance. See also Background.
Images can also be added to style a
list with the property list-style-image (see
also List marker style).
Usually images have the correct orientation when included in a document.
However, it can be important to honor the orientation field in the EXIF data
of JPEG and TIFF images, which can be done with the
image-orientation property.
The property applies only to content images (e.g. replaced elements and
generated content), not decorative images (such as background-image).
CSS properties also control the size of images in print. Unless an explicit
size for an image is specified by using the width
and height properties, Prince will determine
the intrinsic size from the image resolution (DPI), which can be overridden
using the prince-image-resolution property:
prince-image-resolution: 300dpi;        /* set an explicit DPI */
prince-image-resolution: normal;        /* 1 image pixel maps to 1px unit */
prince-image-resolution: auto, normal;  /* auto-detect, fallback to normal */
prince-image-resolution: auto, 96dpi;   /* auto-detect, fallback to 96dpi */
Not all images have an internal resolution set, so sometimes it is necessary
to specify an explicit resolution. Alternatively, specifying a resolution of
normal means that an image that is 100 pixels wide, will be the
same size on the page as a block that is 100px units wide.
The property prince-background-image-resolution
does the same for background images.
Please note that specifying prince-image-resolution and
prince-background-image-resolution only affects the default DPI of
images, ie. it makes them physically bigger or smaller on the page - it does
not affect the number of pixels in the image, and thus the PDF file size will
be the same.
To reduce the PDF file size, JPEG images can be recompressed at a lower
quality level, or PNG images be converted to JPEG, with the
prince-image-magic property. See also
Image Magic.
SVG can be included in any XML document simply by adding a
svg element.
Global definitions of graphical elements are supported, for example references to elements outside of the current SVG fragment, either in the same document or other documents. Defining these elements in a <defs> element helps understandability of the SVG element. You can use a <use> element to reference those elements later.
The display, float, and flow properties
and all margin, padding, border, and
background
properties can be applied to the top-level svg element but not to
child elements within it.
The following elements are supported
inside the svg element:
g |
for grouping related graphics elements |
rect |
for drawing rectangles |
circle |
for drawing circles |
ellipse |
for drawing ellipses |
line |
for drawing lines |
mask |
for masking another element |
polyline |
for drawing polylines |
polygon |
for drawing polygons |
path |
for drawing arbitrary paths |
text |
for drawing text |
tspan |
for adjusting text and font properties inside the text element
|
image |
for including bitmap image files |
a |
for creating hyperlinks |
defs |
for containing referenced elements |
use |
for using a referenced element |
The svg element should include view box and view port information
so that the SVG content can be correctly mapped to the containing box.
| Attributes | |
|---|---|
width |
the width of the viewport (100% of the container width, if omitted) |
height |
the height of the viewport (100% of the container width, if omitted) |
viewBox(x y width height) |
the x, y coordinate of the top left corner of the viewbox and the width and height of the viewbox |
XML
<svg width="3cm" height="2cm" viewBox="0 0 300 200">
    <!-- the SVG content -->
</svg>
Rectangles are created using the rect element.
| Attributes | |
|---|---|
x, y
|
the x, y coordinates of the top left corner of the rectangle |
width |
the width of the rectangle |
height |
the height of the rectangle |
rx, ry
|
the radii for rounded corners |
XML
<svg viewBox="0 0 500 300"
        width="10cm" height="6cm">
 <g fill="none" stroke="gray" stroke-width="20">
  <rect x="50" y="50" width="400" height="200"
        rx="80" ry="50"/>
 </g>
</svg>
Output
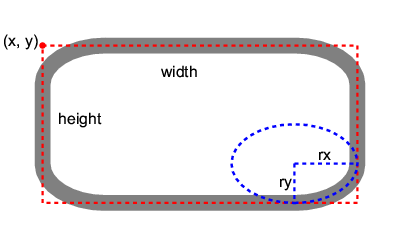
Circles are created using the circle element.
| Attributes | |
|---|---|
cx, cy
|
the centre of the circle |
r |
the radius of the circle |
XML
<svg viewBox="0 0 200 200"
        width="5cm" height="5cm">
 <g fill="none" stroke="gray" stroke-width="20">
   <circle cx="100" cy="100" r="100"/>
 </g>
</svg>
Output

Ellipses are created using the ellipse element.
| Attributes | |
|---|---|
cx, cy
|
the centre of the ellipse |
rx, ry
|
the radii of the ellipse |
XML
<svg viewBox="-10 0 220 200"
        width="6cm" height="6cm">
 <g fill="none" stroke="gray" stroke-width="20">
  <ellipse cx="100" cy="100" rx="100" ry="60" />
 </g>
</svg>
Output
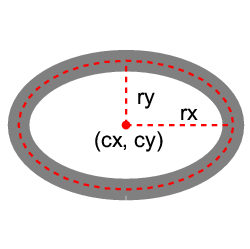
Lines are created using the line element.
| Attributes | |
|---|---|
x1, y1
|
the start point of the line |
x2, y2
|
the end point of the line |
XML
<svg viewBox="0 0 100 50"
        width="6cm" height="3cm">
 <g stroke="gray" stroke-width="2">
    <line x1="10" y1="25" x2="90" y2="25"/>
 </g>
</svg>
Output
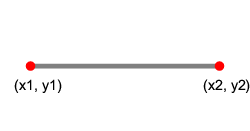
Masks are created using the mask element.
| Attributes | |
|---|---|
x |
the x-axis coordinate of one corner of the rectangle |
y |
the y-axis coordinate of one corner of the rectangle |
width |
the width of the rectangle |
height |
the height of the rectangle |
XML
<svg xmlns:xlink="http://www.w3.org/1999/xlink">
  <defs>
    <linearGradient id="Gradient">
      <stop offset="0" stop-color="white" stop-opacity="0" />
      <stop offset="1" stop-color="white" stop-opacity="1" />
    </linearGradient>
    <mask id="Mask" x="0" y="0" width="200" height="200">
      <rect x="0" y="0" width="200" height="200" fill="url(#Gradient)"  />
    </mask>
  </defs>

  <rect x="0" y="0" width="200" height="200" fill="green" />
  <rect x="0" y="0" width="200" height="200" fill="red" mask="url(#Mask)" />
</svg>
Output

Polylines are created using the polyline element.
| Attributes | |
|---|---|
points |
list of points that defines the line. Points are separated by whitespace and each point is a pair of x, y coordinates separated by comma. |
XML
<svg viewBox="0 0 600 400"
        width="6cm" height="4cm">
 <g stroke="gray" stroke-width="10">
  <polyline points="50,300 200,300 200,100
               400,100 400,300 550,300" />
 </g>
</svg>
Output
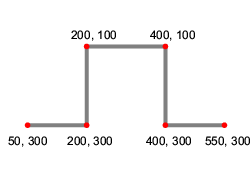
Polygons are created using the polygon element.
| Attributes | |
|---|---|
points |
list of points that defines the line. Points are separated by whitespace and each point is a pair of x, y coordinates separated by comma. |
XML
<svg viewBox="600 0 600 400"
        width="6cm" height="4cm">
 <g fill="none" stroke="gray" stroke-width="10">
    <polygon points="850,75  958,137.5 958,262.5
                    850,325 742,262.6 742,137.5" />
 </g>
</svg>
Output
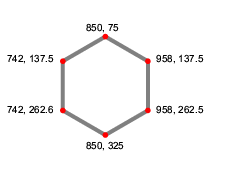
The path element is for drawing arbitrary paths.
The d attribute inside the element path takes
a list of path commands.
Parameters of a command can be separated either by whitespace or a comma.
| Command | Parameters | Meaning |
|---|---|---|
| M (absolute), m (relative) | (x y)+ | moves to the given (x, y) coordinates to start a new subpath |
| Z or z | none | closes the current subpath |
| L (absolute), l (relative) | (x y)+ | draws a line to the given (x, y) coordinates |
| H (absolute), h (relative) | x+ | draws a horizontal line to the given x coordinates |
| V (absolute), v (relative) | y+ | draws a vertical line to the given y coordinates |
| C (absolute), c (relative) | (x1 y1 x2 y2 x y)+ | draws a cubic Bézier curve to the given (x,y) coordinates, uses the given (x1,y1) coordinates as the first control point, the (x2,y2) coordinates as the second control point |
| S (absolute), s (relative) | (x2 y2 x y)+ | short hand of the C/c command: the reflection relative to the current point of the second control point of the previous command is used as the first control point. |
| Q (absolute), q (relative) | (x1 y1 x y)+ | draws a quadratic cubic Bézier curve to the given (x,y) coordinates, uses the given (x1,y1) coordinates as the control point. |
| T (absolute), t (relative) | (x y)+ | short hand of the Q/q command: the reflection relative to the current point of the control point of the previous command is used as the control point. |
| A (absolute), a (relative) | (rx ry x-axis-rotation large-arc-flag sweep-flag x y)+ | draws an elliptical arc to (x, y): the size and rotation of the ellipse are defined by two radii (rx, ry) and the x-axis-rotation; the center (cx, cy) of the ellipse is also determined by the large-arc-flag and sweep-flag constraint. |
XML
<svg viewBox="0 0 600 400"
        width="12cm" height="8cm">
 <g fill="none" stroke="red" stroke-width="10">
    <path d="M100,200 C100,100 250,100
		    250,200 S400,300 400,200" />
 </g>
</svg>
Output
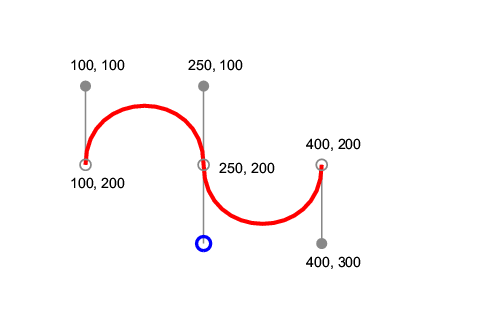
The text element is for writing arbitrary text.
The tspan element is supported inside the text
element, for adjusting text position and font properties.
| Attributes | |
|---|---|
x, y
|
the absolute position of the text |
dx, dy
|
the relative offset of the current text position (optional) |
XML
<svg viewBox="0 0 1000 300"
        width="10cm" height="3cm">
    <text x="200" y="150" fill="blue" font-size="70">
      That
        <tspan dx="2em" dy="-50" font-weight="bold" fill="red" >
          is
        </tspan>
        <tspan dy="100">
           a peach!
        </tspan>
    </text>
</svg>
Output
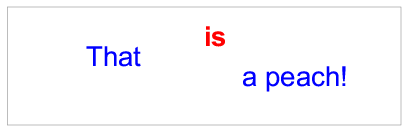
The image element is for including external image files, either
bitmap images or other SVG images.
| Attributes | |
|---|---|
xlink:href |
the URL of the image to include |
x, y
|
the x, y coordinates of the top left corner of the image |
width |
the width of the image |
height |
the height of the image |
Note that the href element must be placed in the XLink namespace:
http://www.w3.org/1999/xlink in order to work.
XML
<svg xmlns:xlink="http://www.w3.org/1999/xlink"
    ...
    <image x="100" y="100" width="50" height="50" xlink:href="myimage.jpg"/>
    ...
</svg>
The a element is for creating hyperlinks.
| Attributes | |
|---|---|
xlink:href |
the URL of the link |
Note that the href element must be placed in the XLink namespace:
http://www.w3.org/1999/xlink in order to work.
XML
<svg xmlns:xlink="http://www.w3.org/1999/xlink"
    ...
    <a xlink:href="http://www.example.com">
        ...
    </a>
    ...
</svg>
The transform attribute can be used on g,
path, and all of the basic shape elements.
It accepts any sequence of the following transformations separated by
whitespace.
XML
<svg viewBox="-150 -200 1400 700" width="12cm" height="6cm">
  <g fill="none" stroke-width="30">
    <rect width="400" height="200" stroke="lightgray"/>
    <rect width="400" height="200" stroke="darkgreen" transform="rotate(-30)"/>
    <g transform="translate(700 100) rotate(-30)">
      <rect width="400" height="200" stroke="blue"/>
    </g>
  </g>
</svg>
Output
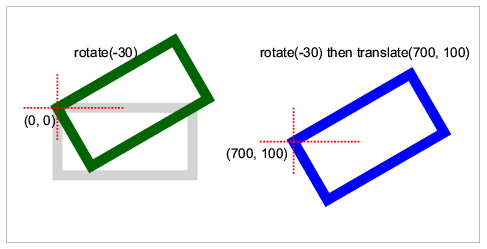
The following style properties are supported on SVG elements:
baseline-shiftclip-pathclip-ruledominant-baselinefont-familyfont-sizefont-stylefont-weightfillfill-opacityfill-rulemarker-startmarker-midmarker-endstop-colorstop-opacitystrokestroke-dasharraystroke-dashoffsetstroke-linecapstroke-linejoinstroke-miterlimitstroke-opacitystroke-widthtext-anchorStyle properties can be applied using SVG presentation attributes:
<rect fill="yellow" stroke="blue" stroke-width="20"
        width="200" height="100"/>
Or by using CSS properties inside the style attribute or element:
<rect style="fill:yellow; stroke:blue; stroke-width:20"
        width="200" height="100"/>
Alternatively, style properties can be applied by linking a stylesheet, or an XML stylesheet:
SVG
...
<?xml-stylesheet type="text/css" href="style.css"?>
...
<rect width="200" height="100"/>
CSS
svg rect {
    fill: yellow;
    stroke: blue;
    stroke-width: 20;
}Prince allows for the output of a rasterized image rather than, or in addition to a PDF output. This produces a JPEG or PNG image of the content, which can be convenient when e.g. planning to use it as a quick preview or thumbnail of the PDF content to display on a website, as can e.g. be seen in the Sample Documents section on this website.
Rasterization is enabled with the
--raster-output
command-line option, which also defines the template of the file naming. The output
format can be chosen either based on the extension of the file name, or by explicitly
indicating it.
prince doc.html --raster-output=page_%02d.png
Furthermore the range of pages to rasterize and the resolution of the raster output can be tweaked in order to determine the number of pages in rasterized format, and the size of the images.
prince doc.html --raster-output=title-thumbnail.jpg --raster-pages=first --raster-dpi=24
If you want to rasterize the HTML to an image format that supports
transparency (PNG, not JPEG) and have a transparent background, in order to
composite it with something else later, the command-line option
--raster-background
can be used with the value transparent.
A full list of rasterization possibilities can be found in the Raster Output Options section.
…aka the Prince Cookbook, collects recipes to achieve certain common or complex tasks useful when preparing a document for printing. Each recipe shows the required features in a "You need" ingredients list and provides a step-by-step explanation to guide you to the required goal.
Prince offers several properties and functions to facilitate the creation of a Table of Contents.
Typically, a table of contents is generated for a document by collecting the
headings of each chapter, each one provided with an id attribute,
into a list or, if necessary, also into nested lists, by means of JavaScript or
in some other way, in order to generate a navigation menu for the document.
Each list item contains a hyperlink to the heading's id. This
list functions as a navigation menu when the document is viewed in a browser.
The transformation into a proper table of contents happens with CSS when Prince generates the PDF - the resulting document will be paged, and possibly be intended for printing. It means that the hyperlinks need to be integrated with an indication of the correct page on which the target is located.
This is achieved automatically with the target-counter() function
in the content property, using the page
counter. The URL is being automatically fetched from the href
attribute of the hyperlink element <a>.
#toc a:after {
  content: target-counter(attr(href), page);
}
The page numbers are best styled right-aligned, while the link texts are
left-aligned. An easy way to achieve this is with the leader()
function: it defines a literal string, which expands to fill the available
space on the line like justified text, by repeating the string as many times
as necessary. The complete CSS entry for a simple table of contents entry thus
looks like this:
#toc a:after {
  content: leader('.') target-counter(attr(href), page);
}Our example document generates at Table of Contents (TOC) by way of JavaScript. You can easily test it by running Prince from the command line:
$ prince --javascript http://css4.pub/2018/toc -o toc.pdf
A second example document generates at ToC by way of JavaScript and, even more impressively, the script also prints out an index which is added to the end of the document, to be used when running Prince a second time (see The "Two-Pass" Solution). Notice how subsequent page numbers in the index are folded into a range. To produce this document, try running these commands from a Linux command-line:
$ wget http://css4.pub/2017/musick/musick.html -o foo.html;
$ prince --javascript foo.html >>foo.html;
$ prince --javascript foo.html -o musick.pdf;
You can view the resulting PDF here.
For longer books, it makes sense to split chapters into separate files. Generating a Table of Contents across all files is tricky in JavaScript since scripts only see one file at a time. In Prince, you can work around this limitation with a two-pass solution (see The "Two-Pass" Solution) where the first pass collects items for the ToC, and the second pass generates the PDF with the ToC.
To try this for yourself, first fetch these five sample files into your own file system, e.g. by running:
$ wget http://css4.pub/2018/multifile-toc/toc.js;
$ wget http://css4.pub/2018/multifile-toc/toc.html;
$ wget http://css4.pub/2018/multifile-toc/ch1.html;
$ wget http://css4.pub/2018/multifile-toc/ch2.html;
$ wget http://css4.pub/2018/multifile-toc/style.css;
Then, run Prince twice:
$ prince --javascript --script=toc.js ch1.html ch2.html -o book.pdf >> toc.html;
$ prince toc.html ch1.html ch2.html -o book.pdf;
You can view the resulting PDF here.
Prince produces PDFs - which are a prominent example of paged media. The main difference with conventional CSS design for browsers is to always keep in mind that you are dealing with pagination, i.e. the content is placed on discrete pages.
The basic unit for paged media in print is the page, organized in page
spreads: the left page, called verso in a left-to-right script
(see Writing Mode), and the right page,
called recto, are of the same size and typically are
symmetrical to each other and are centered on the gutter.
Selected and
Named pages can be placed recto
or verso, and Prince expands several properties and the
@page
at-rule pseudo-classes with the values verso and
recto, or inside and outside,
referring to the layout on each page of the spread to facilitate the
work with page spreads.
You have control on wether to place specific selected and named
pages right or left, or recto or verso with the help
of break-before
and break-after, each of which takes
the values recto and verso in addition to
the traditional values.
h1 {
    break-before: recto;
}
This rule places an h1 element always at the beginning of
a recto page.
Pages can also be specifically targeted and styled with
the @page
at-rule pseudo-classes :right and :left, or
:recto and :verso.
Using the values right and left when placing
elements on pages symmetrically arranged around the central gutter is
possible, but rather cumbersome, since their placement depends on the
placement of the page on a spread. Prince offers the extensions
inside and outside to ease the task.
p {
    margin: 2em;
}
@page:left {
    margin-right: 3em;
}
@page:right {
    margin-left: 3em;
}
This example creates a bigger margin around the central gutter.
So, when you start thinking about the layout box model, Prince
offers the properties margin-inside
and margin-outside to help styling.
p {
    margin: 2em;
    margin-inside: 3em;
}
This example creates a bigger margin around the central gutter, like the previous one - albeit in a shorter way.
Floats are particularly sensitive to the placement on the page with
regards to whether it is a left-facing or right-facing page. Prince
extends the float property (and the
property clear) with the values
inside and outside. For details please see
the chapter Floats.
On a paragraph level, the
properties text-align
and text-align-last similarly take the
keywords inside and outside to help
achieving a smooth layout.
@page:verso {
    @top-left { content: counter(page) }
    @top-right { content: string(book-title) }
}
@page:recto {
    @top-left { content: string(chapter-title) }
    @top-right { content: counter(page) }
}
h1 {
    text-align: center;
    string-set: book-title content();
}
h2 {
    text-align: outside;
    string-set: chapter-title content();
}
img {
    float: inside;
}
This style snippet could be part of the stylesheet for a little booklet - it displays the page number in the upper outside corners, the book title in the upper inside of the left, or verso page, and the chapter title in the upper inside of the right, or recto page. Chapter headings are aligned to the outside of the page spreads, while any image in the book is floated close to the central gutter.
One of the main differences when designing for paged media is that you need to think about concrete pages, as opposed to a continuous flow of the page designed for the web and for web browsers. A problem may arise when elements such as tables are longer than the page they need to be displayed on.
The table itself is naturally split over several pages - but if you
want table headers and footers repeated on each page, you need to code
them in the HTML of the document by using the elements
thead and/or tfoot. The content of these
elements will be carried on to all the subsequent pages on which the
table appears.
Tables can also be provided with a table caption by using the
caption HTML element, or by styling an arbitrary
element with display: table-caption to
be made to behave like caption elements. The caption is
positioned above the table by default, but it can be moved to the
bottom with the caption-side property.
When a table spans across more than one page, the
prince-caption-page property
determines whether table captions will be displayed on the first page
of a table, or only on the following pages, or repeated on every page
that a table appears on. See also Fancy Table Captions.
table + p {
    display: table-caption;
    caption-side: bottom;
    prince-caption-page: following;
}HTML tables only have one caption per table. However, in printed form a table might span several pages (see Long Tables) and it might be desirable to have separate captions for the first and the following pages - you might want to add "cont." to the caption of the first one, or otherwise differentiate them. Prince offers an extension mechanism to do so.
As mentioned in Long Tables, when a table spans
across more than one page, the prince-caption-page
property determines whether table captions will be displayed on the first page of
a table, or only on the following pages, or repeated on every page that a table
appears on. This opens up the possibility to have a different caption
on the first and on the following pages.
You might define a caption in HTML for the main table caption - to
be displayed on the first page. Additionally, you make another
element into a table caption with the
display property - and display it only
on the following pages!
The paragraph functioning as a table caption can be hidden in browsers by using CSS Media Queries.
HTML
<table>
  <caption>Demo table</caption>
  <tr>
    <td>A</td>
    <td>B</td>
  </tr>
  <tr>
    <td>C</td>
    <td>D</td>
  </tr>
  <tr>
    <td>E</td>
    <td>F</td>
  </tr>
</table>
<p>Demo table (cont.)</p>
CSS
caption {
    caption-side: bottom;
    prince-caption-page: first;
}
table + p {
    display: table-caption;
    caption-side: bottom;
    prince-caption-page: following;
}When preparing a document for print, "running" headers and footers repeating on every page, such as page numbering and titles of the book and of the current chapter, are a common need.
Prince uses CSS for these headers and footers and for styling them.
Each page is structured in Page regions - most page content is located inside the page area, including the Footnotes, but the page-margin boxes contain most of the content repeating in slightly varied way across the whole book - the running headers and footers.
A typical case is page numbering, which can easily be obtained with
Generated Content: the current page number can be printed
in a page region with the content
property. (See also Page Numbering).
@page {
    @bottom {
        content: counter(page)
    }
}
By using Named pages, you can style the page numbering of the Preface with roman numbers and the main pages with arabic numbers - see the example Restarting page numbering.
The title of the book, or the current chapter, can be copyied into the page regions by using the string-set property. For details, please see the Copying content from the document chapter.
CSS
@page {
    @top { content: string(doctitle) }
}

h1 { string-set: doctitle content() }
The @page rule specifies that the top-center page region will contain the text
content of the document title copied from the text content of the
h1 element in the document.
If some special formatting of the text in the margin box is required, copying the text will not suffice - you need to remove an element from the natural page flow to place it in the margin box. See Taking elements from the document for details.
A peculiar and interesting use of page headers happens in
dictionaries: typically, you might want to display page headers like
"a-af", where "a" is the first definition on the page and "af" is the
last one. This can easily be obtained by adding
The optional page-policy value to the
string() function.
The string-set property is applied to
each definition in the dictionary (the b:first-child from the
following example), and then the first
and last page policy values are use to select the
relevant definition to display in the page header.
@page {
  @top-left { content: string(term, first);}
  @top-right { content: string(term, last);}
}

.chapter p b:first-child { string-set: term content() }  /* pick up term to be used in running header */
This is the crucial set of rules for the Dictionary sample.
The dictionary sample is furthermore noticeable for its use of the
optional page policy keyword first-except: the current
letter of the alphabet is displayed on each page heading, except
for the page on which the letter appears in the body of the page,
starting the new section.
@page {
  @top-center { content: string(letter, first-except);}
}

.chapter header { string-set: letter content() }content: counter(page)Paged media is organized in pages - and numbering the pages is a common task: generated content does this for you automatically. The easiest way of doing so is numbering them sequentially from the first to the last page.
To use a counter, it usually first needs to be initialized with the
counter-reset property, which can be applied
to any element and initializes one or more counters to the specified values,
or to zero if no value is specified. Once initialized, the counter will be
displayed with the counter() function in the
content property.
Page counters work a bit more simple and usually don't need to be explicitly initialized or incremented.
@page {
  @bottom {
    content: counter(page);
  }
}
However, if you want to restart the numbering after the Preface of your book, you need to name the pages (see Named pages) and the counter needs to be re-initialized with the main content. See also the example Restarting page numbering.
.preface {
  page: preface;
  counter-reset: page 1;
}
@page preface {
  @bottom {
    content: counter(page, lower-roman);
  }
}

.main {
  page: main;
  counter-reset: page 1;
}
@page main {
  @bottom {
    content: counter(page);
  }
}
The page numbers can be referenced with the target-counter() function.
This provides a convenient mechanism when you want to print out a page reference
that on an interactive medium, such as can be seen in a web browser, might be
expressed with a hyperlink.
CSS
a[href]::after {
    content: " [See page " target-counter(attr(href), page) "]";
}
This will add a cross-reference after every link with the correct page number determined automatically. For example: [See page 17].
If you are referencing the pages in the Preface, marked with lower roman-style numbers, you need to re-specify the counter style for the target counter - the style is not automatically taken over.
CSS
a[href|="#preface"]::after {
    content: " [See page " target-counter(attr(href), page, lower-roman) "]";
}
In some documents, particularly those that are unbound such as office documents,
it can be useful to show the total number of pages on each page. The total
number of pages can be accessed by using the pages counter.
This is a pre-defined counter that is fixed to the total number of pages in
the document.
@page {
  @bottom {
    content: "Page " counter(page) " of " counter(pages);
  }
}
This rule will generate page footers such as "Page 1 of 89".
float: prince-column-footnote
Prince has a simple way of creating footnotes: the @footnote page
area, where footnotes can be floated to with the float
property. For details see Footnotes.
In a multi-column layout (see Columns), footnotes can be placed at the bottom of the page, spanning all columns. But usually you want to position the footnote at the bottom of the column the footnote call appears in.
To achieve this, the values prince-column-footnote or
prince-column-inline-footnote of the
float property are used.
The value prince-column-footnote transforms the element
into a column footnote: it creates a footnote call in the place where
it appears in its natural flow, and moves the element to the bottom of
the column. The footnote marker is placed outside of the block of the
footnote. With the value prince-column-inline-footnote,
the footnote marker is placed inside of the block of the footnote.
float: prince-column-footnote
float: footnote
In some cases it might happen that you want to point several footnote calls at
the same footnote. Prince offers a convenient mechanism to achieve this by
combining regular footnotes with the generated content function
target-counter().
First we create our regular footnotes - the only extra step we need to do, is to provide each footnote with a unique ID.
<p>
This paragraph has a footnote.<span class="fn" id="fn1">First footnote.</span>
</p>
When another foonote call needs to be pointing at this, already existing footnote, we have to create it manually by adding a link to this footnote's ID.
<p>
This paragraph refers to the first footnote.<a class="rfn" href="#fn1"></a>
</p>
This footnote call will be created by using the generated content function
target-counter() referencing the footnote counter.
content: target-counter(attr(href), footnote);
When creating regular footnotes, Prince automatically takes care of the styling of the footnote calls, but the manually created ones need to be explicitly styled. The following are the default rules that style a footnote call - here shown with all the rules necessary for creating all the footnote calls:
.fn {
    float: footnote;
}

.rfn {
    color: inherit;
    text-decoration: none;
    content: target-counter(attr(href), footnote);
    vertical-align: super;
    line-height: none;
    font-size: 83%;
}float: footnote
Prince has a simple way of creating footnotes: the @footnote page
area, where footnotes can be floated to with the float
property. For details see Footnotes.
It gets slightly more complicated when you want to position the footnotes not under the text, in their default position, but at the side of the pages as sidenotes. Two approaches are possible, each with its advantages and drawbacks. Either
We shall see each approach separately.
A straightforward approach for sidenotes is to position the footnote area to the desired place, instead of leaving it in its default position.
This rule moves the footnotes area to the left side of a page.
The advantage of this approach is that footnote calls and markers are created automatically (see Footnote calls and Footnote markers).
The biggest disadvantage is that the footnotes are not placed to the side of the location of the footnote calls, but are inserted into the footnote page area filling the space from the top of the page. Should this be of importance, use the second approach instead.
The footnote text is floated to the left (or right) and moved out of the way with negative margins.
.footnote {
  float: left;
  max-width: 60px;
  margin-left: -90px;
}
This rule floats the footnotes to the left side of a page.
The advantage is to position the footnotes vertically aligned with the footnote calls.
The disadvantage is that footnote calls and markers are not created automatically, but need to be manually added as counters, and styled. Also, footnotes may overlap vertically if they are too close together.
A variant of this approach, useful when creating floating sidenotes in a multicol layout, can make use of some scripting to determine, with the help of The Box Tracking API, in which column the sidenote call, and thus the sidenote, is placed - making sure the sidenote is always in the correct position. You can see this in full action in the Sidenotes sample (HTML - PDF).
Endnotes are quite easy as their placement is not relative to the page. There are two ways of creating them.
In their most simple form, an endnote is placed at the end of the document by the author, with a (hyperlinked) call in the text.
However, it can be laborious to manually synchronize references in this manner. A more convenient alternative is to keep the notes inline and to move them to the end of the document at the time of formatting. This is a simple tree transformation which can be performed by a script. The following sample document features references which are kept inline and moved to the end by a script:
No special CSS formatting is required to support endnotes.
In a similar fashion table notes can be created. These are a variation of endnotes. However, instead of moving the notes to the end of the document, the notes are moved to the end of the table, or to the end of the table cell. Again, this is a simple tree transformation which doesn't require anything special from CSS.
The table in the above document sample also has inline notes that are moved to the end of the table by a script.
Hyperlinks are a direct reference to another location, easy to follow on the interactive web page, or a PDF loaded in a viewer, by clicking on it. On the printed page, this mechanism obviously does not work.
Prince offers some CSS functions to help translating hyperlinks into
print-friendly display, useful in different
scenarios: target-counter(),
target-content() and attr(), to be used
with the content property. (See
also Generated Content Functions).
The target-counter() function can be used to reference
the value of a counter at a linked element, and it can specify any
counter, allowing cross-references to refer to list items, chapters or
sections as well as pages.
Used with generated content after a hyperlink, it will add a cross-reference with the correct page number determined automatically.
CSS
a[href]::after {
    content: " [See page " target-counter(attr(href), page) "]"
}
This adds something like "[See page 17]" after each link. Note the
use of the function attr() inside
the target-counter() function.
It can also take an optional counter style, similar to the
normal counter() function.
CSS
a[href]::after {
    content: " [See chapter "
             target-counter(attr(href), chapter, upper-roman)
             "]"
}
This will add a cross-reference after every link with the correct chapter number determined automatically and displayed using roman numerals. For example: "[See chapter IV]".
The target-content() function can be used to reference
the text content of the linked element.
CSS
a[href]::after {
    content: " [See '" target-content(attr(href)) "']"
}
This will add a cross-reference after every link that includes the text of the element being linked to, such as a chapter title. For example: "[See 'Introduction']".
The attr() function, used in the previous examples inside
the other functions, can also be used on its own to insert the URL of a
remote resource.
CSS
a[href]::after {
    content: " [Located at '" attr(href) "']";
}
This will add the URL after every link. For example: "[Located at 'http://www.princexml.com/']".
The prince-image-magic property
performs various image-related, Prince-specific tasks that do not fit
into other existing CSS properties. It applies magic to images!
To reduce the PDF file size, JPEG images can be recompressed at a
lower quality level by using the function recompress-jpeg(quality%)
with the required quality percentage as argument.
PNG images can be converted to JPEG images with the keyword
convert-to-jpeg (using the default compression rate), or
they can also be converted to JPEG with the required compression rate
as argument with the function convert-to-jpeg(quality%).
Prince usually strips unnecessary metadata from JPEG images to help
contain size. But it might happen that you need that extra data,
possibly for further downstream processing. The keyword
jpeg-verbatim inhibtis this stripping and includes the
images without modification in the PDF file.
Two more keywords perform more obscure tasks that might be required in
very specific circumstances: the keyword ignore-icc-profile
causes Prince to ignore any ICC color profile embedded in the image,
useful e.g. in those cases when the embedded ICC profile is broken; and
snap-to-integer-coords can be used to avoid blurring of
images in some PDF viewers.
Several of the values can be combined, to perform more than one magic
on images - for details please check the grammar of the
prince-image-magic property.
img {
    prince-image-magic: recompress-jpeg(50%) convert-to-jpeg(50%) snap-to-integer-coords;
}
This example recompresses all JPEG images to 50%, converts any non-JPEG images to JPEG with the same quality, and snaps them all to integer coordinates to avoid blurring in some PDF viewers.
hyphens
The property hyphens controls whether hyphenation
is allowed to create opportunities to wrap within a line of text.
The default value of the hyphens property is
manual - to enable automatic hyphenation in a body of text, the
value auto has to be declared.
The value none instructs never to hyphenate, while the default
value manual tells Prince to only hyphenate when there are
characters inside the word that explicitly suggest hyphenation opportunities,
such as e.g. "soft hyphens" (represented either by the Unicode character
U+00AD or the HTML entity ­). With the
value auto, words may be broken at appropriate hyphenation
points as determined automatically by the language-appropriate hyphenation
resources, or by hyphenation characters in a word.
In order to make automatic hyphenation work as intended, it is important to
communicate to Prince the natural language the text is in, so that the
language-specific hyphenation rules can be applied - this is done by means to
the lang or xml:lang attributes.
The character shown at the end of a line when the word is hyphenated can be
specified with the prince-hyphenate-character
property.
Fine-tuning of hyphenation can be done with the
prince-hyphenate-after and
prince-hyphenate-before properties to determine
the minimum number of letters in a word that may be moved to the next line or
that may be left at the end of a line when the word is hyphenated.
The prince-hyphenate-limit-lines property is used to
determine the maximum number of consecutive lines that may end with a hyphenated
word.
Prince uses the hyphenation patterns from the CTAN archive - the full archive is
accessible here.
The default hyphenation patterns can be found in the installed hyph.css file,
located in the default style sheets location (see Installation Layout).
Hyphenation patterns for the following languages are provided:
| da | Danish |
| de | German |
| en-US | English |
| es | Spanish |
| fi | Finnish |
| fr | French |
| is | Icelandic |
| it | Italian |
| lt | Lithuanian |
| pl | Polish |
| pt | Portuguese |
| ru | Russian |
| sl | Slovenian |
| sv | Swedish |
A special case is Thai hyphenation, supported thanks to the LibThai package.
To add hyphenation patterns for other languages, download them from the
CTAN
archive. Save the files for the chosen language without the .txt
extension, and link to the pattern file (with the .pat extension) with
the prince-hyphenate-patterns CSS property. Prince determines
which language to use for hyphenation with the help of the :lang() CSS
selector, which in turn checks the lang or xml:lang attributes
of the document:
:lang(en-GB) {
    prince-hyphenate-patterns: url("hyph-en-gb.pat");
}
<span lang="en-GB">supercalifragilisticexpialidocious</span>
Prince only supports local hyphenation dictionaries.
font-variant: prince-opentype()prince-text-replacePrince supports typographic ligatures found in OpenType fonts, i.e. Prince will replace certain characters that appear next to each other with other special glyphs that join those two characters together into one single glyph.
A prominent example of a typographic ligature is fi, which replaces the two characters fi with a single glyph.
Prince automatically enables ligatures declared by the OpenType fonts with the
liga feature (see OpenType Features in Prince). This feature
covers the "standard ligatures" which the font manufacturer thinks should be used
in normal conditions. Microsoft has a list of the OpenType feature names
here.
Other special ligatures need to be explicitly enabled in Prince to take effect.
This is achieved by using the font-variant CSS property with
the prince-opentype() function (see CSS Functional Expressions).
Care must be taken in which order the features are enabled! And please note that
enabling one feature will disable all the default features. To see which OpenType
features are enabled by default, see the OpenType Features in Prince section.
@page {
    font-variant: prince-opentype(dlig, liga);
}
Unlike other ligature features, the clig feature specifies the context
in which the ligature is recommended. "Contextual ligatures" are important in some
script designs.
The dlig feature covers the "discretionary ligatures" which may be
used for special effects.
Some ligatures were in common use in the past, such as ligatures with the so-called
"long s" - but they appear anachronistic today. Some fonts include the historical
forms as alternates, so the "historical ligatures", covered by the hlig
feature, can be used for a 'period' effect. This feature replaces the default (current)
forms with the historical alternates.
Some scripts, most notably Arabic and Syriac scripts, require certain ligatures
to be used in normal conditions. These "required ligatures" are covered by the
rlig feature. Prince enables this feature by default in Arabic script.
Another mechanism for replacing characters is given with the
prince-text-replace property. For
an example use, please see the section on Character Entities.
@prince-overlayWhen producing a PDF, it might be desirable to include a watermark, visible on all pages. In Prince it is easy to do so with CSS.
In order to repeat it on all pages, the watermark needs to be placed in a
@page at-rule.
We shall place it in the page region @prince-overlay (see
Page regions) and create the watermark with generated
content (see Generated content in page regions):
@page {
   @prince-overlay {
      color: rgba(0,0,0,0.8);
      content: "Watermark";
      font-size: 20pt;
   }
}
The overlay can be styled in all possible ways and it can be aligned in other places than middle center:
@page {
   @prince-overlay {
      content: "Watermark";
      vertical-align: top;
   }
}
Currently it is only possible to have one overlay, but you could flow an entire element having multiple individually positioned contents (see Taking elements from the document).
The styled watermark can be saved into a watermark.css file, which
will be called when generating the document:
prince --style=watermark.css myfile.html -o myfile_with_watermark.pdf
Sometimes it is necessary to rotate a block element so that it fits on the page. This is common with tables. Two approaches are possible: either the whole page is printed sideways, or only the content in a table cell is rotated. We shall see each approach separately.
prince-rotate-bodyprince-shrink-to-fitFigure Printing a big table sideways shows a table, rotated so that its width fits within the page's length. This can be achieved with the following rules:
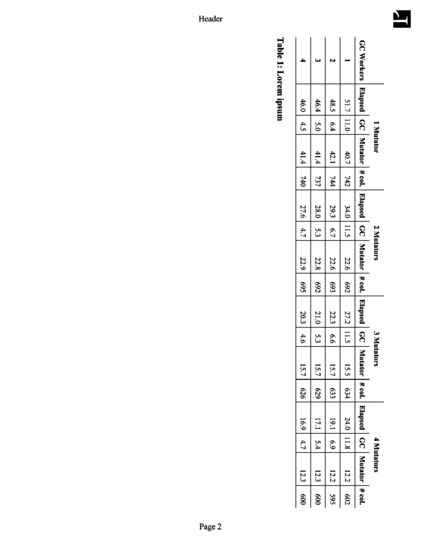
prince-rotate-body in a named page
to print it sideways.
Download the PDF
or the HTML.
@page big_table {
    prince-rotate-body: landscape;
    prince-shrink-to-fit: auto;
}

table.big {
    page: big_table
}
The prince-rotate-body property works within
@page rules only,
so this example uses a named page to place the table on a page of its own.
Then the @page
rule for big_table pages uses the
prince-rotate-body property to tell prince that
the body of the page, but not the headers and footers, should be rotated.
The table in this example is still too wide so we also use the
prince-shrink-to-fit property to make it a little
smaller.
If you download the full example (HTML or PDF) you will see that the paragraphs before and after the table are not placed on the same page. This is because they do not belong to the same named page (see Named pages). However on page four there are two tables, both tables belong to the same named page and therefore Prince will try to place them together on the same page.
Another way of rotating content is by changing the writing mode with the
writing-mode property, or by transforming an
element with transform: rotate() - see
Rotating content in table cells.
transform: rotate()writing-modeThere are cases, when preparing a table with a large amount of content, that you would like to configure your layout to be most efficient - a useful trick is to rotate the content in some table cells, or in the table headers. Rotating by 90° might be a way to achieve this, but readability suffers. A reasonable compromise is to rotate 45° only - the space it needs is not more than with a 90° rotation, and your readers don't have to tilt their heads repeatedly. In the following example we shall rotate table headers by 45°.
The rotation is achieved with transform: rotate().
It could be applied directly to the th element, but it is impossible
to configure the width of the column as we wish it. We shall thus nest a div
and a span element:
<th class="rotate">
  <div>
    <span>Column header 1</span>
  </div>
</th>
The rotation will happen with the following CSS code:
th.rotate {
  /* Make sure the th is high enough, */
  height: 150px;
  /* and make sure the words of the header are not split with a newline. */
  white-space: nowrap;
}

th.rotate > div {
  transform:
    /* Magic Numbers to put it in place, */
    translate(25px, 50px)
    /* rotate it, */
    rotate(-45deg);
  /* and give the div the width you wish. */
  width: 30px;
}
th.rotate > div > span {
  /* And finally, add some styling. */
  border-bottom: 1px solid #ccc;
  padding: 5px 10px;
}
A more basic means for rotation, allowing for less fine-tuning, is the use of the
writing-mode CSS property. This option only allows rotation by
90°. It can be very handy when only some table cells with too much content are rotated,
so as not to use too much horizontal space. You cannot rotate the table cell directly,
so you have to nest one span element inside - and then you style it:
td.rotate > span {
  /* Rotate the content */
  writing-mode: vertical-rl;
  /* Optionally, you can force the table cell's content not to wrap */
  white-space: nowrap;
}
For a different approach to rotating content, see the section on Printing wide content sideways.
console.log()One limitation of producing a document intended for print is its non-interactive, static nature: a document cannot be modified after it is deemed to be ready for print. See JavaScript in Printed Media.
JavaScript can be run twice only: the first time it is run before layout, where
it interacts with and modifies the layout (and the DOM structure). Once layout is
finished, JavaScript can be run a second time from the complete event
handler - see Event Handling. However, this time it is only allowed
to inspect the layout and cannot modify the DOM.
A problematic situation arises when you want to modify your document after layout has finished - a typical scenario would be when you want an index to be created with correct page numbers. The content depends on the layout of the document itself.
(Please note that this only affects the creation of an index - a simple table of contents or a reference to a place on another page can easily be achieved with target-counter links.)
Typically Prince is run a first time to prepare the layout of the document and
run JavaScript after layout has finished, collecting the output of the script to
append it to the document with the help of the console.log() - see
Console Access.
Now the document would be ready for generating the PDF - Prince is run a second time, producing the desired document.
Here is a minimalistic two-pass solution where the document is adorned with a ToC and index:
wget http://www.princexml.com/howcome/2015/index/musick.html -O musick.html;
  prince --javascript musick.html >>musick.html;
  prince --javascript musick.html -o musick.pdf
Another use of the two-pass solution is to create changebars - see the description here.
Documentation for Prince can easily be viewed online in the browser. But there might be circumstances when it is convenient to have the documentation in one file, stored locally - and which format would be most suitable, if not PDF?
And since Prince is a tool for creating PDF files from HTML, it could also be your choice of tool to create a PDF version of the documentation!
The HTML version of the documentation is served in three distinct files:
Additionally, each file needs a few more files to display correctly - including images, CSS files to style the documents, as well as JavaScript files, necessary not just for browser-only features like scrolling to the right place in certain circumstances, but also for the core of the Prince JavaScript Support documentation.
To create a PDF version of the documentation we need to run just one simple command line:
prince --javascript http://www.princexml.com/doc/ http://www.princexml.com/doc-prince/ http://www.princexml.com/doc-refs/ -o prince-documentation.pdf
This command produces the documentation in PDF format, including a cover page, the User Guide and the References section.
If you are using the Prince GUI on Windows, you need to paste the three URLs for the cover page, the User Guide and the References by selecting the option "Add URL" three times. Next, you select the checkbox "Merge all documents into a single PDF file" and select a location where to save this file to. Make sure that the checkbox for "Enable Document Scripts" is checked, and click on the "Convert" button to convert the documents into your documentation in PDF format.
The Installation Guide is not included: since Prince is needed to create your documentation PDF, we assume that you have already installed it!
The Prince User Guide tries to be exhaustive in explaining how to use the application and its features. However, there might always be something not answered in the documentation, or something not working as expected. There are a couple of ways to get help to solve the problems:
We work hard to make Prince work on multiple platforms (Windows, Linux, etc) and with multiple configurations. However things don't always work correctly the first time. You're very welcome to contact us for support or visit our forum. However if you are facing a common problem, you may be able to find an explanation and solution below.
When running into trouble with Prince, the first thing you should do is to check for any errors. These can be found in the Prince output log.
When launching Prince from the command line, Prince will print any error or
warning messages directly to the console, prefixed with error:
or warning: messages. The level of verbosity, or a log file
where to print all output, can be controlled with a few command-line
Logging Options. A more advanced control of the output is
given by the Structured Log.
When using the Prince GUI, the output log is printed to the log window on the bottom left of the main GUI window.
prince: ./picture.bmp: warning: Unknown image format
Prince supports JPEG, PNG, TIFF and GIF images as well as SVG (see Images). If you try to format a document that includes images in a format that is not supported by Prince, such as BMP, you may see the above error message from Prince.
The solution is to convert the image file into a format that is supported by Prince. We suggest PNG, which is a well-supported general purpose image format with lossless compression.
Prince offers a convenient capture/replay system with the two command-line options --capture and --replay - the former saving a copy of all the information in a job to a specified directory, including the input document(s) and all of the resources referenced by them and on the command line (including remote HTTP resources), such as style sheets, images, JavaScript files, fonts, etc., conveniently allowing it to be replayed later for debugging purposes with the latter command-line option. The directory might contain sensitive information (as far as included in the PDF job), so we recommend only submitting them by email when requested to do so, instead of posting them on the forum.
For assisting in tracking down difficult platform bugs, the princedebug
script is available on Linux and MacOS X platforms. It is located in
/usr/lib/prince/bin and runs Prince with the specified
command-line arguments, dumping a considerable amount of debug
information to two files in the /tmp directory, namely
prince.debug and prince.strace.
These files contain information about the system and environment in which Prince was run, and about the job in question, so we recommend only submitting them by email when requested to do so, instead of posting them on the forum.
The princedebug script is not available on Windows.
This usually happens when Prince is not able to find a suitable font, or might be using the wrong font. Try installing a font that supports your script, or try using a different font in your stylesheet. See also: Fonts and Redefining the generic font families.
Why is all the content displayed on one page, while I was expecting it to take several pages?
Typically content displays on only one page, even though it should be much longer, because it is wrapped up:
overflow: hidden,which Prince cannot split over several pages. It can happen to the whole content in a document, or to just a section of it. This issue does not affect browsers, because they don't paginate. See also: Paged Media.
Prince usually takes care of reformatting a document to fit on a printed
page. However, there are cases where it doesn't work as expected. Wide content
can be made fit by Rotating content, or by applying the CSS property
prince-shrink-to-fit, which scales down all content
equally. Alternatively, the command-line option
--css-dpi changes the DPI of
the "px" units in CSS, which defaults to 96dpi.
We do not recommend people making a habit of using this, and instead advise to design a layout specifically appropriate for the paper being used. Or at least using relative size units.
Different PDF profiles have different requirements - you might be generating a PDF with a version or profile which does not support transparency. The only PDF profile to support transparency is the PDF/X-4 profile. See also: PDF Versions and Profiles and Color Management and PDF Profiles.
PDF tooltips can be enabled with the CSS property prince-tooltip like this:
*[title] { prince-tooltip: attr(title) }However, please note that tooltips are not a standard PDF feature, and they may only work in Adobe Reader and Adobe Acrobat and may not be visible in other PDF viewers, such as web browsers.
How can I make an element, such as an image or some text, appear on each page of the PDF document?
For this purpose you can use the @page
page regions. See: Page regions and Watermarks.
You cannot add style to generated content in the page regions, except for
some inline style properties, such as color and
font. A possibility for using more complex styling is to use
the element() or flow() CSS functions. See
Generated content in page regions, Copying content from the document and
Taking elements from the document - however, this latter approach will
remove the element from the document itself.
How can I start counting pages on a left page and display a right page as second page?
You can specify break-before:left | right
on the root element of the document.
CSS
body[start=even] {
  break-before:left;
}
HTML
<body start="even" startpage="28">
Yes, Prince supports JavaScript - remember to enable it with the
--javascript
command-line option (see Applying JavaScript in Prince). However,
there are some limitations: Prince produces printed documents, and interactive
events make no sense in this context. Also, modifications of the document
after layout has finished are not possible. See: Scripting.
No, unfortunately this is part of the inherent limitations of printed media - see JavaScript in Printed Media. However, JavaScript can run after layout is done, and the output can be used for a second run of Prince - see The "Two-Pass" Solution.
Yes. In XML, this is done by means of XML Inclusions (XInclude). Note
that XInclude is disabled by default, and can be enabled with the
--xinclude
command-line option. Also note that XInclude only applies to XML files.
To apply it to HTML files, the XML input format needs to be specified with
the --input
command-line option.
Another option in HTML is to use the iframe element:
<style>
@page {
  @bottom {
    border: solid red thin;
    content: flow(footer)
  }
}
.footer {
  flow: static(footer)
}
</style>
<iframe class="footer" src="http://www.google.com"></iframe>
<p>Normal content</p>
However there may be some subtleties required to get the correct size and styling of content within iframe elements.
Yet another option would be to use JavaScript to issue an XMLHttpRequest, parse the text of the response with DOMParser, then extract the elements and copy them into the main document. However, it will be tricky to support nested styles this way.
Prince takes HTML or XML files as input, and converts them to PDF files. Additionally, CSS style sheets can be provided for styling the documents, and JavaScript files can be used for additional manipulation of the input.
See the sections Applying Style Sheets in Prince, Applying JavaScript in Prince and XML Input for details.
The input files can be provided in several ways:
Input files can either be local files, or remote files that will be fetched over HTTP or HTTPS, in which case the URL to the file, or to the site, needs to be provided. Prince will automatically create the PDF output once the input pages and files have finished loading.
Prince can apply style sheets from three different sources:
xml-stylesheet
processing instruction
Style sheets may import other style sheets using
@import rules.
These rules must occur before any other rules or declarations in the style
sheet, and have the effect of importing all the rules and declarations from
the specified style sheet. See CSS At-rules.
@import "base.css";
@import "custom.css";

/* more declarations */Multiple style sheets can be applied and in some cases declarations from different style sheets may conflict. For example, one style sheet might specify that heading elements should use the Times New Roman font, while a different style sheet might specify that heading elements should use the Arial font:
First style sheet:
h1 {
    font-family: "Times New Roman";
    font-size: 24pt;
}
Second style sheet:
h1 {
    font-family: "Arial";
    color: red
}
In the above example, the font-family declarations conflict,
and only one can possibly be applied. However, the font-size and
color declarations do not conflict, and thus both will be applied
to the h1 element.
Style sheets are applied using a cascading process that calculates a priority for each declaration. Conflicting declarations are resolved by choosing the declaration with the highest priority and ignoring the remaining ones.
Priority is determined by looking at the origin of the declaration and
whether or not it is labeled with !important.
!important
declarations!important declarations
(highest priority)If the conflicting declarations have the same origin and importance, the priority is determined by comparing the specificity of the selectors used to apply them. (Combinations of selectors have even higher priority).
h1"#id" (highest priority)If the conflicting declarations have the same specificity, the declaration that occurs last in the style sheet has the highest priority.
If the declarations are from different style sheets, the declaration that
occurs in the last style sheet to be specified has the
highest priority.
This is based on the order that style sheets are specified on the command line
and also on the order that xml-stylesheet processing instructions
occur in the document.
Prince is not running JavaScript by default - document scripts can be enabled by
specifying the --javascript
option on the command-line. Prince will then execute all JavaScript found in the
HTML script elements in the input document.
External scripts can be run by specifying one or more
--script=FILE
options on the command-line. These scripts will always be executed, regardless of
whether document scripts have been enabled or not.
JavaScript functions can also be called from CSS generated content, by using the
prince-script() syntax for referencing Script Functions.
Please note that scripts contained prince-script() are treated as
document scripts, and hence need to be explicitly enabled.
Prince processes well-formed XML 1.0 documents with full support for namespaces, internal and external entities, DTDs, character references and CDATA sections. Comments and processing instructions are ignored and do not affect the output.
Prince loads DTD files in order to resolve entity definitions and default attribute values. However, Prince does not perform validation upon input documents. If validation is a processing requirement, the use of an external validator is recommended.
xml:lang
Prince supports the xml:lang attribute, which is used to
indicate the language of the document text. Elements can be selected by
language using the CSS :lang() selector.
xml:id
Prince supports the xml:id attribute, which is used to give
elements a unique identifier. This identifier can be used when creating
links and cross-references; it also allows elements to be selected
using the CSS ID selector.
xml:base
Prince does not support the xml:base attribute, therefore
hyperlinks must be absolute URLs or relative to the document path.
Prince provides sensible default styling behavior for several common XML vocabularies:
svg elements are treated as replaced elements,
similar to img elements in XHTML,
and their content is rendered in a rectangular space.
No line breaks or page breaks are made within an svg
element.
(See Scalable Vector Graphics (SVG) for details of which elements are supported).
Prince does not support XSLT. External XSLT processors can be used and the resulting document can be passed to Prince.
XML Inclusions (XInclude) provides a method of including content from other files into an XML document. When Prince processes the XML document, the inclusions are resolved and the included content is treated as if it had been in the original document all along.
The core of XInclude is a single element, <include href="..."/>, which
specifies the inclusion of the file referenced by the href
attribute. The element is in the XInclude namespace,
http://www.w3.org/2001/XInclude, which must be declared either
on the element itself or one of its ancestor elements.
Please note that XInclude is disabled by default, and can be enabled with the
--xinclude
command-line option. Also note that XInclude only applies to XML files. To
apply it to HTML files, the input format needs to be specified with the
--input
command-line option.
Here is an example of a book written in XHTML in which each chapter has been placed in a separate XML document for convenient editing and then included in the main document using XInclude:
<html xmlns:xi="http://www.w3.org/2001/XInclude">
<head>
<title>Book Title</title>
</head>
<body>
<xi:include href="chap1.xml"/>
<xi:include href="chap2.xml"/>
<xi:include href="chap3.xml"/>
</body>
</html>
(Note that the XInclude namespace was defined on the root element and bound
to the xi prefix to save space by avoiding the need to declare the
namespace on every inclusion).
XInclude can also be used to include text files into XML documents:
<xi:include href="file.txt" parse="text"/>
This is a convenient way of including files containing arbitrary non-XML text, such as emails, database reports or program source code. It also allows the inclusion of external XML content as "unparsed text", as if all the markup had been explicitly escaped with character entities or placed in a CDATA section.
It is possible to specify fallback content that should be used if an included file cannot be loaded. The fallback content can be arbitrary XML and may even contain additional inclusions.
<xi:include href="report.html">
    <xi:fallback>
	<p>No report is available</p>
    </xi:fallback>
</xi:include>
If the report.html file cannot be loaded then the paragraph
saying "No report is available" will be included in the document instead.
Prince produces PDF files that are compatible with Adobe Acrobat and other PDF viewers. The output can be controlled in several different ways, addressing different aspects of the resulting files.
For the error and warning output log, please see Output log.
The PDF files produced by Prince conform to several different PDF versions, up to PDF 1.7, depending on the chosen PDF Profile and the enabled PDF features.
Prince supports tagged PDF files and optional PDF profiles, which can be selected
using the --pdf-profile
option on the command-line interface, or the
setProfile method if using a server
wrapper, or the
PDF.profile
function in JavaScript.
The available profiles, and the PDF version they are based on, are:
| PDF Profile | PDF version |
|---|---|
| PDF/A-1a | PDF 1.4 |
| PDF/A-1b | PDF 1.4 |
| PDF/A-3a | PDF 1.7 |
| PDF/A-3b | PDF 1.7 |
| PDF/UA-1 | PDF 1.7 |
| PDF/X-1a:2001 | PDF 1.3 |
| PDF/X-1a:2003 | PDF 1.4 |
| PDF/X-3:2002 | PDF 1.3 |
| PDF/X-3:2003 | PDF 1.4 |
| PDF/X-4 | PDF 1.6 |
Prince supports files with the combined PDF/A-1a+PDF/UA-1 and PDF/A-3a+PDF/UA-1 profiles.
Prince also uses:
prince-pdf-print-scaling property is set, orprince-pdf-page-mode property has the value show-attachments;prince-pdf-paper-tray property is set, orprince-pdf-duplex property is set.
To enable tagged PDF without using one of the profiles that already imply it, the
command-line option --tagged-pdf
can be used.
Prince supports PDF object streams to reduce the size of tagged PDFs. This can
be disabled by the command-line argument
--no-object-streams
or from JavaScript via the
PDF.objectStreams
boolean property.
Object streams are enabled by default, therefore Prince produces files with PDF version 1.5 - unless a profile that requires older PDF versions will automatically disable object streams.
Choosing one profile over another can help producing a PDF file which has the right properties for its intended destination. Each PDF profile places restrictions on the features allowed in a PDF file in order to achieve its aims. Please also see the Color Management section for the impact the PDF profiles have on color management. Prince produces error messages when the restrictions are not respected.
$ prince foo.html --encrypt --no-embed-fonts --pdf-profile="PDF/A-1b"
prince: error: PDF/A-1b does not support encryption
prince: error: PDF/A-1b requires fonts to be embedded
Generally speaking, PDF/A profiles were created with the goal of long-term preservation of the documents (PDF for Archiving), while PDF/X profiles were created to address publisher's needs in the graphic arts industry (PDF for eXchange). The PDF/UA profile is a standard for producing accessible electronic documents (PDF for Universal Accessibility).
--pdf-output-intent
command-line option in the PDF Output Options section)Prince supports a wide range of PDF features, including the following:
Prince supports PDF-internal and -external links. HTML hyperlinks are
automatically converted. To make an element in XML, or any arbitrary
element, a clickable link, the prince-link CSS property
is required.
xref {
    prince-link: attr( linkend )
}
The property prince-pdf-link-type may be used
to control whether relative links should be embedded in the PDF as web (URL)
links or file links. By default they will be resolved against the base URL of
the input document.
Prince also supports the following PDF-specific fragment identifiers, supported by web browsers, and will use them when generating links to local PDF files.
<a href="test.pdf#page=2">...</a>

<a href="test.pdf#nameddest=section1">...</a>
Named destinations (nameddest) in PDF files have a similar function
to HTML IDs: they can be the target anchors for links from other documents. The
property prince-pdf-destination is used for
creating them.
HTML
<div class="section" data-sectionid="section1">
CSS
div.section {
    prince-pdf-destination: attr( data-sectionid )
}
In order to link to this section, the following syntax is used:
HTML
<a href="test.pdf#nameddest=section1">...</a>
Prince supports the pdf-action: URL scheme for PDF actions.
Typical values are Print, GoBack, GoForward,
NextPage, PrevPage, FirstPage,
LastPage.
<a href="pdf-action:Print">Print Document</a>
However, Prince passes the provided values verbatim to the PDF viewer, so the user can supply values that Prince doesn't know about, but the viewer does.
Please be advised that this and the following actions and scripts are dependent on the PDF viewer, and in many cases might only work in Adobe Acrobat products.
The property prince-pdf-open-action may be used
to specify a space-separated list of actions to perform when the PDF file is
opened, like eg. popping up the print dialog box automatically, or setting the
default zoom level for PDF documents. Any arbitrary identifier can be specified,
although these may be PDF viewer specific; Acrobat can take just about any menu
item.
@prince-pdf {
    prince-pdf-open-action: zoom(fit-page) print;
}
In a similar fashion, JavaScript code that will be executed when the PDF file
is opened may be included with the prince-pdf-script
property. A common use case is to activate the "Print" dialog automatically. To
achieve the equivalent of the previous example, the following code could be used:
@prince-pdf {
    prince-pdf-script: "this.zoomType = zoomtype.fitP; this.print();"
}
Prince allows for some degree of control on the pages and the page layout in a PDF
file. The CSS property prince-pdf-page-label can
be used to set the page label that will be displayed in the PDF viewer. It can be
used to instruct the PDF viewer to display the page label in the ToC in a particular
way.
@page {
    prince-pdf-page-label: counter(page, lower-roman);
}
The property prince-pdf-page-mode can be used to
set the default page mode for the PDF file when it is opened. For example, whether
the bookmarks panel should be displayed, and whether the viewer should be fullscreen.
@prince-pdf {
    prince-pdf-page-mode: fullscreen;
}
Also the default page layout for the PDF file when it is opened can be determined
with the prince-pdf-page-layout property.
@prince-pdf {
    prince-pdf-page-layout: two-column-right;
}
The values of this property are mapped to PDF page layout options:
| CSS Keyword | PDF Page Layout | Description |
|---|---|---|
single-page |
Single Page View | Displays one page at the time |
one-column |
Enable Scrolling | Displays pages in one continuous vertical column |
two-column | two-column-left
|
Two Page Scrolling | Displays facing pages side by side in a continuous vertical column - the first (i.e. cover) page is on the left. |
two-column-right |
Two Page Scrolling & Show Cover Page | Displays facing pages side by side in a continuous vertical column - the first (i.e. cover) page is displayed alone on the right. |
two-page | two-page-left
|
Two Page View | Displays a two-page spread at the time - the first (i.e. the cover) page is on the left. |
two-page-right |
Two Page View & Show Cover Page | Displays a two-page spread at the time - the first (i.e. the cover) page is displayed alone on the right. |
Prince also provides two properties to fine-tune the printing of the PDF. The
property prince-pdf-print-scaling can be used
to disable print scaling for the PDF file when it is printed and the property
prince-pdf-paper-tray controls the
PickTrayByPDFSize flag in generated PDF files, which specifies whether the PDF
page size is used to select the input paper tray.
Prince compresses its PDF output to reduce the size of the documents that it produces, but does not create linearized PDF files, as this would increase formatting time and memory requirements. An external program such as Adobe Acrobat or Ghostscript may be used for this purpose if necessary.
Compression may be disabled with the command-line option
--no-compress.
Prince can encrypt the produced PDF files with the
--encrypt
command-line option. The default key size is 128 bits. With the option
--key-bits a
different key size can be chosen. Also the JavaScript methods
PDF.encrypt and
PDF.keyBits
can be used for the same purpose.
The command-line options --user-password
and --owner-password set
respectively the PDF user password and the PDF owner password.
Prince also offers a range of command-line options to disallow printing, copying,
annotating and modifying the PDF output:
--disallow-print,
--disallow-copy,
--disallow-annotate and
--disallow-modify.
Prince embeds fonts in its PDF output to ensure accurate viewing and printing on any system. Typically, only the necessary parts of a font will be embedded.
When disabling font subsetting with the command-line option
--no-subset-fonts,
Prince will embed the entire font in the PDF file, which is convenient if
people are planning on editing the PDF file later, and may need to add glyphs
that were not present in the original PDF.
Font embedding can be disabled if necessary, for example if Prince is being
used to create PDF files in a controlled environment with known fonts where
space is at a premium. The command-line option
--no-embed-fonts
is used for this purpose.
Prince can create PDF bookmarks that link to document content.
PDF bookmarks have numeric levels that place them in a bookmark hierarchy.
For example, a bookmark at level 2 can contain nested bookmarks at level 3,
or any higher level. The level of a bookmark is controlled using the
prince-bookmark-level property, shown here
being applied to the XHTML heading elements:
h1 { prince-bookmark-level: 1 }
h2 { prince-bookmark-level: 2 }
h3 { prince-bookmark-level: 3 }
h4 { prince-bookmark-level: 4 }
h5 { prince-bookmark-level: 5 }
h6 { prince-bookmark-level: 6 }
The default value for this property is none, which inhibits the creation
of a bookmark for the element.
It is possible to control the state of the bookmark, i.e. whether the bookmark
is in an open or closed state, with the
prince-bookmark-state property. In this way
you can close each chapter and hide the subsections for documents that are very
long, or you can choose to have a deep bookmark tree.
PDF bookmarks have textual labels that by default are copied from the text
content of the element that generated the bookmark. The text of this label
may be controlled using the prince-bookmark-label
property, shown here being applied to a chapter element that has a title
attribute:
CSS
chapter {
    prince-bookmark-level: 1;
    prince-bookmark-label: attr(title)
}
This property can take any content value, including literal text strings and counters. See Generated Content Functions.
PDF bookmarks are links that display a particular part of the document when
activated. By default, a bookmark will link to the element that generated the
bookmark, which is sensible behavior for bookmarks generated from headings
or chapter elements. It is also possible to change the target of a bookmark
using the prince-bookmark-target property,
which takes a URL directly or an attribute containing a URL:
CSS
bookmark { prince-bookmark-target: url(#intro) }
bookmark { prince-bookmark-target: attr(href) }
The default value for this property is self, referring to the element
that generated the bookmark.
Tagged PDF files have special handling mechanisms for specific tag types. In
Prince, it is possible to assign PDF tag types to elements in the document
through the prince-pdf-tag-type property, in
order to create XML vocabularies in the PDF.
CSS
ul.toc {
  prince-pdf-tag-type: TOC;
}
.toc li {
  prince-pdf-tag-type: TOCI;
}
HTML
<ul class="toc">
  <li>First Chapter</li>
  <li>Second Chapter</li>
</ul>
Bruce Lawson has written an interesting introduction on how to make accessible tagged PDFs with Prince - all you need to know about PDF tags and Prince!
Prince creates PDF metadata from the content of the XHTML metadata elements.
The content of the <title> element is used for the
document title, while the <meta> element can be used to
specify the document author, subject, keywords, date, and generator
application:
XML
<html>
<head>
<title>Cooking with Cabbage</title>
<meta name="author" content="John Smith"/>
<meta name="subject" content="An interesting book about food"/>
<meta name="keywords" content="cabbage, cooking, eating"/>
<meta name="date" content="2009-04-01"/>
<meta name="generator" content="MyReportingApp"/>
</head>
Additionally, XMP metadata can be added to a PDF file from an XMP file. This
file needs to be passed to Prince either via the
--pdf-xmp
command-line option, the prince-pdf-xmp CSS property, or it
can be specified in JavaScript with the
PDF.xmp()
function.
The PDF.xmp()
JavaScript function, the prince-pdf-xmp CSS property and the
--pdf-xmp
command-line option require either a URL pointing to an XMP file, or an
encoded data: URL.
Prince includes data from the <x:xmpmeta> element and its
contents. The xpacket processing instructions are ignored, as
Prince generates those itself when it produces the PDF file.
Prince can process local files or fetch them from remote locations. To do this, a full URL needs to be provided, including the protocol.
prince http://example.com/path/file.html -o out.pdf
If authentication is required for the URL, the credentials can be passed by means
of the --auth-user
and --auth-password
command-line options. A more cautious way is to add the
--auth-server
option, which sends username and password credentials to the specified server only -
the default is to send them to any server which challenges for authentication. The
option --auth-scheme
sends username and password credentials only for requests with the given scheme,
either HTTP or HTTPS, while --auth-method
specifies a comma separated list of HTTP authentication methods to enable. Valid
entries are: basic, digest, ntlm and negotiate.
A shorthand command-line option for authentication is
--auth, which specifies
a URL with credentials for HTTP authentication: [SCHEME:]//USER:PASS@HOST[:PORT].
Unlike the preceding options, it may be used multiple times. The username and password
must be percent-encoded.
The advanced command-line option
--no-auth-preemptive
instructs Prince not to send credentials to named servers until an authentication
challenge is received. When multiple authentication methods are enabled, an initial
request may be required to discover the methods supported by the remote site.
If cookies are required, the --cookie
command-line option can be used to set a value for the Set-Cookie HTTP header value.
The option may be used multiple times. Alternatively, the option
--cookiejar specifies
a file containing HTTP cookies.
The command-line option --ssl-cacert
specifies an SSL certificate file, while the option
--ssl-capath is
used to specify an SSL certificate directory.
The command-line option --ssl-version
sets the minimum version of SSL to allow. It may be one of: default,
tlsv1, tlsv1.0, tlsv1.1 or tlsv1.2.
The value default lets libcurl choose. The option
--insecure disables
SSL verification. Please note that using this option is not recommended!
Prince makes use of the libcurl library to process network locations - see Acknowledgments. Please note that command-line options are passed to curl as-is. On some systems curl might use a library other than OpenSSL to handle SSL - in those cases the SSL-related command-line options might behave in a slightly different way. In case of doubt, please check your own curl documentation.
Client certificates are supported on Linux with several command-line options. The
--ssl-cert option
specifies an SSL client certificate file, while the
--ssl-cert-type
option defines the SSL client certificate file type (PEM, DER) - the default is PEM.
The option --ssl-key
specifies an SSL private key file and
--ssl-key-type
is used to define the SSL private key file type (PEM, DER) - the default is PEM.
Last but not least, --ssl-key-password
indicates the passphrase for the private key.
On MacOS, the command-line option
--ssl-cert
specifies a PKCS#12 file containing a client certificate and private key. The
options --ssl-cert-type,
--ssl-key and
--ssl-key-password
are not available.
Client certificates are not supported on Windows.
If an HTTP proxy server is required, it can be specified with the
--http-proxy
command-line option.
The option --http-timeout
can be used to define the HTTP timeout in seconds, which can be useful for slow servers.
Prince can also disable downloading multiple HTTP resources at once with the
--no-parallel-downloads
command-line option.
Prince can be used server-side to produce PDFs, invoked by a wrapper script. Some care needs to be used in the configuration to make it reliable and secure.
When you control the input, Prince produces the expected output. But when you have no control on the input, as happens when running Prince on a server, it might be important to harden the installation in order to reduce a possible surface of vulnerability. Prince offers some options to aid the configuration, while other possibilities depend on the environment configuration on the server.
It might be a good precaution to run Prince with the command-line option
--no-local-files
in order to exclude any unwanted access to the local file system. It is also
a good idea not to enable
--xml-external-entities
or --xinclude
(they are not enabled by default).
A more comprehensive hardening practice is to run Prince in a chroot/jail/vms/container. Prince needs access to several libraries it depends on, as well as fonts and SSL certificates. To check direct dependencies, run the following command:
ldd /usr/lib/prince/bin/prince
When running multiple instances of Prince, it might be advisable to disable
parallel rasterization with the command-line option
--raster-threads=1
to improve throughput. Setting GC_MARKERS=1 in the environment will
do the same for garbage collection threads.
Since different server configurations make use of different scripting languages, wrappers in those languages are necessary to invoke Prince. Wrappers for several of the most widely used scripting languages are available for download on the Wrappers Download Page.
A useful tool for writing custom wrappers in other languages are the Advanced Command-Line Options.
For details on the usage of each of the wrappers, please consult the following chapters.
Prince can be called from within a Java class for servlets by using Java interface.
This package contains:
prince.jar),
The Prince.jar file contains the class file that provides the Java
interface to Prince (com.princexml.Prince). The documentation
lists the Java class methods and explains how to use them.
Prince can be called from .NET languages using the Prince C# / .Net wrapper.
The wrapper package contains:
To use the Prince .NET wrapper in C#, add a reference to the DLL to your Visual Studio project.
To convert HTML or XML files into PDF, instantiate a Prince object with the full path to the Prince engine executable file. Once this is done, you can apply style sheets and scripts, or configure other properties by calling the appropriate subroutines. Finally, you can call one of the Convert functions to generate a PDF file.
Please note that document scripts need to first be enabled with
prn.SetJavaScript(true) - external scripts added with
AddScript will always be run.
The following code sample demonstrates how to convert a single HTML document into a PDF file:
// instantiate Prince by specifying the full path to the engine executable
Prince prn = new Prince("C:\\Program Files\\Prince\\Engine\\bin\\prince.exe");

// specify the log file for error and warning messages
// make sure that you have write permissions for this file
prn.SetLog("C:\\docs\\log.txt");

// apply a CSS style sheet (optional)
prn.AddStyleSheet("C:\\docs\\css\\stylesheet-1.css");

// apply an external JavaScript file (optional) and enable document JavaScript
prn.AddScript("C:\\docs\\js\\test.js");
prn.SetJavaScript(true);

// convert a HTML document into a PDF file
prn.Convert("C:\\docs\\test1.html", "C:\\docs\\pdf\\test1.pdf");
To combine multiple HTML documents into a single PDF file, call
ConvertMultiple:
String[] doc_array = {"C:\\docs\\test1.html", "C:\\docs\\test2.html"};

prn.ConvertMultiple(doc_array, "C:\\docs\\pdf\\merged.pdf");To use the Prince The C# / .Net Wrapper in VB.NET, add a reference to the DLL to your Visual Studio project. Alternatively, you can include the Prince.vb source file directly if you prefer.
To convert HTML or XML files into PDF, instantiate a Prince object with the full path to the Prince engine executable file. Once this is done, you can apply style sheets and scripts, or configure other properties by calling the appropriate subroutines. Finally, you can call one of the Convert functions to generate a PDF file.
Please note that document scripts need to first be enabled with
prn.SetJavaScript(true) - external scripts added with
AddScript will always be run.
The following code sample demonstrates how to convert a single HTML document into a PDF file:
' instantiate Prince by specifying the full path to the engine executable
Dim prn As Prince

prn = New Prince("C:\Program Files\Prince\Engine\bin\prince.exe")

' specify the log file for error and warning messages
' make sure that you have write permissions for this file
prn.SetLog("C:\docs\log.txt")

' apply a CSS style sheet (optional)
prn.AddStyleSheet("C:\docs\css\stylesheet-1.css")

// apply an external JavaScript file (optional) and enable document JavaScript
prn.AddScript("C:\\docs\\js\\test.js")
prn.SetJavaScript(true)

' convert a HTML document into a PDF file
prn.Convert("C:\docs\test1.html", "C:\docs\pdf\test1.pdf")
To combine multiple HTML documents into a single PDF file, call
ConvertMultiple:
Dim doc_array() As String

doc_array = {"C:\docs\test1.html", "C:\docs\test2.html"}

prn.ConvertMultiple(doc_array, "C:\docs\pdf\merged.pdf")Prince can be called from PHP using the PHP interface.
This package contains two files:
prince.php script and
The prince.php file contains the PHP class that provides the interface
to Prince. The readme.html file lists the PHP class methods and
explains how to use them.
The ActiveX/COM wrapper allows Prince to be called from various languages: ASP, ActiveX, COM, Visual Basic and also Coldfusion.
This package contains two files:
PRINCE.dll file andPrince can be called from ASP pages using the ActiveX/COM interface.
This interface is provided in the form of an ActiveX DLL file that needs to be registered in the Windows registry using REGSVR32.EXE:
regsvr32 C:\Prince\PRINCE.dll
In order to call Prince from an ASP page, we need to create a COM object using the CreateObject server method. Once the COM object is created, you can use the COM interface methods to perform the tasks.
Please note that document scripts need to first be enabled with
prn.SetJavaScript(true) - external scripts added with
AddScript will always be run.
The following is some sample code for illustration:
<%
Dim pr
Dim res

Set pr = Server.CreateObject("PrinceCom.Prince")
pr.SetPrincePath "C:\Prince\engine\bin\prince.exe"
pr.AddStyleSheet "C:\Prince\css\test1.css"
pr.AddStyleSheet "C:\Prince\css\test2.css"
pr.SetJavaScript(True)
pr.SetEncryptInfo 128, "password1", "password2", true, true, true, true

If pr.Convert("C:\Prince\examples\magic.html", "C:\output.pdf") = 1 Then
    res = "Successful"
Else
    res = "Unsuccessful"
End If
%>Prince can be called from Visual Basic and other languages on Windows using the ActiveX/COM interface.
This interface is provided in the form of an ActiveX DLL file that needs to be registered in the Windows registry using REGSVR32.EXE:
regsvr32 C:\Prince\PRINCE.dll
Please read the README.TXT file that comes with the ActiveX DLL file for more details of the COM interface methods.
Prince can be called from ColdFusion pages using the Java interface or the ActiveX/COM interface, if on Windows.
Start by downloading the Java interface for Prince. This package contains:
prince.jar),
The Prince.jar file contains the class file that provides the Java
interface to Prince (com.princexml.Prince). The documentation
lists the Java class methods and explains how to use them.
Place the Prince.jar file in a directory of your choice then
start ColdFusion Administrator.
Under 'Server Settings > Java and JVM', you should find 'ColdFusion Class
Path'. Here you can tell ColdFusion where to look for Java classes. Type in
the full path of the Prince.jar file. It should be something like:
PATH\Prince.jar, where PATH is the path of the
directory that contains the Prince.jar.
If this is done correctly, ColdFusion should know where to find the Prince Java interface class. The following is some sample CFML code showing how to use it:
<cfscript>
   pr = CreateObject("java", "com.princexml.Prince");

   pr.init("C:\Prince\engine\bin\prince.exe");
   pr.addStyleSheet("C:\Prince\test\test1.css");
   pr.addStyleSheet("C:\Prince\test\test2.css");
   pr.setJavaScript(true);
   pr.setEncryptInfo(128, "secretPassword1", "secretPassword2",
      True, True, True, True);

   if (pr.Convert("C:\Prince\examples\magic.html", "C:\output.pdf"))
      WriteOutput("Successful");
   else
      WriteOutput("Unsuccessful");
</cfscript>
If on Linux, substitute the paths with the appropriate UNIX style paths.
If you are running ColdFusion on Windows, you can also call Prince using the ActiveX/COM interface.
This interface is provided in the form of an ActiveX DLL file that needs to be registered in the Windows registry using REGSVR32.EXE:
regsvr32 C:\Prince\PRINCE.dll
In order to call Prince from ColdFusion, we need to create a COM object using
the CreateObject function that is available in CFML scripting (you can also
use the <cfobject ...> tag if you prefer). Once the COM
object is created, you can use the COM interface methods to perform the tasks.
The following is some sample code for illustration:
<cfscript>
   pr = CreateObject("Com", "PrinceCom.Prince", "local");

   pr.SetPrincePath("C:\Prince\engine\bin\prince.exe");
   pr.AddStyleSheet("C:\Prince\test\test1.css");
   pr.AddStyleSheet("C:\Prince\test\test2.css");
   pr.setJavaScript(true);
   pr.SetEncryptInfo(128, "secretPassword1", "secretPassword2",
      True, True, True, True);

   if (pr.Convert("C:\Prince\examples\magic.html", "C:\output.pdf") eq 1)
      WriteOutput("Successful");
   else
      WriteOutput("Unsuccessful");

   ReleaseComObject(pr);
</cfscript>
Please read the README.TXT file that comes with the ActiveX DLL file for more details of the COM interface methods.
Prince can be called from Python using the command-line interface, like this:
import subprocess

subprocess.call(["prince","foo.xml","bar.pdf"]);
It is possible to write XML to Prince directly from the Python script rather than have Prince read it from an external file:
import subprocess

p = Popen(["prince","-","out.pdf"], stdin=subprocess.PIPE, stdout=subprocess.PIPE)

outs, errs = p.communicate("<html><body><h1>Hello, world!</h1></body></html>".encode("utf-8"))

if p.returncode :
  # Ugh.
else :
  pdf = outs
The first filename argument of "-" instructs Prince to read the XML from its standard input stream rather than from a file.
For Python CGI scripts, the PDF output can be written to the standard output stream so that it is returned to the browser:
import subprocess
p = Popen(["prince","-"], stdin=subprocess.PIPE, stdout=subprocess.PIPE)
outs, errs = p.communicate("<html><body><h1>Hello, world!</h1></body></html>".encode("utf-8"))
if p.returncode :
# Ugh.
else :
pdf = outsBecause the second filename argument has been omitted and the XML is being read from standard input, the PDF will be written to standard output. Be careful to redirect the output of this script if you try running it from the terminal.
Alternatively, it is possible for the Python script to read the PDF output directly rather than have Prince save it to an external file:
import subprocess
p = Popen(["prince","-"], stdin=subprocess.PIPE, stdout=subprocess.PIPE)
outs, errs = p.communicate("<html><body><h1>Hello, world!</h1></body></html>".encode("utf-8"))
if p.returncode :
# Ugh.
else :
pdf = outs
print("PDF is "+str(len(pdf))+" bytes in size")Prince can be called from Perl using the command-line interface, like this:
system("prince foo.xml bar.pdf");It is possible to write XML to Prince directly from the Perl script rather than have Prince read it from an external file:
open(PRINCE, "| prince - out.pdf");
print PRINCE "<html><body><h1>Hello, world!</h1></body></html>";
close(PRINCE);
The first filename argument of "-" instructs Prince to read the XML from its standard input stream rather than from a file.
For Perl CGI scripts, the PDF output can be written to the standard output stream so that it is returned to the browser:
print "Content-Type: application/pdf\n\n";
open(PRINCE, "| prince -");
print PRINCE "<html><body><h1>Hello, world!</h1></body></html>";
close(PRINCE);
Because the second filename argument has been omitted and the XML is being read from standard input, the PDF will be written to standard output. Be careful to redirect the output of this script if you try running it from the terminal.
Alternatively, it is possible for the Perl script to read the PDF output directly rather than have Prince save it to an external file:
open(PRINCE, "prince foo.xml - |");
# ... read PDF output from PRINCE file handle
close(PRINCE);
There are also third-party wrappers available for download on external sites. Please note that YesLogic does not take any responsibilities for third-party wrappers offered for download on these external locations.
Prince can also be called from the command-line with two special options, useful for understanding the calls Prince can be controlled with, and the output it produces, in order to write your own wrapper: the Prince Control Protocol and the Structured Log.
prince --controlThe Prince Control Protocol, accessible through the command-line option --control,
is a synchronous bidirectional protocol that consists of a sequence of "chunks"
sent via the standard input and output streams.
Each chunk contains a sequence of bytes with a length and a three letter tag. Here is an example "version" chunk to demonstrate the syntax:
ver 15
Prince 20161219
This chunk has a tag ver (all tags are three ASCII characters)
followed by a space, then the length of the data expressed as a decimal number,
then a newline character, then the data itself (15 bytes), then another newline
(not part of the data).
This "version" chunk is emitted by Prince when the control protocol begins and can be used to check the Prince version and confirm that communication is functioning as expected. Prince will then wait for jobs to be submitted.
If a chunk contains no data then the length is zero and the chunk ends with the newline immediately following the length. In fact the length itself may be omitted, making this a perfectly valid chunk:
end
This end chunk consists of three letters and a newline character
and can be used to terminate the Prince process when there are no further jobs
to process.
Currently the control protocol includes the following chunk types sent by Prince:
ver, sent at startuppdf, a generated PDF filelog, the complete output log for the job including all errors
and warningserr, errors relating to the control protocol itselfAnd these chunks sent by the caller:
job, the description of a requested conversion job, expressed
in JSONdat, a file resource needed by the jobend, to terminate the control connectionA typical interaction looks like this:
Prince: ver
Caller: job
Caller: dat
Caller: dat
Prince: pdf
Prince: log
Caller: end
Instead of sending the final end chunk the caller may choose to
submit another job chunk and continue converting documents. The protocol
is synchronous so replies simply match requests in order.
The job chunk contains a description of the conversion job represented
in JSON format, which can be followed by an optional sequence of dat
chunks containing file data which is needed by the job, eg. HTML documents, style
sheets, PDF attachments, or whatever.
The number of dat chunks is specified by the job-resource-count
field in the job description, and these files can be accessed via a special job-resource
URL scheme, eg. job-resource:0 will access the content of the first
dat chunk, then job-resource:1, job-resource:2,
etc. This allows any number of resources to be provided inline with the request
and removes the need to create actual temporary files.
The JSON job description has several nested objects with fields corresponding to Prince options:
{
"input": { <input options> },
"pdf": { <pdf options> },
"metadata": { <metadata options> },
"raster": { <raster options> },
"job-resource-count": <int>
}The input options and job-resource-count are mandatory,
the rest are optional and will default to the normal values.
The input options object includes these fields:
{
"src": <single URL or list of URLs>,
"type": <string>,
"base": <string>,
"media": <string>,
"styles": [ <list of URLs> ],
"scripts": [ <list of URLs> ],
"default-style": <bool>,
"author-style": <bool>,
"javascript": <bool>,
"xinclude": <bool>,
"xml-external-entities": <bool>
}Only the src field is required, the rest can be left as defaults.
Now we can make some simple job descriptions, eg. to convert a single HTML file:
{
"input": {
"src": "/path/to/input.html"
},
"job-resource-count": 0
}This can be sent as a single job chunk and Prince will respond
with a pdf chunk if the conversion succeeded and a log
chunk.
Or you can convert a HTML document without saving it to a temporary file:
{
"input": {
"src": "job-resource:0"
},
"job-resource-count": 1
}This requires the job chunk to be followed by a dat
chunk that contains the HTML and then Prince will respond as before.
The pdf options object includes these fields:
{
"color-options": "auto" | "use-true-black" | "use-rich-black",
"embed-fonts": <bool>,
"subset-fonts": <bool>,
"artificial-fonts": <bool>,
"force-identity-encoding": <bool>,
"compress": <bool>,
"encrypt": {
"key-bits": 40 | 128,
"user-password": <string>,
"owner-password": <string>,
"disallow-print": <bool>,
"disallow-modify": <bool>,
"disallow-copy": <bool>,
"disallow-annotate": <bool>
},
"pdf-profile": <string>,
"pdf-output-intent": <URL>,
"fallback-cmyk-profile": <URL>,
"color-conversion": "none" | "full",
"pdf-lang": <string>,
"pdf-xmp": <url>,
"tagged-pdf": "auto" | <bool>,
"attach": [ <list of attachments> ]
}Each attachment is a <url> (string) or an object:
{
"url": <url>,
"filename": <string>,
"description": <string>
}The metadata options object includes these fields:
{
"title": <string>,
"subject": <string>,
"author": <string>,
"keywords": <string>,
"creator": <string>,
}The raster options object includes these fields:
{
"dpi": <integer>,
"background": "white" | "transparent"
}--structured-log=LEVELThis option is designed to make it easier to integrate other software with Prince. It takes these values:
--no-structured-log--structured-log=normal--structured-log=quiet--structured-log=progress--structured-log=bufferedThe default is --no-structured-log, in which case error and warning
messages will be written to the terminal (stderr stream) as they occur in a human
readable format, eg.
prince: foo.html: error: can't open input file: No such file or directory
prince: foo.html: error: could not load input file
prince: error: failed to load all input documents
Specifying --structured-log=normal writes the log messages in
an alternate format with fields separated by | characters, in order
to make it easier to parse by other software.
The first field indicates the type of message, which can be:
sta| = status message;prg| = progress percentage;fin| = final outcome, which can be
fin|success, orfin|failure;dat|name|value = data messages produced by
Log.data("name", "value");msg| = messages, which can be any of the following:
msg|err = error message;msg|wrn = warning message;msg|inf = information message;msg|dbg = debug message;msg|out = console output from console.log();msg|err|foo.html|can't open input file: No such file or directory
msg|err|foo.html|could not load input file
msg|err||failed to load all input documents
fin|failure
The last msg|err message has an
empty source location field.
Specifying --structured-log=quiet suppresses all log
messages, except for the final fin message, indicating success or
failure:
fin|failure
This allows other software to read the stdout stream from Prince containing the PDF file in its entirety, then read the final status from the stderr stream, without worrying about blocking due to deadlocks.
Specifying --structured-log=progress prints percentage log messages
for use in GUI applications:
prg|94
prg|96
prg|99
prg|100
fin|success
Specifying --structured-log=buffered is the same as normal,
but all log messages will be delayed until after the full PDF has been written
to the stdout stream, again so that other software can read from stdout and then
read the log from stderr without deadlocking.
The deadlock problem happens when Prince writes log messages to stderr and blocks, waiting for the other software to read them, but the other software is blocked waiting for Prince to write the PDF to stdout, leading to a deadlock where both processes hang indefinitely.
By omitting log messages, or by delaying them until after the PDF is written, this deadlock can be avoided. Another option is to use the Prince Control Protocol, which also avoids this problem.
Prince for Books is a new venture that allows us to spend more time on features particularly sought by publishers.
The initial focus of work is on the features common to all books: making the pagination and line-breaking choices expected of books, by featuring a few extensions to CSS and fine-tuned algorithms.
For the time being, Prince for Books is only available as a a command-line
application named prince-books. It is used like the standard
Prince - see Command-line Reference for available options.
prince-books OPTIONS FILES [-o PDF]
To download it, head over to the Prince for Books
download page. It is available in package bundles only - to install it,
the files need to be copied into place (Windows), or an installation script
needs to be run (on Linux and MacOS X). It can be installed without problem
alongside a normal Prince installation - the executable to run is called
prince-books.
Prince for Books introduces a few new CSS properties to try handling line
breaks in a more granular way, and additionally, it tries harder to avoid a
hyphen at the end of a page and at the end of the last full line, as well as
for ragged text (i.e. for left-aligned or centered text). It also tries to
avoid a short last line, especially if it is shorter than the value of
text-indent.
prince-wrap-inside
The property prince-wrap-inside offers a way to
instruct Prince how to break text: the keyword phrase is for marking
up a phrase that one would weakly prefer to keep on a single line. It adds to
Prince's perceived cost of breaking within that phrase, but only a small cost,
comparable to the cost of hyphenating a compound adjective such as ‘midyear’.
The keyword avoid is a stronger directive: it avoids breaking the text
to which the property is applied even if it causes the affected text to be unusually
tight, or the previous line to be unusually loose; but not if either line would
become truly exceptionally tightly or loosely spaced.
This property would most commonly be used in headings, or perhaps in important passages of body text such as in instructions or for the name of a product in advertising. For example, if one opens a book that was printed before the widespread use of computers in publishing, then one would likely see that any headings that don't fit in one line won't simply put as much on the first line as fits, but will instead break somewhat according to natural phrasing.
To make it more likely for Prince for Books to produce this effect, one might
put span elements around phrases, styling each of these spans with
prince-wrap-inside:phrase.
HTML
<h1>The <span>fulfilment <span>of the law</span></span>
<span>and <span>of the prophets</span></span></h1>
CSS
span {
prince-wrap-inside: phrase;
}The example would produce a title line like this:
The fulfilment of the law and of the prophets
If however the final available space were narrower than the required space, Prince might instead format as:
The fulfilment of the law and of the prophets
prince-line-break-choices
Another property for fine-tuning the line breaking behaviour is
prince-line-break-choices.
The keyword title is intended for title pages of books or
chapters, where phrasing considerations are of prime consideration even at
the cost of extremely unbalanced lines.
The keyword heading, on the other hand, is closer to body,
differing mainly in that it's less likely to hyphenate, and is more willing to
make the first line(s) a little shorter if doing so avoids a short last line.
The *-lookahead keywords enable paragraph-at-a-time
line-breaking for the paragraph in a non-justified paragraph: choosing where
to end the line not just based on what seems best for the current line (as
one might decide if using a pen or typewriter), but also considering the
effect on future lines.
Enabling lookahead for a paragraph makes Prince take longer, though the results are typically slightly better: still ragged, but fewer lines that are much shorter than nearby lines.
A disadvantage of lookahead is that any "mistakes" (that is, differences from what a human would choose) risk appearing inexplicable to a reader, unlike with the non-lookahead versions where the only reason that a line would be noticeably short is where the following line starts with a long word.
This means that the non-lookahead versions might be a better choice in jobs where Prince's line breaks will be accepted without human oversight; whereas if a typesetter will look for and correct any problems in the rag of the paragraph, then the lookahead versions will typically give a better starting point.
A typesetter's intervention currently involves modifying the HTML: it is not
requireed to assign an id to each paragraph, but it is
nevertheless common practice to do so for making other changes, such as
changing the number of lines in a paragraph for pagination purposes (whether
using prince-n-lines or
word-spacing or
letter-spacing), or assigning a unique value
to each chapter in order to change how many lines are on the last page of the
chapter (say, by adding 1pt to the inside margin). See also
Spread Balancing.
To illustrate the difference, one could also say that non-lookahead versions give paragraph shapes reminiscent of those given by word processors and web browsers, while the lookahead versions come slightly closer to what one might find in books.
The keyword fast can be used for quick web-browers–style line
breaking, useful for testing the effect of styling changes that don't depend
on good line breaking.
The base stylesheet that Prince for Books applies to all HTML documents (i.e. the "user-agent style sheet", in CSS terminology) includes the ruleset
h1, h2, h3, h4, h5, h6 {
prince-line-break-choices: heading;
}
but HTML semantics alone do not distinguish content where the more extreme
prince-line-break-choices: title could be appropriate. Doing so
requires additional conventions, such as those given in the
HTMLBook specification.
The below example applies title-lookahead line-breaking to
the book title, chapter titles and part titles, while applying heading-lookahead
line-breaking to subtitles.
CSS
body[data-type="book"] > h1,
body[data-type="book"] > heading > h1,
section[data-type="chapter"] > h1,
section[data-type="chapter"] > heading > h1,
div[data-type="part"] > h1,
div[data-type="part"] > heading > h1 {
prince-line-break-choices: title-lookahead;
}
heading > * {
prince-line-break-choices: heading-lookahead;
}
HTMLBook uses a slightly non-standard representation of subtitles: not using
hgroup, and using p elements rather than the heading
elements h1 to h6.
prince-forced-breaks
The property prince-forced-breaks controls whether
a line ended by a "preserved newline" (such as introduced by <br>)
should preferably appear to be a normal full line (as if ended only by normal
line wrapping), or whether being shorter than a normal full line is actually
preferable, for example to mark a deliberate break.
The br element would usually create a visually forced break,
treating that line much as if it were the last line of a paragraph. For
example, it would continue to do so in any UA not supporting the property
prince-forced-breaks (thus getting in the way of reading the
content in some other UA, or using the same source document for web/epub
deployment), or if the stylesheet doesn't load. Tweaking line breaks using
prince-forced-breaks: full is not intended to be consciously
noticeable by readers, so br would not be the best approximation
in HTML.
CSS
lb { white-space: pre; }
lb::before { content: "\A"; prince-forced-breaks: full; }
This example shows the styling for an <lb /> element,
which can be added to force breaks. Of course we first need to instruct
Prince to respect "preserved newlines" - we do this with the
white-space property.
Literally using the element name lb in the html namespace would
make the document not valid HTML. The element could be either in a non-HTML
namespace, or one could use a custom element to be inserted with JavaScript.
If multiple editions are to produced from a single source document, then a variation would be
CSS
lb[ed ~= "a"]::before { ... }in the stylesheet for edition A (and similarly for the stylesheets of other editions), and
HTML
<lb ed="a c" />
in the document where a line break should be forced only in editions A and C.
The difference is particularly marked in justified text, where lines ended by
prince-forced-breaks: full are subject to justification like most
other lines.
A prominent new feature is the concept of "spread balancing": Prince for Books can
try to ensure that the content on two-page spreads is the same height. Due to the
widows and orphans
properties (see Widows and orphans) it is possible for one
page to have fewer lines than the other, and this unevenness looks upsetting.
Prince for Books also tries to reduce the number of uneven spreads.
prince-page-fill
The property prince-page-fill is used to turn
on the page balancing mechanism. Prince for Books will check how much space is
left at the bottom of each page of a two-page spread and compares it with the
line-height to determine whether the pages end with different numbers of lines.
If one page is longer than the other, Prince will attempt to repack that page
one line shorter, so that they match in height. If it is still unbalanced,
which might happen due to triggering another widows/orphans constraint, it will
revert to the original layout.
Prince also includes the bottom margin in the evaluation for balancing, allowing said margin to be truncated for purposes of deciding whether the two pages can be considered to have the same length.
prince-n-lines
Another way to address page balancing is by using the property
prince-n-lines. It is for use in the pagination
phase of typesetting, for ensuring that page ends are even while avoiding widows
and other awkward breaks.
Typically, the best paragraph to apply this property to will be either already long and/or currently has either a very short or almost full last line, so that the paragraph doesn't need to change much in length compared to its existing "length" (as reckoned by its height). That is, the typesetter can choose a good candidate by looking at how much the last line would need to shrink or grow (including a word or two for the next line if growing), and how many times that length would fit in the height of the paragraph, with more being better.
As noted before, a typesetter's intervention currently involves modifying the HTML.
Values other than the initial value of auto request that the
paragraph occupy the given number of lines; where values other than a simple
integer are relative to the number of lines that the paragraph would have
occupied if this property still had its initial value (auto).
The value change means to make the paragraph either a line
longer or shorter, whichever will be deemed to look better. This value is
provided for the common case that a page break opportunity exists both at a
line earlier and at a line later than where the page end would naturally
fall, as would typically be the case if the only relevant restriction arises
from widows:2 or orphans:2 or a minor heading that
occupies two body lines worth of height. Thus, this tends to be the most
commonly used value for this property, other than leaving at its initial value.
A simple integer value is the least convenient value to use (since choosing the desired number requires counting the existing number of lines, and since this property is most commonly used on long paragraphs). Its value lies in the fact that the result is not subject to variation in "the number of lines that the paragraph would otherwise have had", as can occur if this paragraph spans a page end, and a subsequent styling change causes some earlier content to changes in size, affecting what is the last line before the break, and if this in turn affects line-breaking decisions made to avoid having a hyphenation at the end of a page.
Alternatives to adjusting a paragraph length include adding extra space around a heading, an image or at the start of a chapter.
Another feature in Prince for Books are the "fractional widows": the
widows property is allowed a value expressed as
percentage.
p {
widows: 50%;
}This indicates indicates that one widow line is accepted, as long as the line width is at least the given percentage value of the available page width, to avoid the worst case of having a widow line that is only one or two words long.